How I Organize My Knitting Needles and Notions

3-ring binders and zippered pockets are a great storage system for #knitting needles and notions! No more digging through drawers and bags to find that one thing I need right now. | withwool.com

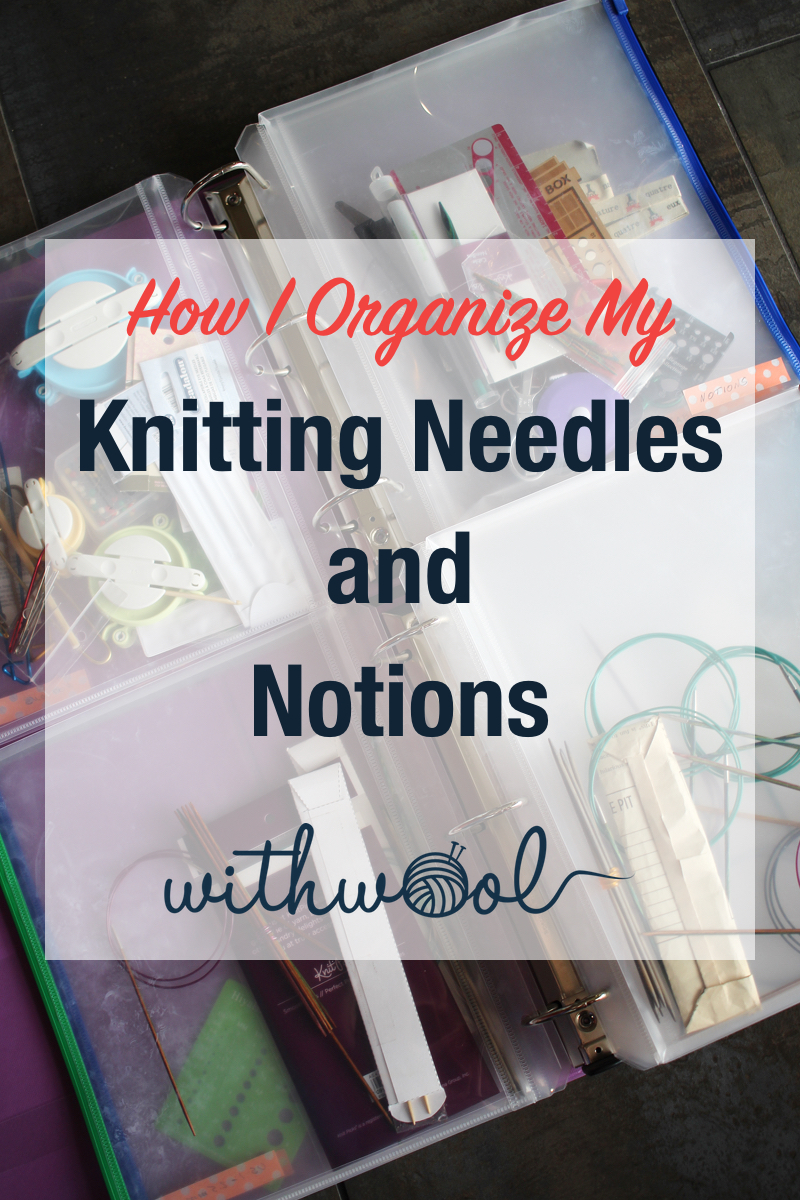
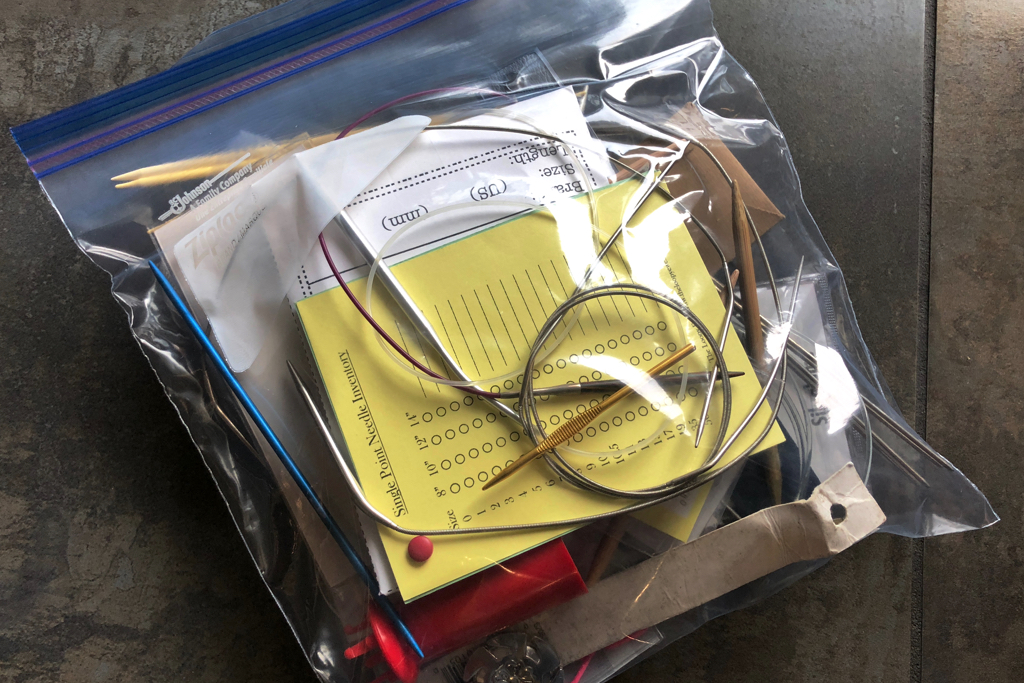
My previous method for organizing my smaller knitting needles, extra interchangeable cables, and random crochet hooks was stuffing them in a plastic bag. This wouldn’t have been so bad if everything had a label marking it’s size or was even in it’s original packaging. Nope. It’s was a tangled mishmash and I had to pull out a needle gauge every time I needed a knitting needle. So I finally did something about it. I picked up three giant 3” 3-ring binders and zippered binder pockets* (yeesh, those were hard to find).

3-ring binders and zippered pockets are a great storage system for #knitting needles and notions! No more digging through drawers and bags to find that one thing I need right now. | withwool.com

The next question was how do I label everything so I know what it is. I thought about designing cute templates that I could print out, but that seemed like more work than I wanted to do. Eventually, I settled on something much simpler. Tape. Specifically, washi tape in a pattern that I liked and that wouldn’t distract from my labeling.

Even after figuring out how I was going to organize everything and getting all the materials, I was still shoving my needles right back into that plastic bag. Ugh. It wasn’t until I’d spread out the needles, and the cables, and crochet hooks on my desk for the 25th time that setting up the binders seemed like a better option than shoving everything back in the bag.

A few notes before we get to the knitty-gritty:

  • I coiled up all my circular needles and extra cables as shown in this tutorial.

  • I grouped everything by size. Size 4 needles with other size 4 needles, regardless of length or type. 4mm crochet hooks went in with the 4 mm knitting needles because I don’t want to have to dig through a separate pocket to find a match for a project. The only exception was my interchangeable needle tips because they already have their own organized pouch.

  • I did not do this all in one sitting. All my various needles and hooks and notions were scattered across my desk, my couch, and my floor. It was overwhelming so I did things in chunks when I felt like it or got frustrated about everything falling on the floor. Again.

  • As I went through years of accumulated knitting supplies, I got rid of what I didn’t need or wasn’t going to use again. Those circular needles with the metal cables that I got in a box at a garage sale did not make the cut.

  • The zipper pockets have different colored zips. I tried to keep things organized by color - needles in one color, extra cables in another - which worked until the end when I had more needles than I had pockets in that color.

Here’s what I did:

3-ring binders and zippered pockets are a great storage system for #knitting needles and notions! No more digging through drawers and bags to find that one thing I need right now. | withwool.com

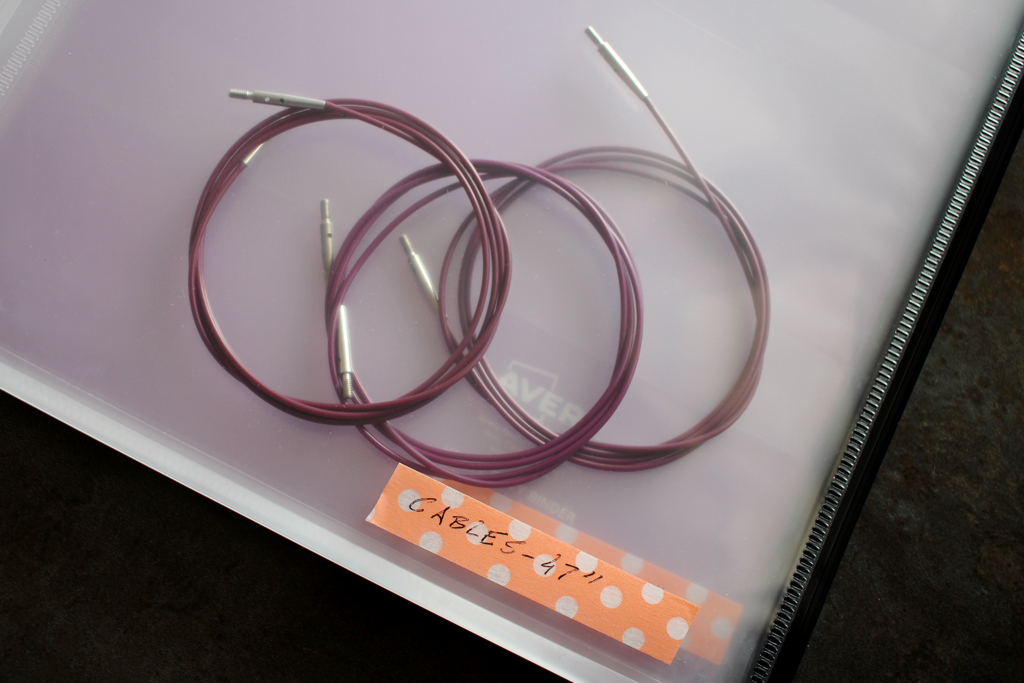
First, I started with the extra interchangeable cables. I measured them, sorted them by length, and put each length in it’s own pocket. As I filled up a pocket, I added a strip of washi tape to the front and wrote down what was inside.

3-ring binders and zippered pockets are a great storage system for #knitting needles and notions! No more digging through drawers and bags to find that one thing I need right now. | withwool.com

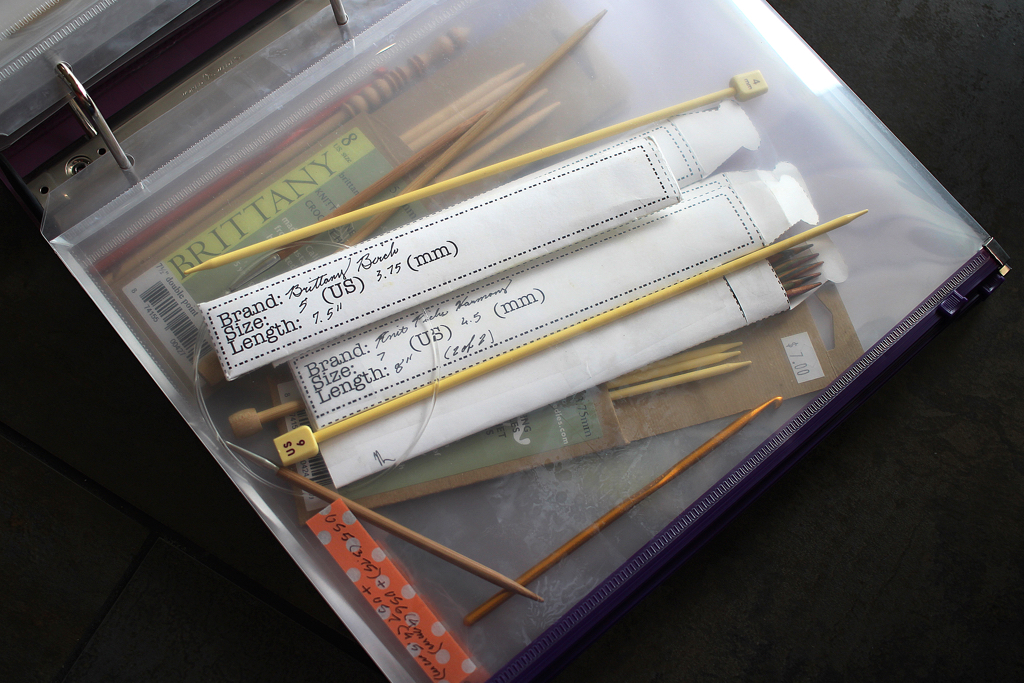
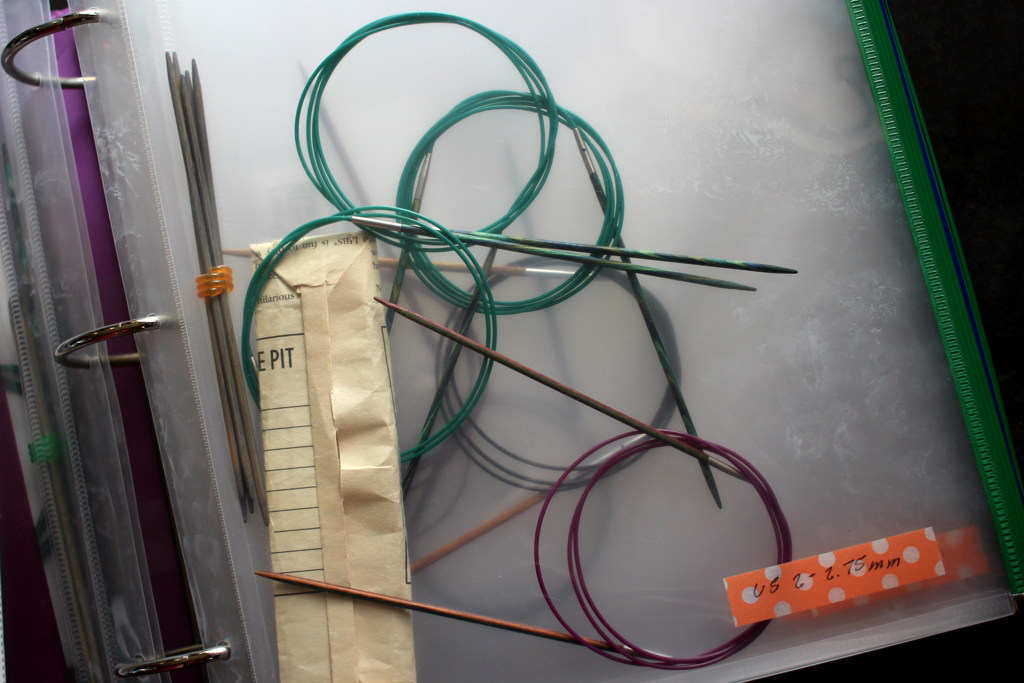
Next up on the list were the fixed circular needles. I coiled them, sorted them by size, and made each size it’s own pocket. These stacked up pretty fast. Sizes that I had a lot of or where on the much smaller end, got there own pockets. I don’t want to have to sort a 2.0mm needle from a 2.5mm every time I start a pair of socks. Sizes that I don’t have many of were bundled together, US 10 and up for example, because its easier to tell them apart. Straights, DPN’s, and crochet hooks went in next.

3-ring binders and zippered pockets are a great storage system for #knitting needles and notions! No more digging through drawers and bags to find that one thing I need right now. | withwool.com

After the needles were contained, I gathered up random notions from various drawers, bags, and shelves. The pom-pom makers I can never find when I need them, they went in a pocket. If it was a needle or pin of any kind - tapestry, beading, cable, or t-pin - it went in a pocket. Extra scissors, needle gauges, tape measures, row counters, chart trackers, etc - you got it - went in a pocket. It is possible to fit a surprising amount of stuff into one of those.

3-ring binders and zippered pockets are a great storage system for #knitting needles and notions! No more digging through drawers and bags to find that one thing I need right now. | withwool.com

After corralling everything into their designated pockets, I sorted them into binders. Notions and interchangeable needle cables went into one binder. Needles and crochet hooks got their own binder. I added a needle gauge into the front of the needle and crochet hook binder to make it easy to put things away.

3-ring binders and zippered pockets are a great storage system for #knitting needles and notions! No more digging through drawers and bags to find that one thing I need right now. | withwool.com

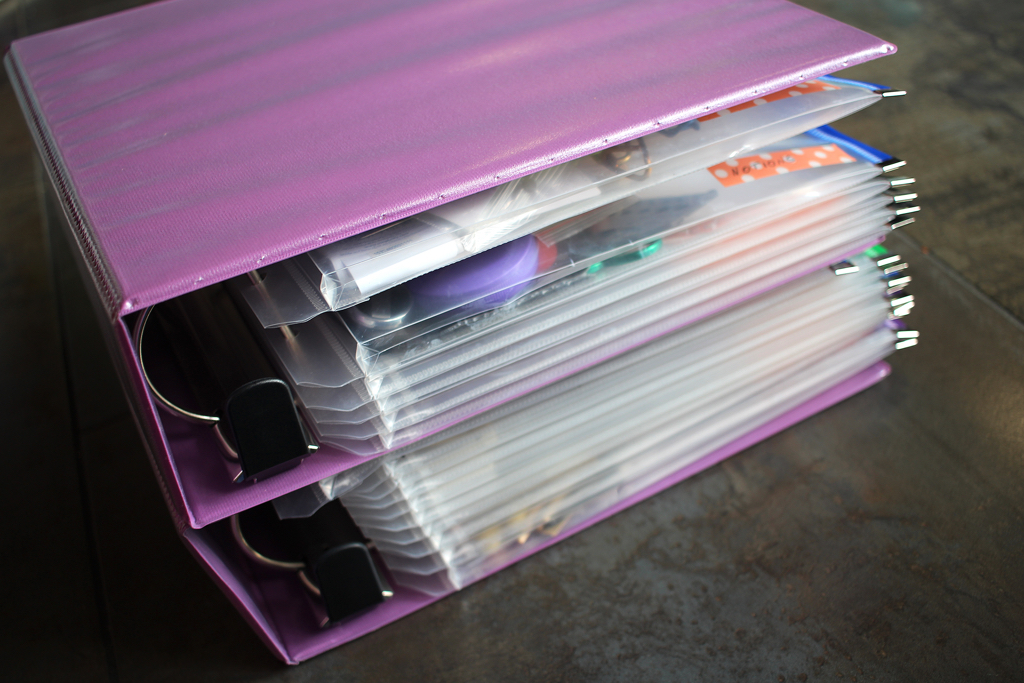
I’ve been using this system for almost a year, and it is a massive improvement over shoving things into scattered bags and drawers then forgetting where they are. The two binders have their own shelf and they are impossible to miss. Whenever I need something, I know right where to look which makes to so much easier to start a project or finish one. If I ever need to expand, I have an extra binder and extra pockets. I am so happy that I finally organized my needles and notions and don’t have to go digging every time I need something.


If you enjoyed this tutorial,

 
Buy Me a Coffee at ko-fi.com
 

Thank you for your support! It means so much! Happy knitting!

*This post contains an affiliate link which means, if you decide to buy through that link, I’ll get a small commission. My opinions are my own, and formed after much use. Thanks!

Yarn Storage - Boxes To The Rescue

Cardboard boxes to the rescue! I don’t have shelves yet, but these boxes will do the job until in the meantime. Yarn Storage - Boxes To The Rescue | withwool.com

Know what I had stacks of after I unpacked from moving? Boxes. Know what I had none of after unpacking? Shelves. 

I was so happy to get my yarn, spinning fiber, and tools unpacked that I was completely fine dumping it all out on the floor. The giant piles of yarn and fiber, pretty as they were, got old fast. What’s the point of unpacking if you still have to rummage around for 5 minutes to find something? So everything went back into the boxes with one big change.

I taped up the bottoms, pushed the top flaps in, and stacked the boxes along the wall. The boxes aren’t pretty - and are far from Pinterest perfect - but they’re functional which is what matters. There’s a spot for fiber and handspun. There’s room for notions, and yarn, and WIPs. There’s room for the bigger stuff like my Sidekick and yarn swift too. I even have a dedicated shelf for knitting and spinning books above the stack. I can see everything and get to everything. After years of having to having to put stuff wherever I could find the space, it’s amazing to have it all in one spot. I’ll get some real shelves eventually, but these boxes work perfectly for now. 

What's In Your Notions Bag?

After years of knitting I’ve got my required notions down to a science so I’ll have what I need whether I’m at knit night, on a plane, or just hanging out on my couch. 

I love getting little peeks at other people’s desks and studios. A knitter’s notion bag is the same thing in a much smaller package. So, what’s in your notions bag? What are the absolutely necessary tools you use to make knitting and crochet easier? Post a photo to Instagram with the hashtag #mynotionsbag or tell me in the comments. I can’t wait to see!

Without further ado, here’s what I keep in mine.

  • About the bag itself. I used to carry around everything in a metal tin but it rusted and was hard to open. I went to Etsy when I couldn’t stand it anymore and found this great pencil case from Silke Jacobs. It’s just the right size to hold my notions while not taking up too much space in my project bags. Plus, I’ve got the room to hold interchangeable needle tips and an extra cable too when I need them.
  • A simple retractable tape measure.
  • Kitty snips! I got a pair to replace collapsable and embroidery scissors when I fly and decided to use them all the time. 
  • Tapestry needles in different sizes. I won the set of two smaller Chibi needles last year and was surprised at how nice they are. Added a larger needle as well so I can weave in ends from lace weight up to bulky.
  • Stitch markers. Lots of stitch markers. I’ve got locking stitch markers, fancy stitch markers, and plain rubber rings in the bag at all times but the selection varies with the project.
  • Needle keys and cable caps. These things are here to keep my interchangeable needles tight and happy. The key makes sure that the needle and cable aren’t going to twist apart. The caps keep my knitting on the cable when I need the needle tips for another project. 
  • Lotion and a nail file. The nail file is a recent addition to the group. After growing out my nails, I got tired of snagging them on my yarn every other stitch. It’s nice not to have to go digging to find the one file that may or may not be in my purse.