Stash Documentation

Spun-Right-Round-Color-Bot-Fiber.jpg

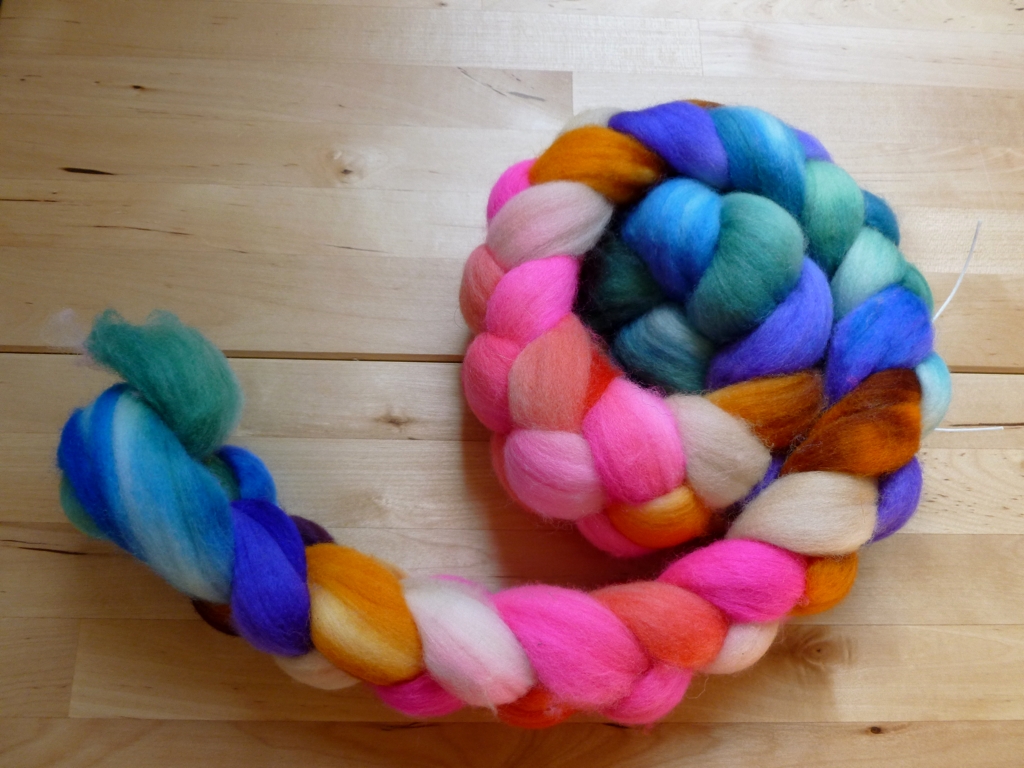
In February, I signed up for the Spun Right Round Fiber club as soon as it popped up in the Etsy shop. Doesn’t hurt to obsessively stalk a shop’s RSS feed, right? Please tell me I’m not the only one that does this. Joining the club was a consolation prize, albeit an awesome one, for not being able to make the trip to Stitches West. Eventually, the shipping notification arrived in my inbox and I waited none too patiently for March’s shipment to show up in my mailbox. The fiber is soft and the colors are definitely outside of my usual color spectrum. Riotous neon pink doesn’t often make it into my stash but this bump makes it look fun. Can’t wait to start spinning it up. 

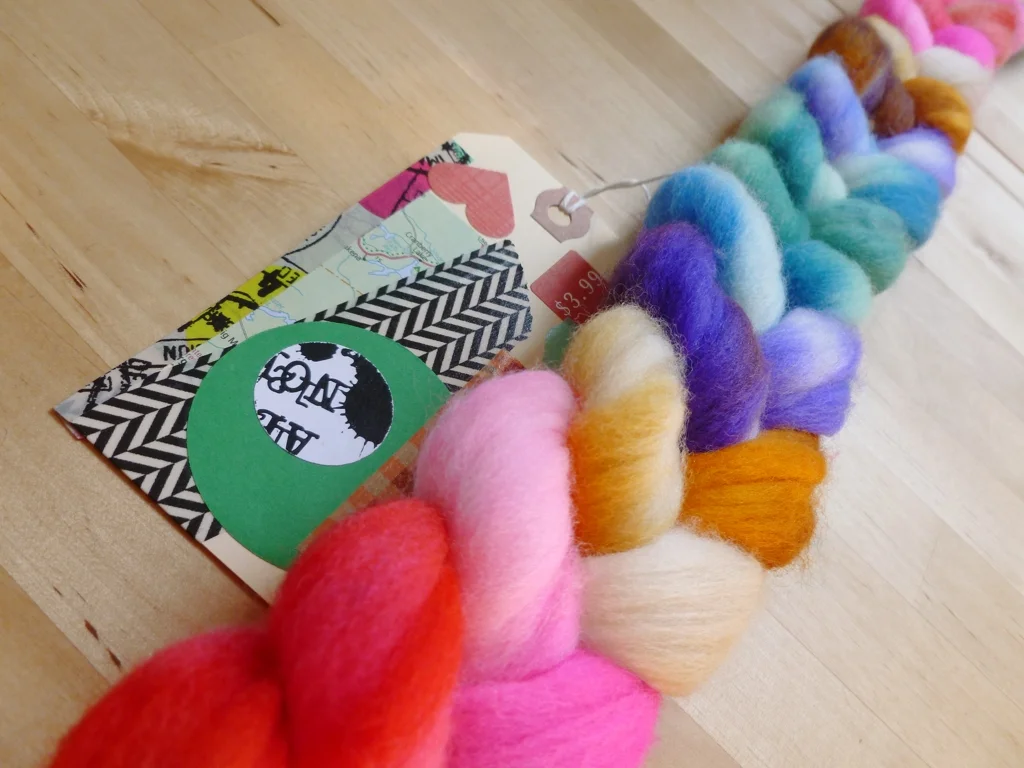
When I went to add the fiber, appropriately named Color Bot, to my Ravelry stash, it looked it was the only fiber I’ve bought in months. Definitely not true. I was also pretty sure that I’ve made more than 21 skeins of handspun. Oh, Ravelry, I have not forsaken you! I’ve just been a little distracted by spinning and writing and websites and knitting and video games and…you get the point. Over the past few days I’ve been adding to, photographing for, and updating the stash catalog. The whole process can be slow going but it’s worth it and I recommend it. A happy, up to date Ravelry stash let’s you see all your fiber at the click of a finger. Makes it easier to decide what to spin next. No need to drag it all unless you want to. Plus, it’s a great reference when you’re trying to decide how to further enhance the stash. 

I almost forgot I had some this stuff. Shame on me. 

Malabrigo Nube - Glitter Colorway. This Merino is ridiculously soft and the colors are everything you’d expect from Malabrigo. 

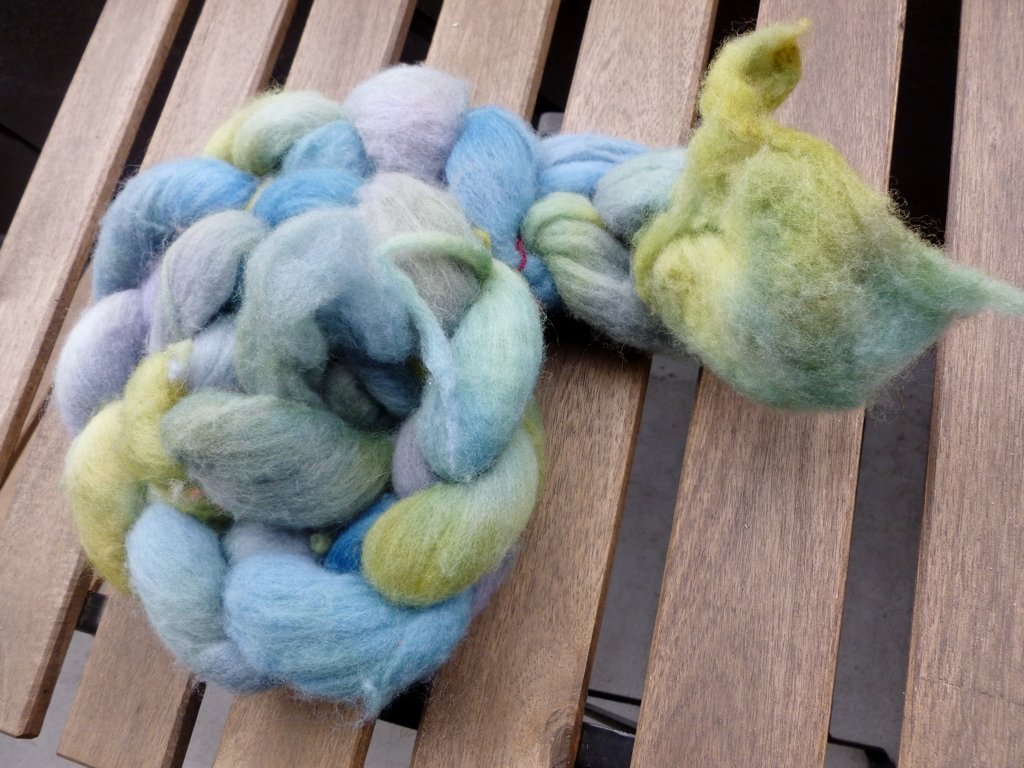
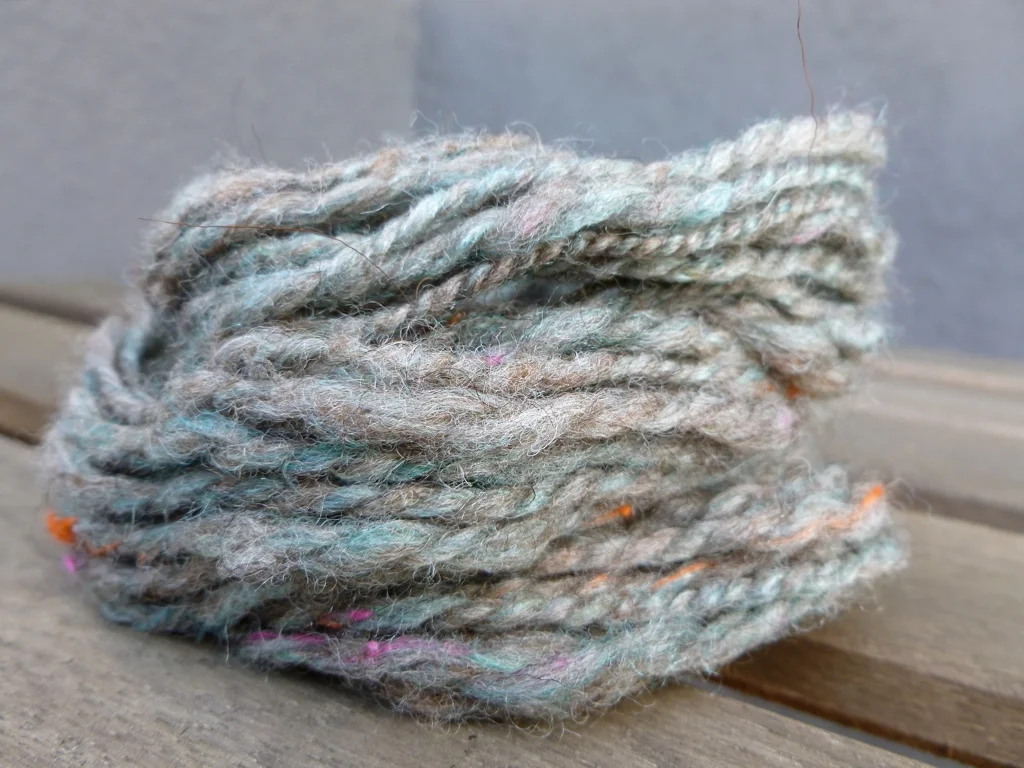
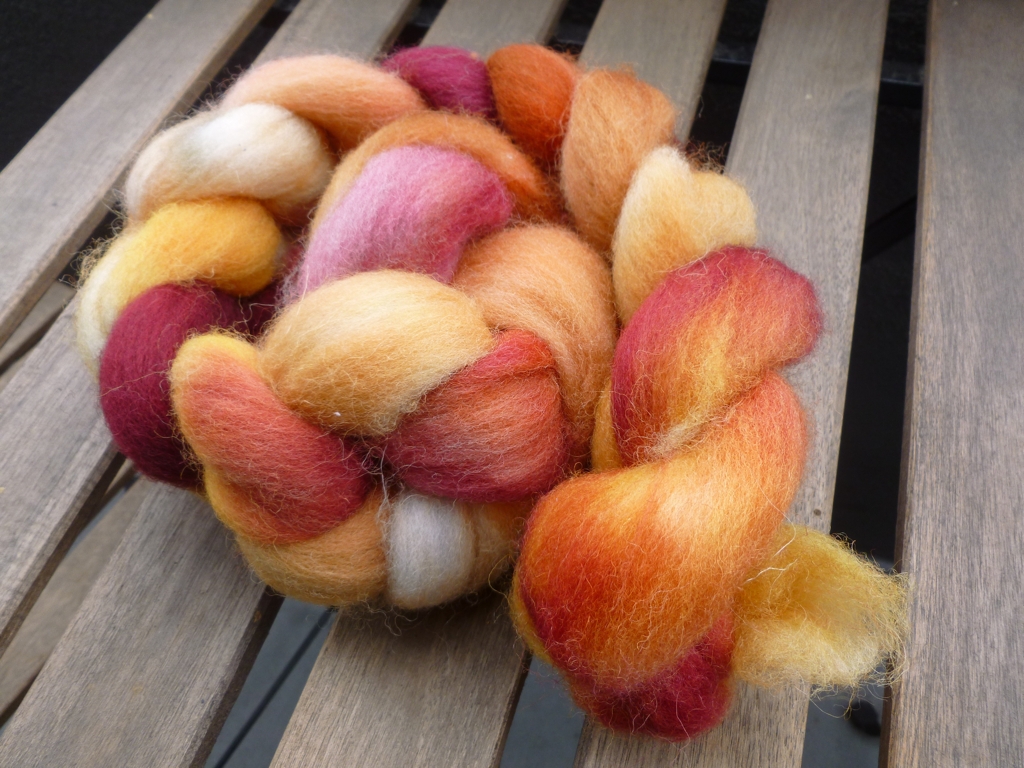
CosyMakes Falkland - Flight of Fancy

Honey-Bear-Fractal.jpg

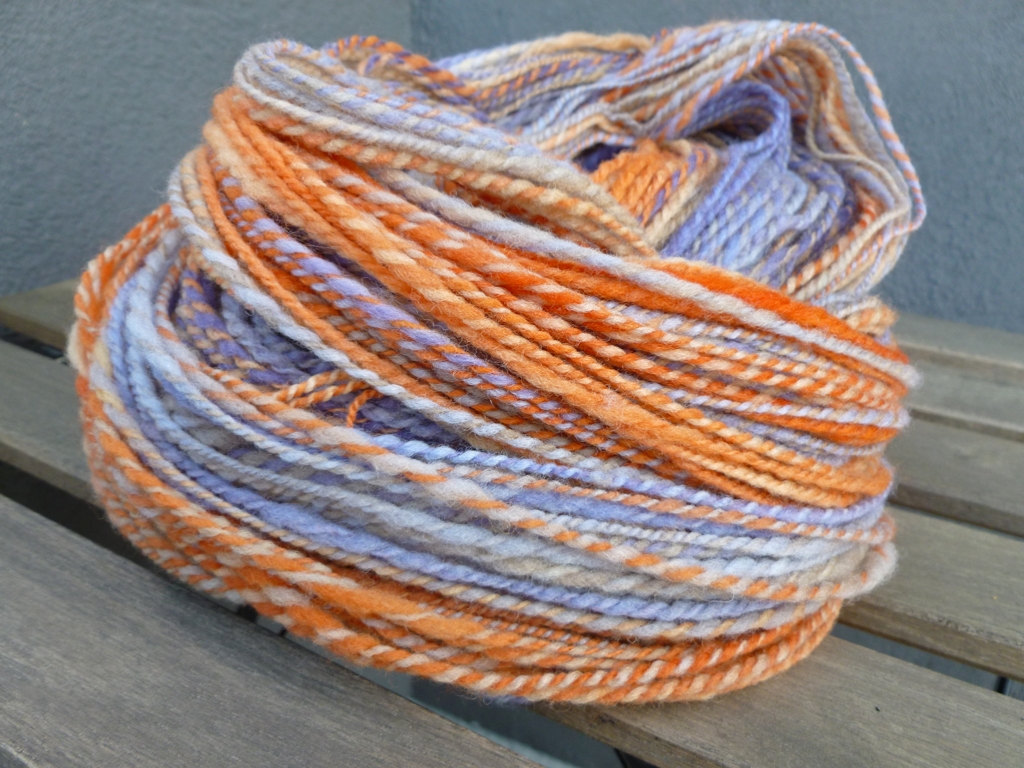
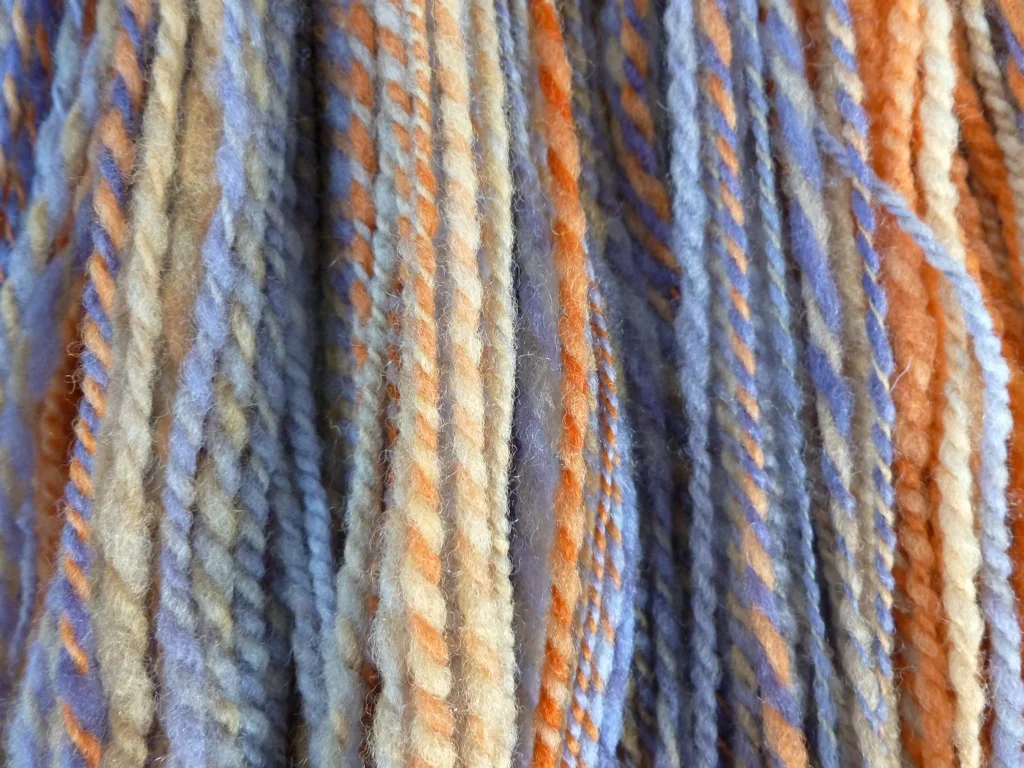
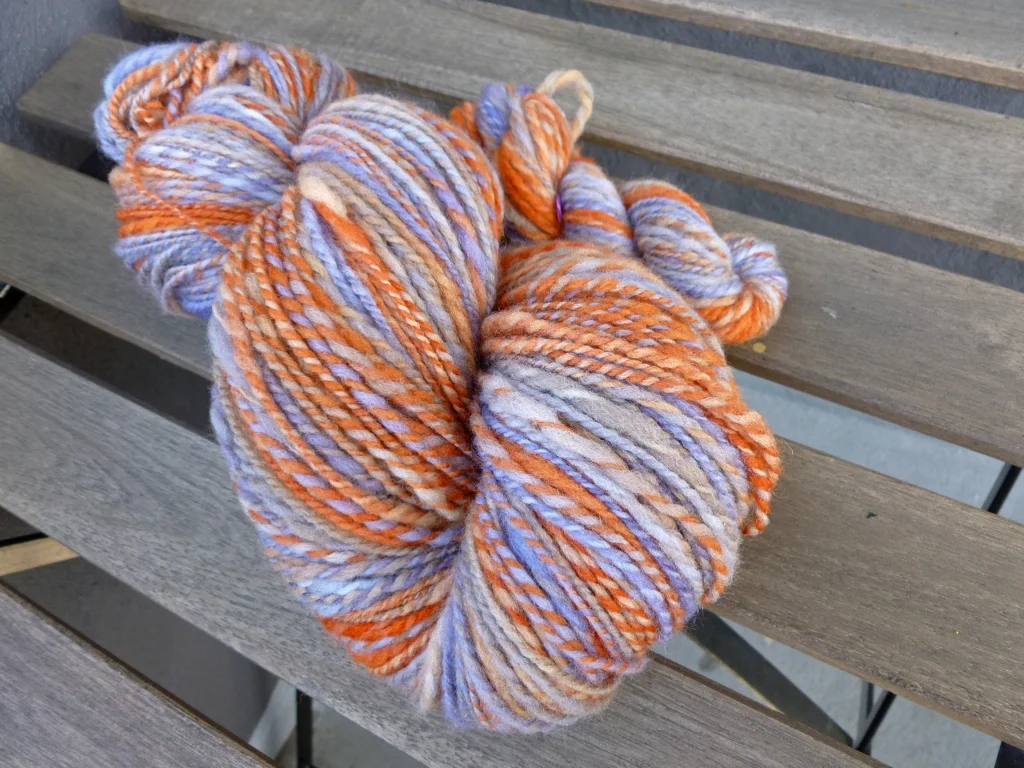
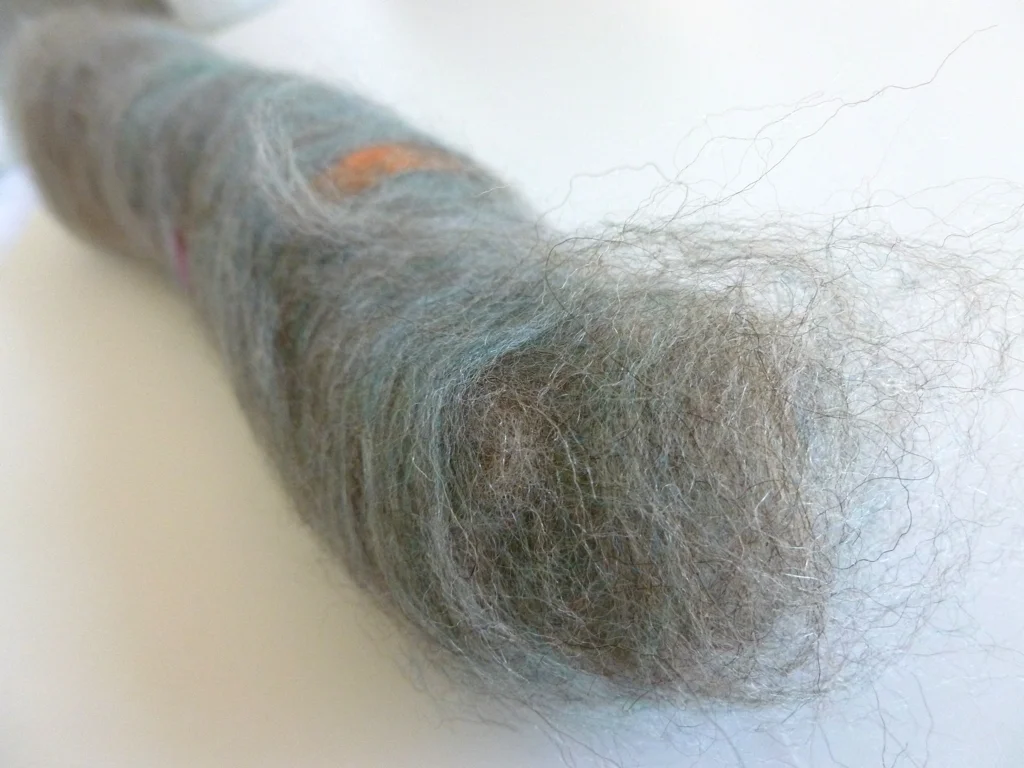
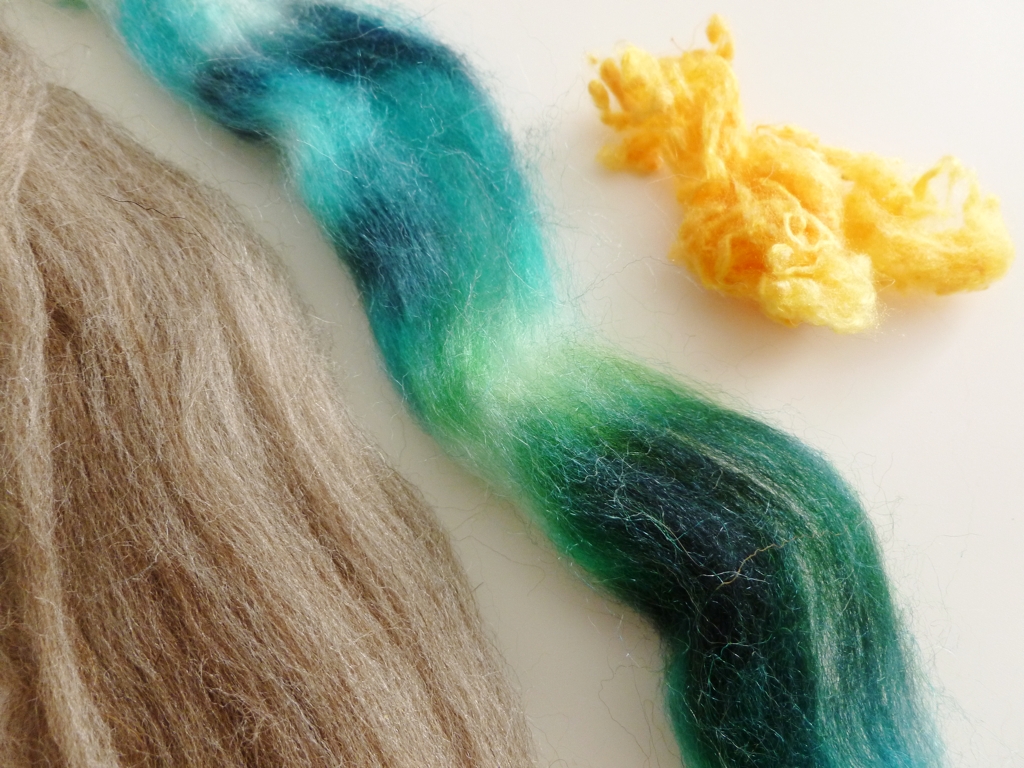
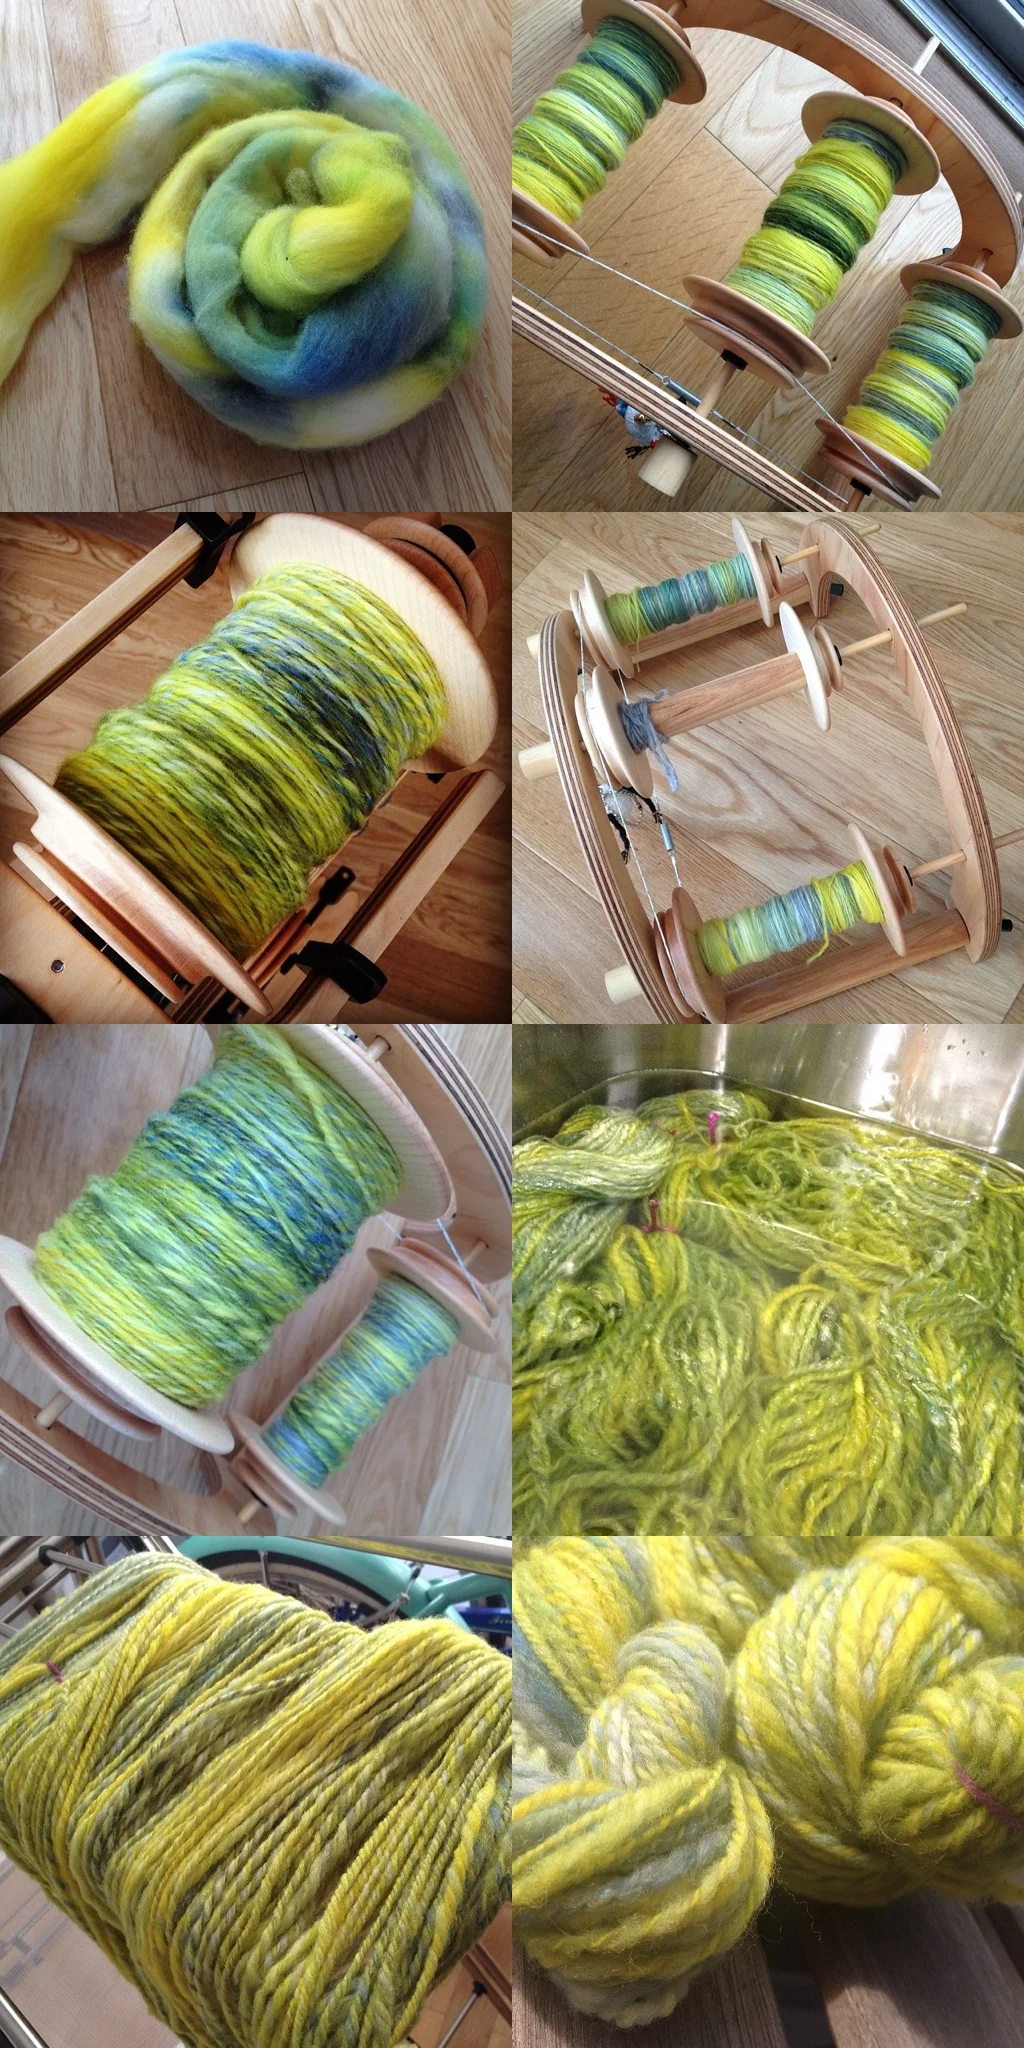
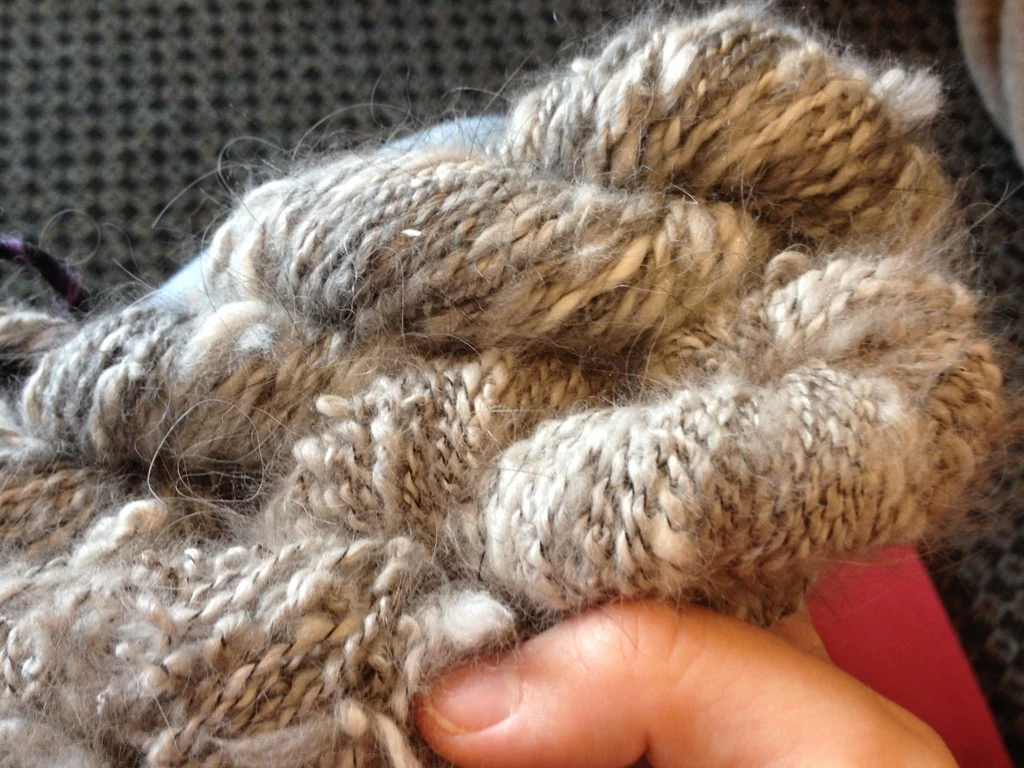
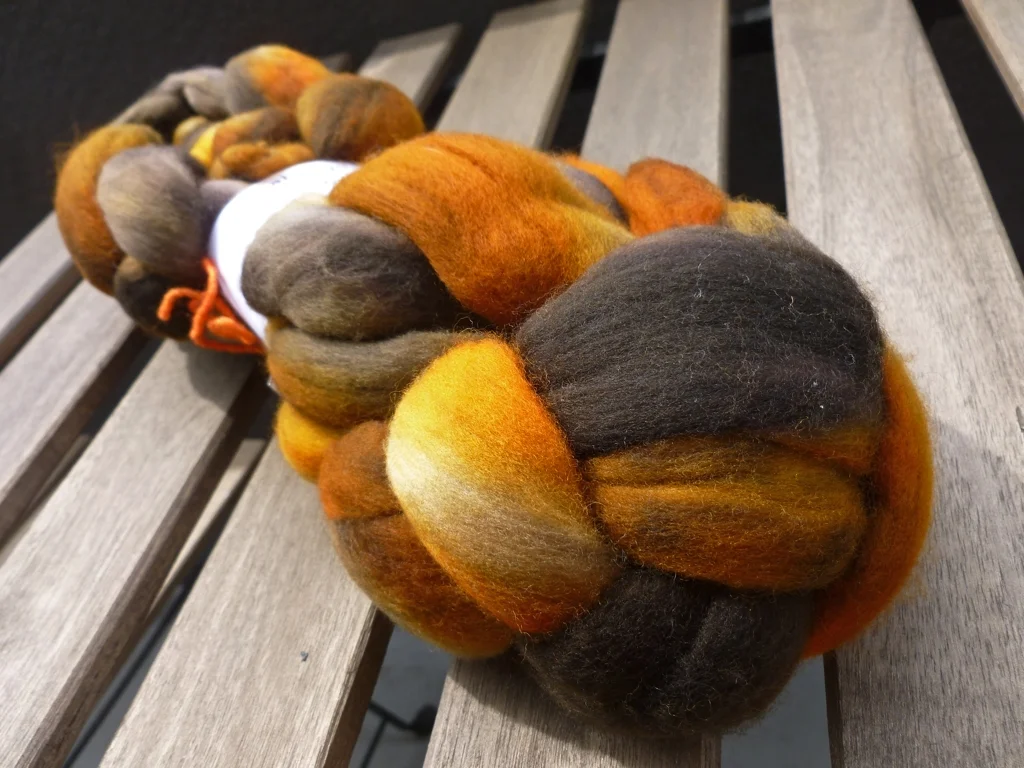
More CosyMakes Falkland in Honey Bear. Before and After.

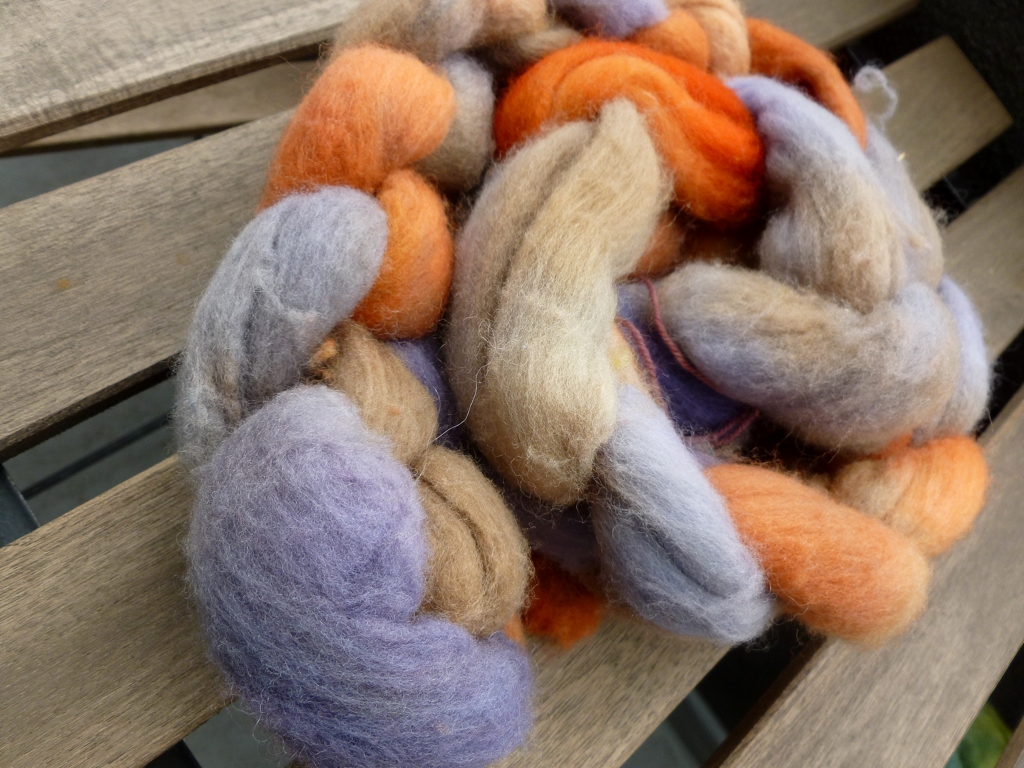
Gale’s Art Corriedale Top - Limited Edition Color

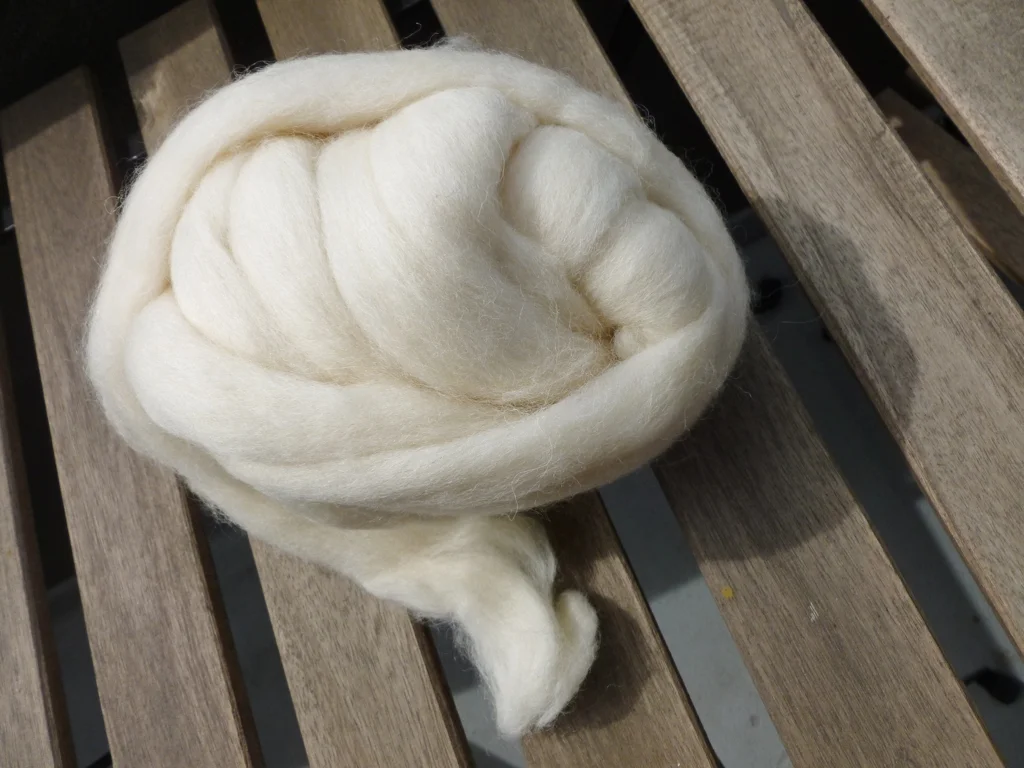
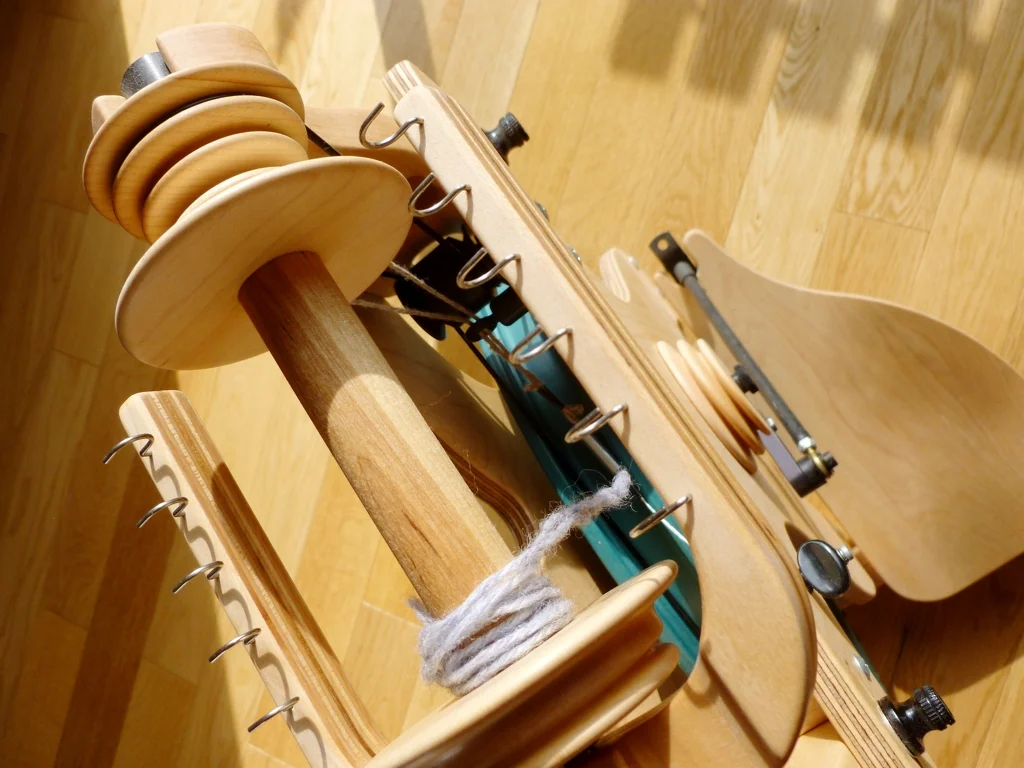
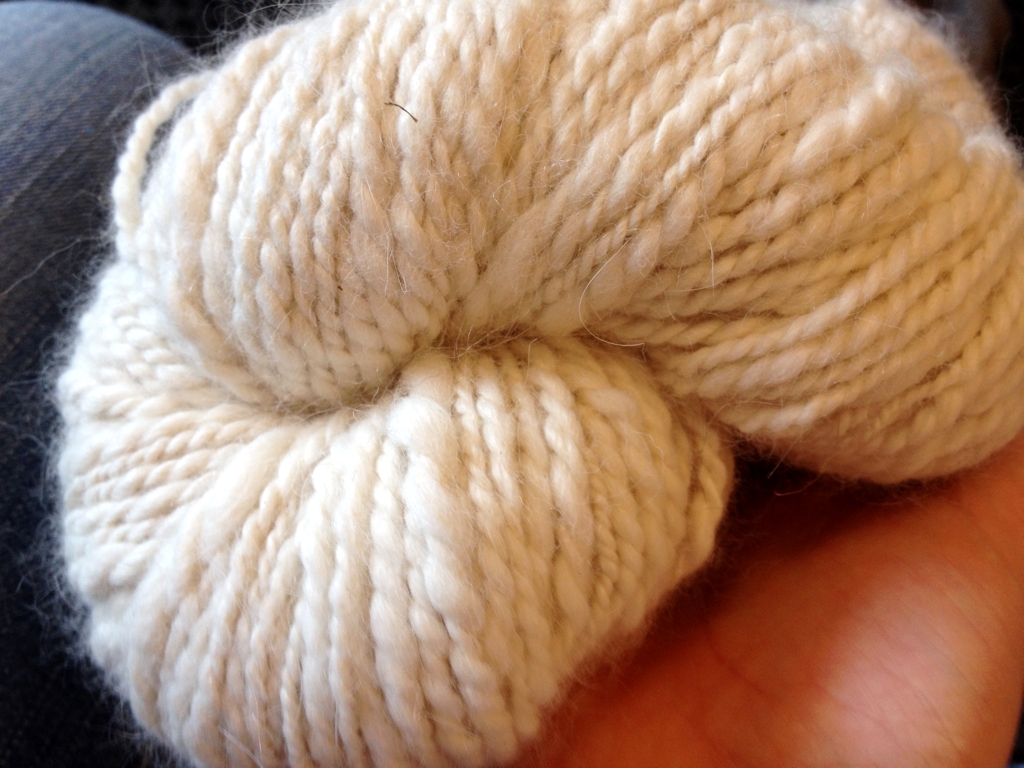
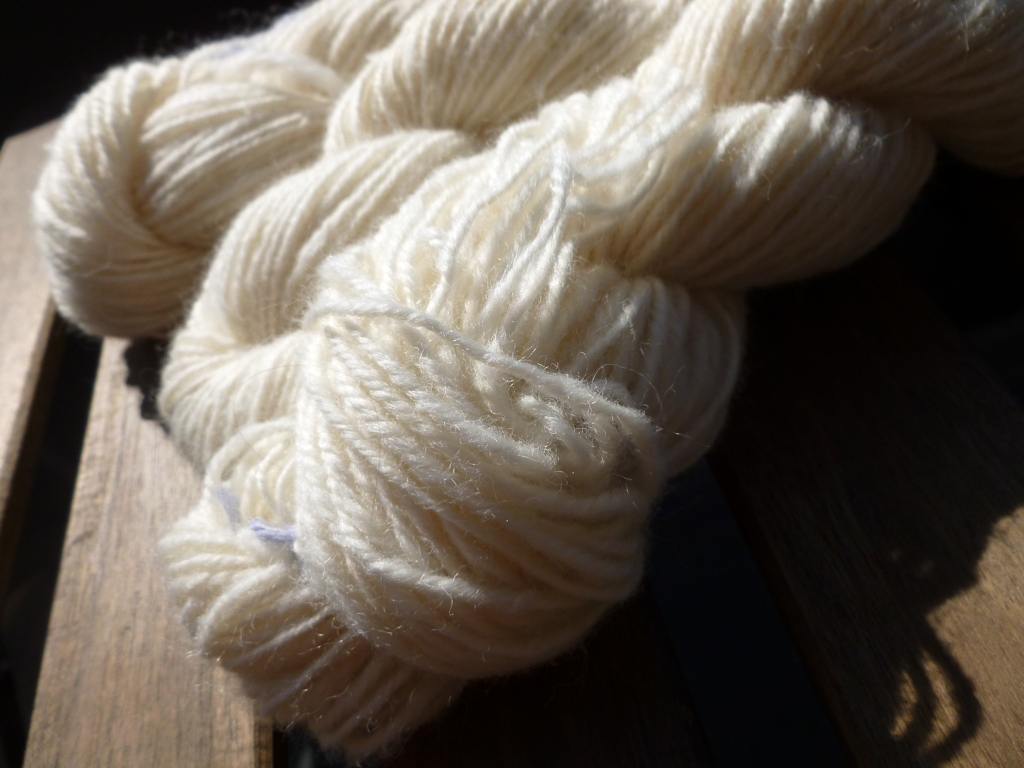
6 oz of un-dyed Corriedale Cross. Sometimes you just need a few neutrals to balance out all the color. Thinking about about pairing it with the purples, greens, and blues of the Corriedale from Gale’s Art. Maybe I’ll try spinning my first skein of sock yarn. 

Honey Bear Handspun

I can’t remember exactly when I first started following CosyMakes but I’m fairly certain I was still in college. I liked her blog, her patterns, and her hand dyed yarn and fiber.  Still do. I wanted to join her fiber even though I didn’t know how to spin. So, during a February Sale, I snapped up a few bumps of fiber. The Falkland was every bit as pretty in my hands as it was on the computer screen. Soft too.

Honey-Bear-Fractal-Skein.jpg

The first word that popped into my head when I unchained the top was, Fractal. The small color palate was clear and distinct with an obvious repeat. A perfect dye job for fractal yarn. I didn’t hesitate to split the fiber lengthwise and then split one half three more times. It’d be so easy to divide the stripes further but I like to keep the repeats longer rather than shorter. 

Spinning the singles long-draw was easy but it took me awhile to ply them together. When it came time to soak the yarn, I had to wash the dishes to clear the sink. Annoying but handspun is worth a little scrubbing.

I’m not sure what the yarn’s next step is. Maybe a shawl or a cowl or simply a gift. I can think of a few people who would gladly take this yarn off my hands. 

The Specs

Fiber: Cosy Makes Falkland Top

Color: Honey Bear

Fractal 2-ply

340 & 32 yards

~ 10 WPI; DK to Worsted Weight

February - March 2014

Rolags: A Love Story

I try to be a monogamous spinner and only work on one project at a time. Mostly, it’s because I only have 4 bobbins and don’t have a way to store extra singles. I also don’t want to confuse my hands spinning several different yarns at one time. If I get bored, the proto-yarn mellows out on the bobbins until I feel like finishing it or a more interesting spin comes along. This might be a problem when I start spinning more than 4 oz of fluff at time. My monogamous spinning is why it’s taken me so long to spin that wonderful rolag from last month’s spinning guild meeting. I even had a free bobbin ready to go. So, the rolag just sat there, tempting me with its softness and novelty until until I had no choice but to empty my bobbins. The orange and purple handspun that came off turned out wonderfully, but more more on that later. Back to the rolag.

I wasn’t sure what to expect when I drafted out a few fibers and started spinning. Turns out that the rolled up fiber was easy to draft as long I didn’t keep a death grip on it. The guild demo last month recommended long draw  and it is definitely the way to work with this prep. The resulting single was a little wild and gave me some good practice with double drafting. I didn’t try to get rid of all the lumps and bumps, they’re part of any woolen spun yarn. I just evened out the largest lumps and tried to keep the irregularities somewhat consistent. Does that sound contradictory? Yes. But was it fun? Yes. I even started looking forward to the interest and color from the bits of silk noil. They add interest and a nice pop. 

The color of the finished yarn surprised me too. Unspun, the rolag’s brown, blue, and green blended together into a heather. To tell the truth, I was reminded of a very large dust bunny. Spun, however, the colors are distinct and quite visible. It’s like knitting with a semi-solid yarn instead of yarn that’s been dyed as a solid. You get to see and enjoy all the nuances and tones that go into a color instead of just one solid note. 

I wish that I had more than just 14 yards of this yarn. It’s soft, fluffy, and wonderfully cushy. I want to knit a hat or even a cowl to cosy up in. Even if I do manage to duplicate the rolag with my extra fiber, I still won’t have enough yardage for either. Just going to have find the right pattern for these few precious yards. 

Before I return to petting this yarn, I want to thank the Greater Los Angeles Spinning Guild for holding a demo on woolen spinning and prep. Who knows how long it would have taken me to kindle a love of rolags if the teacher hadn’t given me one on a silver platter. Now I’m researching hand carders, blending boards, and drum carders. I even turned a giant batt into 37 fauxlags, AKA fake rolags. Those things are fun to spin too which is great since I have 30 of them to spin. 

Goldfinch Handspun

When I first joined Instagram, the predominate color of my photos was yellow and this yarn is the reason why. The fiber was so bright and colorful that I couldn’t resist photographing it and documenting the spinning process from beginning to end. After hanging out in my stash for more than a year, this falkland deserved some time in the spotlight. 

When I finally decided to spin, I wasn’t sure what it was going to turn into until I unchained the roving. The fiber was soft. The colors were lovely and mottled. I just wanted to spin it with doing any sort of fancy prep. Normally, this would mean spinning a simple 2-ply but a brand new bulky flyer and bobbin had just arrived at my front door. With 4 bobbins, one of them extra large, I could easily spin a warm, cushy 3-ply! So, I split the roving into 3 equal sections and got started. Spinning the singles was easy. Plying the singles was ridiculously easy with the bulky flyer. I didn’t have to constantly watch the bobbin to make sure the yarn wasn’t getting tangled up in the flyer or wrapping around the tensioning cord. I didn’t have to ramp up the tension just to get yarn to feed through the orifice and wrap around an already bursting bobbin. All I had to do was treadle, ply and, occasionally, join broken singles back together.

Goldfinch-2ply.jpg

I’ve heard tales of singles being the same length but I’ve never been that lucky or skilled. Take your pick. One of the singles was much shorter than the other two. Time for 2-ply. Chain-plying was out because, while it would give me a similar thickness, the colors wouldn’t behave the same way. Thankfully, the leftovers fit on a regular bobbin with room to spare.

Goldfinch-Compared.jpg

Now I just have to figure out what to do with all this cushy, cushy yarn. Pet it? Done. Squish it? Done. Sniff it? Done. Cuddle it? Done. Knit it? Haven’t started yet but I have a plan. 

The Specs

Fiber: Gwen Erin Natural Fibers - Falkland Top

Color: Goldfinch

3-ply

238 yds; 3.3 oz

Aran Weight; ~ 8 WPI

2-ply

94 yds; 0.7 oz

Worsted Weight; ~ 9 WPI

Bring on the Rolags

Merino-Rolag.jpg

Spinning Guild never ceases to be inspiring. There’s always something new to see, fiber to feel, and the simple contact high of being around other spinners. This month’s meeting on woolen spinning and prep was no exception. I picked up a few pointer about long draw and double drafting but was completely drawn into the process of making rolags on hand cards. I’d never seen anyone using hand cards in person before. Our demonstrator used solid and dyed merino along with a little silk noil for interest. The finished rolags were thick and fluffy but also light and airy. The once distinct colors had blended and merged into lovely heather.

Rolag-Fibers.jpg

The spinning taskmaster that lives in my head wanted to spin one. Thankfully, the teacher made extras for us to work with and I got to take one home. As soon as I free up a bobbins, I’m going to spin it up. The taskmaster will not be denied. 

If I like spinning from rolags and the yarn that it makes, which I probably will, I’m getting a pair of hand cards. In fact, I’ve already started researching them. Any suggestions for the perfect set? 

In the meantime, the teacher also showed us how to make fake rolags, faulags, with only a dowel and some combed top. Have a feeling that I’m gong to making a lot of those.

Merino-Rolag-Close-Up.jpg

Review: The Field Guide to Fleece

When I bought The Field Guide to Fleece last week, I thought it would be helpful when I eventually went to a random fiber festival. Or when I was looking up wool and fleeces from indie dyers and farms. I definitely didn’t expect to use it 2 days later at the spinning guild meeting.

Southern-Cross-Fibers-Tequila-Sunrise.jpg

At every meeting, the guild holds a raffle for fiber or books or yarn. I spent $3 and split my 6 tickets between some roving and a washed fleece. Didn’t win the fleece but I did get the roving. There was no label, only a few notes on the bag. It was just enough info to find out the roving was the January 2012 shipment of the Australia-based Southern Cross Fiber Club. The colorway, Tequila Sunrise, is beautiful and on a completely new to me wool, Texel.

On a lark, I looked at The Field Guide first instead of searching though a few pages of search results. On page 204, was an entry for the Texel which is originally from the Netherlands and bred mainly for meat. It has a staple length of 3-6” and, while lacking in luster, spins up to make a lofty, air-filled yarn. The fiber is nowhere near soft but good for hardy blankets, pillows, and mats.

Field-Guide-To-Fleece.jpg

The Field Guide to Fleece by Deborah Robson and Carol Ekarius is a steal at $14.95. It alphabetically details 100 different sheep breeds with photos and clear, detailed information. Everything from breed history and characteristics - staple length, micron count, and fleece weight - as well as how the wool takes dye, its best uses, and how readily the fiber felts. Every entry has a photo of the sheep and a close-up of an individual lock next to a ruler. The book is a wonderful pocket-sized resource that’s worth buying both for new and experienced spinners who need a good, quick resource. 

Heather Holiday Handspun

Handspun-Ashland-Bay-Merino-Yarn.jpg

We’re still talking about Christmas gifts, right? Because I’ve got my last skein of 2013 handspun to show off. This particular yarn, the only yarn I gave away last year,  was spun for a friend who knits beautiful lace shawls that seem to pop off the needles every time she turns around. Plus, the last time I gifted her some handspun she immediately knit it into a cowl. I think she must have cast on for it as soon the package landed on her doorstep. So, she deserves handspun yarn and I went on the hunt for soft fiber in the perfect color.

Handspun-Ashland-Bay-Merino.jpg

Once the goodness, Ashland Bay Multi-Colored Merino, was in hand, I was ready to spin but not just any old yarn. I wanted to replicate one of the first skeins to come off my wheel, a soft DK weight 2-ply spun from the same fiber. That teal yarn demanded to be knit as soon as it came off the bobbins but I haven’t found the right pattern yet. To recreate said yarn, I split the fiber in half, set the wheel up with the same ratio and tension, and got to spinning. The final product wasn’t exactly the same but it was awfully close. Instead of a DK, it was a sport weight. Instead of 300 yards, there were 464. Sounds good to me. 

Baltic-Blue-Handspun.jpg

The Specs

Fiber: 4oz of Ashland Bay Multi-Colored Merino

Color: Baltic

about 12 WPI post washing

464 yards

Spinning a heathered top was a new experience for me. Up to that point, I’d only worked with solid and hand dyed fibers; neither behave quite the same as a heather. The heathered top and the final yarn look very different since drafting the fiber further blends the colors. I wasn’t exactly sure what I’d end up with so I just went with it. The yarn is definitely still blue but you can see yellow, red and purple up close. I love the nuance and want to spin a whole sweater’s worth of this fiber. That’s definitely a first. 

Heavenly Handspinning Herbal Wheel Wax

Spinning-Wheel-Cleaning-Start.jpg

Thursday afternoon, I put a silly horror movie, they do exist, on in the background and sat down to clean my wheel. The process wasn’t as difficult or time consuming as I had imagined it to be. Just detailed. First, I dusted every surface, crevice, and joint I could reach. Happy with the lack of dust, on went the wood wax.

Heavenly-Handspinning-Wheel-Wax .jpg

Thanks to a demo at a fiber guild meeting last year, I was able to buy some Heavenly Handspinning Herbal Wheel Wax from The Yarn Marm. The hardest part of whole process was getting the tin open. Somehow, I managed to not spill half the liquid contents prying of the lid. The wax had a pleasant smell and was easy to apply. I let it sit of 5 minutes before rubbing it off with a soft cloth. Now the wood has a wonderful luster and a layer of protection against dry, salty air. 

Oiling was a breeze since since only the footmen cranks and the bobbin ends on the flyer needed attention. 

Spinning-Wheel-Cleaning-Time.jpg

From start to finish the entire process only took about 50 minutes. The wheel looked beautiful and ready for a test spin. It spun effortlessly and quietly too. I’m looking forward to spinning a lot of yarn this year so I’m not going to wait months to clean it again. Gotta take care of my Sidekick after all. 

Spinning Wheel Maintenance

Dirty-Spinning-Wheel.jpg

Okay, I admit it. I’ve been a bad spinner by not properly babying my wheel. The first step is admitting you have a problem, right? When I first got my wheel, I knew it had to be maintained on a regular basis. The manual talked about oiling and protecting the wood and dusting of all things. Totally doable. But I haven’t done any of those things. Before you drag out the pitch forks and the torches to take my wheel away, know I’m mending my ways. I have oil, wood wax, and dusting cloths. I’m going to spend the afternoon giving my Sidekick a proper cleaning before I spin the first yarn of 2014. After all the work this wheel has done over the past few months, it definitely deserves a little love.

Dirty-Treadles.jpg

Since this is my first time ever deep cleaning a wheel, a little research was in order. I found some helpful articles and have a better idea of what to do. Maybe they’ll help you and your wheel out too. 

The Spinner’s Glossary by Lee Juvan  - Handy overall article with lots of photos, tips, and instructions for cleaning and protecting your wheel. 

How to Care for Your Spinning Wheel - Basic video tutorial for how to clean and protect a spinning wheel; goes through the process for 4 different wheels.

How to Size and Replace Drive Bands

Schacht’s Spinning Wheel Care Tips

The Care & Feeding of Spinning Wheels by Karen Pauli popped up frequently in my research despite being published in 1981. Might get my hands on a copy. 

Another Day, Another Skein of Handspun

Spunky-Eclectic-Diesel-Handspun.jpg

Another skein of handspun washed, dry, and ready for its close up. It was spun just to be spun. Well, kind of. When I first dug the fiber out of my stash, I wanted to see if I could spin a fingering weight yarn on my wheel using my current whorls. So far, everything I’ve spun has ranged from sport to heavy worsted. The skeins’ random thin bits don’t really count. The last intentional fingering yarn I spun was on a spindle during Tour de Fleece 2013. After playing around with the settings, I was sure I’d figured out how to spin a fingering yarn. I put on the smallest, fastest whorl I had, 11:1, and set a high take-up. The only thing left to do was start spinning.

Spunky-Eclectic-Diesel-Spun.jpg

What I ended up with is definitely not a fingering weight yarn. What it definitely is, is a sport weight with sections of fingering and worsted mixed in. The yarn is beautiful and soft, but not really what I was going for. Oh well. Might teach me to start spinning small sample skeins before starting a project. Who am I kidding? That’s never going to happen when I’m spinning a single 4 oz bump of fiber.

Diesel-Handspun.jpg

Those precious little bumps of fiber are one-off pleasures. Usually, I’m not spinning with a specific project in mind. I spin them to enjoy the process and do something with wool. I want to enjoy the color and the feel of fiber moving through my hands. Of course, I want the yarn too but said yarn is a finished object of its own. It isn’t just a step in the larger process of a shawl of a sweater. It needs to be appreciated as yarn first before it morphs into something else. Plus, I feel like I’m wasting that tiny little bit I’d be tearing off for a sample.

I’m sure I’ll be more scientific and detail-orientated when I start spinning for large projects that  require more than 1 skein. I’ll take notes and spin sample skeins. I promise. Until that happens, I’ll enjoy the process and the inevitable stash enhancement.

The Specs

Fiber: Spunky Eclectic Handpainted Falkland

Color: Diesel

490 Yards

Sport Weight; 12-13 WPI

Diesel-Handspun-Skein.jpg

Hello, Angora

Spun by Yarn Marm

Spun by Yarn Marm

This month’s fiber guild meeting was a crash course in spinning angora. The Yarn Marm came by to demo and spread the love of Angora Rabbits. She also brought along a giant, fluffy ambassador named Albert. FYI, angora rabbits are larger than you think. 

Spun by Yarn Marm

Spun by Yarn Marm

During the demo, several skeins of Yarn Marm’s handspun angora made the rounds around the meeting. Every single one of them was soft, fluffy, and absolutely luxurious. Most of the skeins were a simple 2-ply but a few were plied with thread. Of all the skeins I handled, the thread plied skeins were the most exciting and inspiring.

Spun by Yarn Marm

Spun by Yarn Marm

In the mid-levels of my fiber stash, there are several ounces of angora from two lovely rabbits named Harvey and Roger. It’s straight off the bunny with no further processing. Besides from lovingly petting it, I’ve had no idea what to do with it until last Saturday. Can I spin it as is without turning into roving? Yes. Is there a way to wash/full the yarn to prevent shedding? Yes. Now that I’m armed with a little bit of knowledge, I’m ready to dig the angora out and start spinning. So what that it’s probably harder to spin than superwash merino? I’ll cross that bridge when I come to it. 

Create Marled Yarn with Chain Plying

How To Chain Ply Variegated Yarn To Create Marled Yarn | withwool.com

Ever fallen hard for a skein of variegated yarn? Yarn that’s beautiful in the skein, but, when knit, turns into a pooling and flashing mess. There are several ways to combat pooling yarn. You can stripe with another yarn or knit from alternate ends every 2 rows. You can change the gauge or slip stitches or do all manner of finicky things. What happens when none of that works and you’re ready to stuff into the very back of the closet?

How To Chain Ply Variegated Yarn To Create Marled Yarn | withwool.com

I had about reached that point with a beautiful skein of orange and blue fingering weight yarn. The reason it didn’t end up forgotten in a closet was because my closet isn’t that big. Besides, my yarn stash is a bit too small to intentionally lose yarn. I tried tons of different tricks to get the colors not to pool but nothing really worked. I was about to move along to another project and a solid yarn when I came across Amy Christoffer’s Moxie Pullover. The sweater is knit with two different colors of yarn held together to create a lovely marled fabric. Why not ply that stubborn skein to create a marl? 

How To Chain Ply Variegated Yarn To Create Marled Yarn | withwool.com

After starting a movie, I sat at my wheel and decided to chain-ply the yarn instead making a 2-ply. Didn’t want to risk the color repeats matching up in a 2-ply and creating a thicker yarn with the exact same pooling problems. Less than an hour later, I had a wonderful marled yarn that I wanted to knit with instead of intentionally misplacing. 

Short and Sweet Directions for Chain-Plying Marled Yarn

How To Chain Ply Variegated Yarn To Create Marled Yarn | withwool.com

1. Figure out which way the yarn is plied. Commercial yarn is usually plied to the left, S twist, so you’ll need to chain ply to the right, Z twist. If you’re plying a single, spin to the left.

2. Wind the yarn into a center-pull ball.

3. Chain-ply. Use a wheel or a spindle, both work just fine. 

4. Once your finished plying, let the yarn rest for a day so the twist can settle into the yarn.

How To Chain Ply Variegated Yarn To Create Marled Yarn | withwool.com

5. Wind the yarn into a skein.  Never mind the crazy tendrils.

6. Soak the skein in a cool water bath with wool wash or gentle soap. Rinse carefully if the yarn isn’t superwash.

7. Hang to dry.

How To Chain Ply Variegated Yarn To Create Marled Yarn | withwool.com

Now the yarn is ready to be wound and knit up into marled goodness. FYI, chain plying will reduce the yardage by a third. This fingering yarn’s original 400 yards turned into about 133 yards of aran weight. So, instead of socks or a shawl, there’s enough yardage to knit a slouchy hat or a small cowl or fingerless mitts. Could even squeak out a small pair of slippers.  Bring on the marl!

How To Chain Ply Variegated Yarn To Create Marled Yarn | withwool.com

Lustrous Orange

Dawning-Dreams-Superwash-Merino.jpg

Can I say I have deep stash of fiber if I’ve been spinning for just under 2 years? Because, if anything qualifies, it’s this bump of fiber I’ve had sitting in my stash for over a year. The fact that I checked the Dawning Dreams shop for few weeks to make sure it was still available makes it seem like I’ve had it even longer. I was drawn to the color, a gradient that started with pale peach and ended with fire orange, and wasn’t concerned about the fiber, so long as it was wool. I finally succumbed to the pretty and ended up with my first 4 ounces of superwash merino. When I opened up the box, I was not disappointed. The fiber was soft and lustrous. The colors were everything I expected. Properly documented and swooned over, the bump went into the stash to wait for me to spin it up. 

Plied-Superwash-Merino-Skein.jpg

I was finally ready to spin it last month. So, I split the fiber lengthwise down the middle to preserve the gradient and got to spinning. Thanks to reading multiple blogs, I expected superwash merino to be slippery and, having spun slippery things before, thought I was prepared. Not so much. My experience spinning slippery fiber on spindle didn’t transfer well to spinning slippery fiber on a wheel. The learning curve was rather steep. 

Spinning the first few yards went well enough, so I kept going. Every thing was going smoothly until the single was just sucked up into the orifice, leaving my confused hands and the rest of the fiber behind. What just happened? I finally did find the end and started pulling it back through the orifice only for the single pull apart. Repeatedly. At the time, it seemed like I was destroying yard after yard of precious handspun. In reality, I probably only lost a few feet of singles not worth plying. I finally did get back to a strong section, joined, and started adding a lot more twist. 

Orange-Superwash-Yarn-Explosion.jpg

Frustrating as it was at the time, spinning superwash merino has made me a better spinner. It got me out of my comfort zone and away from my default yarn. It made me experiment and troubleshoot. I learned that making small adjustments to a wheel’s tension and take-up can drastically affect twist and the final yarn. It’s one thing to read about it and another thing to witness it first hand. 

The finished yarn is every bit as lovely as that bump of fiber I just had to have. It’s lustrous and soft with wonderful drape. It would be the perfect yarn for a shawl. If only I could pick a pattern.

The Specs

Fiber: Superwash Merino dyed by Dawning Dreams

440 yards

DK to sport weight, 11-13 WPI

Orderly-Orange-Superwash-Yarn.jpg

How to Un-Ply Yarn

Plying can be magical, but it doesn’t always turn out the way you expect. Here’s how you can your un-ply your handspun to get the results you want. How To Un-Ply Yarn | withwool.com

Plying is magic. You can combine 2 or more strands or even just one and turn them into something beautiful and balanced. So, why would you ever want to un-ply yarn? Well, plying doesn’t always turn out the way you think it will. Maybe after plying 2 singles together, you realize that they would look much better chain-plied. Or, the colors barber pole instead of matching up. If you’re working with a commercial yarn, you could split the plies to use for sewing seams, attaching buttons, or embroidery.  I un-plied a skein of handspun because I’m stubborn and and wanted to the colors to match up. 

In order to make un-plying a less tedious process, you’ll need:

  • the yarn to un-ply - a few yards or a few hundred
  •     a spinning wheel or spindle
  •     a lazy kate or a small cardboard box and knitting needle combo to act as a lazy kate
  •     something to wrap freed singles around - small balls or origami stars or a ball winder
Plying can be magical, but it doesn’t always turn out the way you expect. Here’s how you can your un-ply your handspun to get the results you want. How To Un-Ply Yarn | withwool.com

1. With the spinning wheel or a spindle, remove twist by spinning the yarn in the opposite direction of the plying. For commercial yarn which is generally plied to the left, spin to the right. Remove as much of the ply twist as possible without adding any extra twist to the singles.

Plying can be magical, but it doesn’t always turn out the way you expect. Here’s how you can your un-ply your handspun to get the results you want. How To Un-Ply Yarn | withwool.com

2. Set up the bobbin or cop on the kate. If you’re using a lazy kate, separate the plies and pull them to opposite sides of a bobbin rod. If you’re using a box, cut slits in the cardboard for each single and pull them all through. In this tutorial, I’m splitting 2 plies but you can also take apart 3 or more plies with the same method.

Plying can be magical, but it doesn’t always turn out the way you expect. Here’s how you can your un-ply your handspun to get the results you want. How To Un-Ply Yarn | withwool.com

3. Evenly pull on the singles to prevent tangles and start wrapping. One single went to the ball winder the other was wrapped around a turkish single. 

When you’re finished, you’ll have at least 2 tangle free singles to work with. Sew on some buttons, embroider, or ply them together all over again. These singles went under the scissors to match up the colors before a second attempt at plying. Definitely worth the effort and the time. 

Plying can be magical, but it doesn’t always turn out the way you expect. Here’s how you can your un-ply your handspun to get the results you want. How To Un-Ply Yarn | withwool.com

Review: Schacht’s Industrious Collapsable Lazy Kate

Schacht-Lazy-Kate-and-Bobbins.jpg

Once I started filling up the bobbins from my new spinning wheel, it became abundantly clear that I needed a lazy kate. Or at least something to act as a lazy kate. A chopstick stabbed into a piece of styrofoam was the first thing shoved into service. It mostly worked. My second homemade lazy kate was a slightly too big box with holes poked in the side and, you guessed it, chopsticks holding the bobbins. It worked pretty well except for when the chopsticks fell out of the holes, which was often. Many an innocent single was broken in that foul contraption. I was all too happy to replace it with an actual lazy kate, Schacht’s Industrious Collapsible Lazy Kate.  

Before I clicked the “Buy” button, I thought about what I’d need from a lazy kate to benefit my spinning and fit into my available space. The kate would need to hold at least 3 bobbins, have adjustable tension, and pack small for travel. It also needed to sturdy and reasonably priced. After combing through Etsy and various spinning shops, Schacht’s lazy kate met all of my requirements for $60. Done.

Disassembled-Schacht-Lazy-Kate.jpg

The kate arrived at my door in lightning speed in a very flat envelope. Things were looking good already. After a few glamour shots, I put the kate together without tools and quickly put it to use. Schacht’s lazy kate is a vast improvement over my box and chopstick combo. Bobbins no longer went flying and they spun easily. Tensioning is easy too thanks to a spring and the two center dowels. Just loosen the wing nuts, twist a dowel, and tighten up the nuts. I’ve even managed to adjust the tension while my hands were full with chain-plying singles. 

Assembled-Schacht-Lazy-Kate.jpg

The Industrious Collapsable Lazy Kate is well built and of great quality. I’m not worried about breaking any of the pieces or repeatedly assembling and disassembling it. Assembled, the kate feels very durable in my hands. The size is nice too since it can easily fit 3 standard Schacht bobbins or 3 bulky bobbins. Even with as much as the kate can hold, it still packs flat and would be very easy to travel with. Just be careful not to lose any of the small pieces like the wing nuts or the rubber rings that secure the bobbin rods. Honestly, the small removable pieces are the only downside to this design. You could get away without the rubber rings but it’d be harder to compensate for missing wing nuts.

Schacht-Lazy-Kate-with-Bobbin.jpg

As far as looks go, the wood and finishing match Schacht’s Sidekick and Ladybug spinning wheels. Same minimalist style too. It feels like I have a matching set when I use the my Sidekick and kate together.

At just $60, I’m glad I picked Schacht’s Kate over both more expensive kates and those at the same price point. I’m sure I’ll be using it for years to come.

How to Wash Excess Dye Out of Yarn

...or, I’m really tired of my hands turning blue.

A few months ago, I was spinning some bright blue roving into yarn. The roving, besides from being easy to draft, was pretty and soft but turned my hands and spindle blue. Drafting the singles, blue hands. Plying the singles, blue hands. Skeining the yarn, oh look, blue hands. Thankfully, a bath to set the twist was a perfect time to get rid of all that extra dye. But first, research. To the internet!

SpinningPencilRoving5.jpg

My first thought was to try a vinegar bath since I’ve repeatedly heard that adding a little vinegar to the water will set the dye. Numerous blog posts and message boards later, I came to the conclusion that just soaking the yarn in vinegar wouldn’t do a thing. There also has to be heat for the vinegar to do it’s job since the vinegar acts as mordant which lets the dye set on the fiber. I wasn’t willing to cook my yarn which meant the only way to fix the blue problem was to wash the dye away. 

If, like me, you don’t put your yarn on the stove, you’ll need a sink, cool water, and good soap to wash the dye away. Wool wash is the best choice but dish detergent works too. I used a combination of Dawn Ultra and Eucalan.  

Washing-Excess-Dye-From-Yarn.jpg
1: Fill the sink with enough cool water to let the yarn soak and float. Add soap after the sink is full to prevent suds that you’ll just have to rinse away later.

2: Dunk the yarn in the water. Let it soak for a few minutes and gently swish it around. If the water dramatically changed color, immediately skip to step 3.

During the yarn’s first dunk, the bath turned so blue that I couldn’t see the bottom of the sink through 4” of water.


Washing-Yarn-Dye-Bath.jpg

3: Drain the water and rinse the yarn with as little agitation as possible. Repeat as necessary. 

I had to put my yarn through 5 separate baths and it was still dripping blue water when I hung it up to dry.

Felted-Handspun.jpg

Pro Tip: Even if you’re using a soap that doesn’t need to be rinsed, agitate the yarn as little as possible. Wool and other animal fibers can still felt in cool water. All the rinsing and agitation can add up over multiple baths. If the yarn does start to felt but you catch it soon enough, the yarn will still be salvageable and knit-able. 

I accidentally felted my blue handspun but stopped washing the yarn when I noticed the felting. I hung it up even though it was still dripping blue water. When it was dry, I had to pull the skein apart one strand at a time. I lost some yardage to shrinkage but I didn’t have to cut anything. Surprisingly, I like the yarn better felted.

Pro Tip #2:

Be aware that the yarn might lose some of it's color during the repeated baths. Mine went from gym short blue to sky blue. 

Blue-Handspun-Yarn.jpg
Felted-Handspun-Spread.jpg

Spinning Fat Singles

Full-Circle-Fat-Single.jpg

Sometimes you just need a creative shot in the arm. To be reminded of just of much more is out there to make and play with. To try something new instead of just sticking with the familiar. On the spinning front, that’s what the Sarah Anderson’s Spinner’s Book of Yarn Designs has done for me. Looking through it’s pages, I saw so many new things that I wanted to try. That book is treasure trove of inspiration and technique. 

One of the first yarns shown is a slub yarn where the single is thin with intentional thick bumps, aka ‘slubs’, throughout. The tutorial teaches how to spin a slub yarn but also acts as a stepping point to spinning fat and chunky singles. Anderson’s fat singles look so squishy, colorful, and consistent. Who wouldn’t want to be able to spin and knit with such a great yarn?

Fat-Single-Skein.jpg

I haven’t spun anything close to a fat single or a slub yarn since I first started spinning and that seemed to be all I could make. My default yarn has thinned over the time and I wanted to see if I could bump it up a little with help from my spinning wheel. So, I set up the whorl with the slowest ratio and got started. Side note: treadling slowly takes more concentration than you’d think.

I set out of spin a slub yarn, honest, and the first few yards definitely are. However, as I got further in, it was easier to spin a consistently thick yarn than to switch between thick and thin. Since my end goal was a fat single anyway, I just went with the flow. Washed and finished, the yarn is hardly uniform. There are stretches of thick yarn and stretches of thin yarn. There are spots where the twist is just barely holding everything together. There’s also 1 knot, but who’s counting? Oh right, I am.

Fat-Single-Detail.jpg

Inconsistencies aside, the skein is soft and undeniably squishy. It’s definitely not the fattest or most even single but it is a step in the right direction. Only the first of many, I hope. 

The Specs

340 yds

9-14 Wraps per Inch

Knit Picks Full Circle Roving - Quarry

Grey-Fat-Single.jpg

Smith Rock Revealed

Spun-Abstract-Fiber-Targhee.jpg

Last month, I finally visited the local spinning guild. When I stepped out of my car, I had no idea where to go so I just followed the woman carrying a spinning wheel. There was yarn, fiber, spinning wheels, and spindles all over the place. Yep, I was definitely in the right place. The meeting and people were great so I wasted no time joining up. There were even a couple local vendors selling fiber and supplies. Resistance was futile and I bought 4 oz of Targhee dyed by Abstract Fibers. The reds, browns and oranges of Smith Rock are a bit outside my usual color spectrum but were exactly what I wanted.

Abstract-Fiber-Targhee-Smith-Rock.jpg

 I split the fiber in half lengthwise and started spinning singles for a 2-ply yarn. The Targhee was wonderfully soft and drafting was easy so I was able to focus on the color as it moved through my fingers. The Bearded One noticed it too. Subdued red might not be my first color choice but it’s definitely his. He called dibs on the finished yarn. He denies it but he definitely called dibs. 

In knitting there’s a “rule” that says if don’t like something about your project, you should fix it immediately instead of pretending it’s okay for another thousand stitches. If it’s bothering you, the only difference those thousand stitches are going to make is that you’re going to have go through them first to get something you’re truly happy with. It’s a good rule. Saves time, energy, and hassle. I motion that this rule should apply to spinning and life in general too. It’s better to fix something immediately than to make a mistake worse by pretending it didn’t happen or that it’s just fine as it is. Who seconds?

Abstract-Fiber-Plying-Ball.jpg

The reason I bring this “rule” to your attention is that we can all stand to be reminded of it from time to time. I certainly could have used the reminder when I started plying this yarn. Sometimes the colors matched but, most of the time, it was a wild barber pole. I kept telling myself I liked it and it would come together in the end. Unfortunately, the more I looked at the plied yarn, the more I didn’t like it. The only fix was un-plying the yarn and doing detailed surgery to get the colors to match. Leaving the yarn as is and shoving it into the back of the closet just wasn’t an option. Un-plying, separating the singles, and matching the colors more than doubled the amount of time I spent on this yarn. The whole misadventure involved a spinning wheel, a cardboard box, a spindle, a ball winder, scissors, and felting. A few days later I had a well matched ball of singles ready for their fourth trip through the spinning wheel.

Spun-Abstract-Fiber-Smith-Rock.jpg

 All the extra work was worth it. The finished yarn is wonderful, soft, and there’s no need to shove it into a closet. The Bearded One agrees since the colors are great and look good on him. I can’t wait to knit it up as we figure out what to make with 430 yards of worsted weight. 

Spun for Spinzilla

three-spinzilla-skeins.jpg

Spinzilla is in the bag for the year. I started a day late. I spun along to podcasts, tv shows, and video games. On Saturday, I finished my third and last single. The final day, Sunday, I finished plying. Ended with 929 yards worth of singles which I turned into 310 yards of chain plied yarn. Not a bad haul of knit worthy yarn for any week.  

Spinzilla was pretty fun and I enjoyed the competition. I didn’t go all out and spin in every free moment. If I wanted to read or play video games, that’s just what I did. My wrists and ankles are thanking me for it. So what if I didn’t get to spin that happy little bump of color I got from Gwen Erin? I hit my only goal of spinning up the rest of my stashed Perendale wool.

untwisted-spinzilla-skeins.jpg


Thanks to the push from Spinzilla, I’ve reached a turning point in my spinning. Before last week, I had only spun small quantities of fiber at a time, 4 oz max. Spinning more than that on a spindle just seemed like a giant time suck that I’d get bored of halfway through and never finish. Didn’t think I could spin a consistent yarn over numerous skeins either. Well, my spindles sat out last week and I worked exclusively on my Sidekick. I spun three separate but matched skeins of yarn which I’ve never done before. Now I feel like I can spin yarn for blankets and sweaters and large projects without getting quitting halfway through. I’m even looking forward to it!

A week and a half later, I’m glad I signed up to compete at the last minute. It was fun even though I didn’t join a team. Can’t wait to try again and beat my yardage in next year’s Spinzilla.

closeup-spinzilla-skeins.jpg

Easily Measure the Yardage of Handspun Yarn

Keep losing count when you're trying to tally the yardage of handspun yarn? Here's how stitch markers can help out! | Easily Measure The Yardage Of Handspun Yarn withwool.com

Whether you're spinning for Tour de Fleece, Spinzilla, or for a particular project, you'll have to figure out how much yardage you have eventually. This locking stitch marker trick will help you keep count no matter how much you've spun. 

Keep losing count when you're trying to tally the yardage of handspun yarn? Here's how stitch markers can help out! | Easily Measure The Yardage Of Handspun Yarn withwool.com

Once the singles are plied and the yarn off the bobbins or spindle, skein up all that precious yardage. Instead of counting every wrap in one go, grab some locking stitch markers and let them keep keep track of the yarn. Just count 20 wraps, or whatever number you like best, and bundle them together with the stitch marker. Repeat till every strand is corralled. Count the markers and you’ll know exactly how many wraps you have without losing count somewhere in the triple digits. No need to wonder if you’ve counted every wrap or double-counted by mistake. The stitch markers are doing all the work.

Now all the need to go is a little math. Multiply the number of wraps by the circumference of the skein and you’ll have your yardage. If you want the yardage of all the individual singles, multiple the final yardage by the number of plies.

Keep losing count when you're trying to tally the yardage of handspun yarn? Here's how stitch markers can help out! | Easily Measure The Yardage Of Handspun Yarn withwool.com