Peppercorn Bracelet the Second

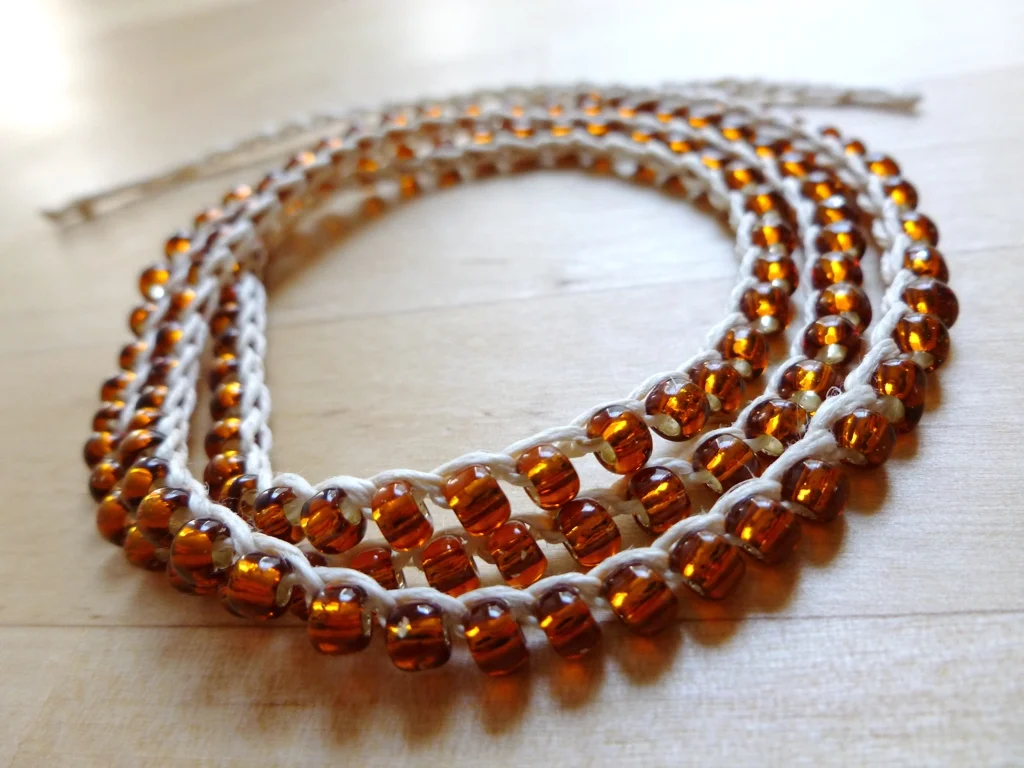
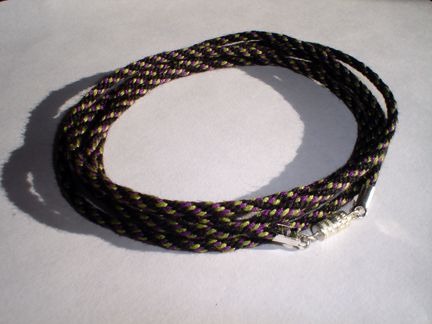
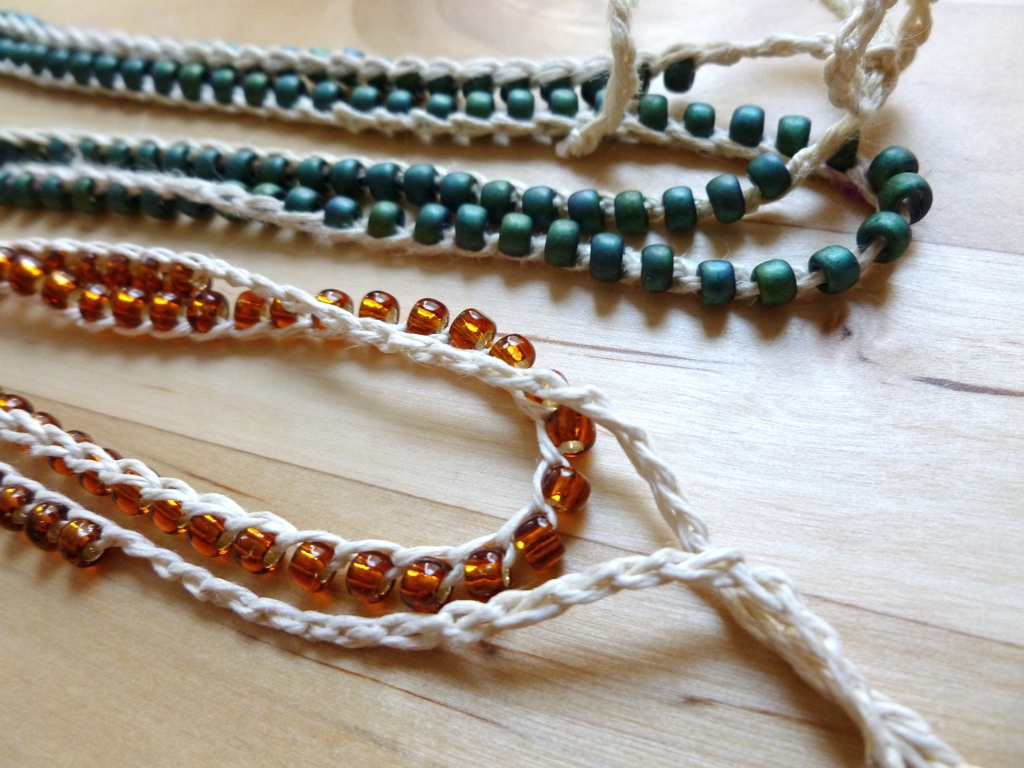
On the same day I wrote about the first Peppercorn Bracelet, my mom sent me an email asking me to make one for her too. My Mom’s absolutely awesome so she went to the top of the list. When I was out and about searching for yarn, I found the perfect bronze-colored glass beads in a yarn shop. A good trip.

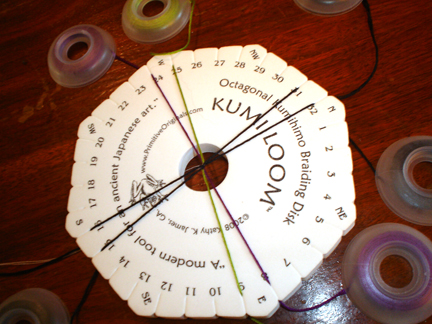
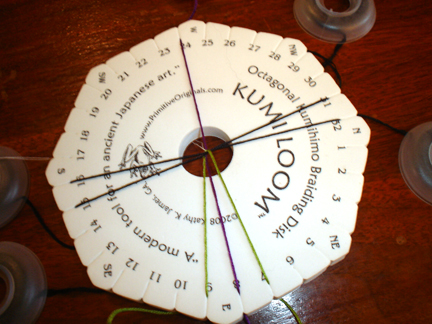
This Peppercorn Bracelet worked up even faster than the first. Using the recommended number of beads will do that. The second reason was because I switched to a crochet hook instead of using double pointed needles. Working fine hemp cord with the DPN’s was hard on the fingers. The needles poked holes in my skin and left my finger tips sore. Using a crochet hook made the whole process pain free and wonderfully fast. I was able to finish the whole bracelet in an afternoon instead of having to space the work out over several days. 

After making two of these, especially from hemp, I can tell you that there is one step that absolutely can not be skipped - blocking. When the bracelet is fresh off the needles or the hook, it’s going to twist and curl up on itself. It won’t lay or hang well and it certainly won’t look its best. The one minute it takes to block the piece is well worth it. Put the bracelet under water just long enough to get it wet. Tug the ends a few times to straighten it out and hang the bracelet up to dry. That’s it.

The Specs

Pattern: Peppercorn Bracelet by Kourtney Robinson

Yarn: Fine Hemp Cord

Beads: Mill Hill size 6/0 seed beads, 16606

Hook: 2.75 MM

Peppercorn Bracelet

Olive-Peppercorn-Bracelet.jpg

In a perfect world, I’d be writing about how I cast on for the Peppercorn Bracelet as soon as the beads and the cord were in hand. The pattern photos are lovely. All the projects on Ravelry are very complimentary. However, I strung the beads in January and then the whole thing sat on a shelf until I was infected by sudden fit of reorganization. Finally knitting the bracelet seemed like a much better idea than stuffing it into a bag and forgetting about it for another month or two. Glad I did.

Olive-Peppercorn-Bracelet-Tie.jpg

Over the next few days, I knit on it at least 5 beads at a time. The hemp cord I subbed in for yarn was a bit hard on the hands and not just because it lacked any stretch. I was poking holes in my fingers trying to get one stitch over the other. The finished bracelet is definitely worth the effort though because I love wearing it. It’s dangly and the hemp cord has a nice drape. Even better, the bracelet’s extra long since I used every bead I had. Why let the extras take up space on that shelf I was trying to  reorganize? Made the end ties longer too so it sits at the perfect spot on my wrist. 

Wearing-Peppercorn-Bracelet.jpg

I like wearing this bracelet so much that I’m definitely going to make more as gifts. They don’t take much cord/yarn, I get to play with pretty beads, and my friends get a nice bracelet. Everyone wins. 

The Specs

Pattern: Peppercorn Bracelet by Kourtney Robinson

Yarn: fine hemp cord

Beads: Toho Seed Beads 6/0

Needles: 2.5 mm DPN’s

Olive-Peppercorn-Bracelet-2.jpg

Breaking for a Bracelet

I’m a big fan of taking a break when necessary. Complicated problems, finicky questions, and pesky knitting designs can be hard to solve in one sitting. Instead of beating my head against the same spot on the wall, I go for a walk, play a game, and do my best to simply ignore the damn thing for awhile. It’s better to come back with a fresh mind and make time for the flash of inspiration to strike. 

The current pesky problem? My latest work-in-progress design. Things were doing so well too. My swatches were truthful and I had enough yarn; the only thing left to do was cast on. Several thousand stitches later, a tiny detail about knitting in the round threw the whole project for a loop. The only thing to do, besides from rip it all out, was to do something else. 

Peppercorn-Bracelet-Materials.jpg

Enter the Peppercorn Bracelet by Kourtney Robinson. I picked up the supplies for it last month and last weekend seemed like the perfect time to get started. My only mod is to use fine hemp cord instead of yarn. By the way, collapsable eye needles for stringing beads are definitely worth the money.

Peppercorn-Bracelet-Beads.jpg

The weekend away and a little mindless knitting seems to have done the trick. I have an easy, wonderful solution and the pattern is back on track. Still have to rip out the first attempt though. Send reinforcements. 

Testing Sophiti-cuffs

I like test knitting even though I don’t do it too often because of schedule conflicts or being waist deep in my own designs and projects. When the opportunity presents itself, I sign up whole heartedly because I like supporting people and designers that I like. I also get to knit the cool stuff before anyone else.

The latest bit of testing was for the Squares Sophiti-Cuffs from Gwen Erin. I’ve been following Gwen’s blog for years now and I’ve never once considered culling it from my RSS feeds. She recently started spinning yarn and dying fiber full time and it’s been to resist. I have a few ounces of her fiber and it’s been elevated to such high status that I can’t help but feel the urge to improve my spinning skills so I can do the fiber justice.

The cuffs turned out to be a quick little project. I might have spent more time picking out buttons than knitting. The grey yarn is leftover from a few different projects and the cream is some of my very own handspun. First time I’ve knit with my own handspun too. Full technical details on Ravelry.

Besides from being quick, the pattern’s pretty versatile too. I think the cuffs would be cute buttoned around gifts, flower pots, or naked table legs. I’m looking at you, Ikea table legs. 

Winners! Also, Kumihimo Tutorial: Part 2

Random.org has spoken! The two winners are GateArte and Katie M. of Brokeknits.com. Hope you have fun! Emails are on the way. 

-----

The focus of this tutorial is how to finish off your braid with crimps and a clasp. If you don't want to add any findings, you can just tie of the ends and go or just have fun experimenting. Anyway, here's what you'll need:

  • Your almost finished braid
  • Scissors
  • Super Glue
  • Scrap Thread
  • Clothes Pin
  • 1 Barrel Clasp
  • 2 8mm crimps
  • Small needle nose pliers

Once you’ve made the braid as long as you want, it’s time to finish it off. Make a little slack on the loom by pulling the working end of the braid straight up.

Then pull the braid and the extra thread back through the hole. Wrap the braid with the scrap thread several times and tie a double knot. Repeat until you have 3 or 4 knots.

Now for the scissors. Just past the wrap and all of the knots, cut off the excess floss but leave the scrap thread. Seal the ends with a drop of glue and pin the scrap thread up in the clothes pin. It makes a handy drying stand in a pinch.

While the glue dries, it’s time to join the crimps and the barrel clasp. The ends of the clasp that I’m using rotate freely so the two can go straight together. First, take apart the clasp so it’s easier to handle. Hold one half of the clasp’s eye with the pliers and pull back the other side until there’s enough space for the crimp. Slip the crimp on to the wire and bend the eye back into place. Repeat for the other half of the clasp and it’s time to attach it to the braid.

Cut off the scrap thread. Then put a drop of glue in the crimps and press in the braid ends. Do something fun while the glue dries.

Once everything is dry, crimp the crimps closed with the pliers.

Time to enjoy your handiwork!

Kumihimo Tutorial: Part 1

Seriously, I can’t stop wearing this thing. Everyday this past 2 weeks, I’ve found a way to wear it and make it work with my outfits. It’s so fun and practical that I can’t let it go. Now, if only I could come up with a name for it. Capital letters and “The” should definitely be involved. Lack of a proper name aside, I must make more. Kumihimo manages to keep my hands busy and give me something crafty to do when knitting isn’t an option but there’s still TV to watch. Rigorous testing has proved it to be a great companion to Buffy the Vampire Slayer.

I’ve fallen hard for Kumihimo and I want to share the love. So, I’m documenting the process with a tutorial and having a little giveaway. Included is almost everything you’ll need to make your own “thing.” The pliers, glue, and scrap thread are up to you. I’ve got two kits. So, just leave a comment - maybe suggest a name and which colors you want- and some way to contact you (email, ravelry ID) by July 30th.

There’s more than one type of braid. They can be round, flat, square, or hollow and, traditionally, they’re made on a round stand or marudai. In this post I’m going to focus on a particular kind of braid, an 8 strand round braid, that is made on a modern equivalent to the marudai - a foam disc. Let’s begin!

Supplies:

  • A kumihimo loom
  • 4 skeins embroidery floss (2 the same color)
  • Scrap thread
  • Yarn bobbins or clothes pins
  • Scissors

You won’t need these until after you’re finished braiding:

  • Super glue
  • 8mm crimps
  • Small barrel clasp
  • Pliers

The first thing to do is prepping your floss for braiding. You won’t a full skein for this project just most of one. Open the skein and make sure the ends are free to grab later. Stretch it around your fingers like yarn on a swift and pull both of the ends at the same time. The floss should come off your fingers tangle free and and nicely doubled.

Cut a nice long piece of thread about 18” and pull it through the loops. Tie the thread in a double knot and you’re ready for the next step - winding. 

Even doubled, the floss is way too long to braid without tangling. Separate the floss into 8 strands and wrap them around the bobbins or the clothes pins. As long as you tuck the working end of the floss into the tip of the clothes pin when you’re finished winding, it should hold itself in place while you braid.

Kumihimo looms and marudai are set up around the 4 cardinal points with numbers marking the individual slots. Pull the scrap thread through the center hole and place the 4 same colored strands (black in this case) on the North South Axis (slots 32:1 and 16:17). Both contrast colors go East to West (8:24 and 9:25).

Now that the floss has been doubled, tied, wound, and arranged on the loom, the hard part is over and you’re ready to braid. In one hand, hold the loom and scrap thread from underneath. Make sure to keep a snug hold on the scrap thread since it’ll help keep the loom in your hand and make it easier to start working.  With North at the top, move the North right strand (1) next to right South (15). There will be one strand at North and three at South.

Next, move left South (17) to left North (31). The strands should be be at two and two again.

Rotate the loom clockwise or you can turn counter-clockwise. Just keep the direction consistent.

Just keep repeating these steps - Right down. Left up. Rotate. - until the braid is as long as you want it. For me, the magic number for a chocker/necklace/bracelet/anklet thing is 45”. To figure out your length, take a piece of string and wear it around your neck (or wrist or ankle) exactly how you want to wear the finished braid. Cut the string at that length and use it to measure as you work.

Unless you’re making a much shorter braid, you probably won’t finish in one sitting. So you know where to begin when you pick up the loom again, move the right strand down and stop. When you’re ready to start again, move the left strand up and keep going as usual.

Good luck, have fun, and I’ll catch up with you next week with how to finish it off and add a handy clasp. Let’s see how many episodes of Buffy I can watch in the mean time. Hope you’re having a nice weekend!