Socks Take Two

Two in progress toe-up socks on circular needles.

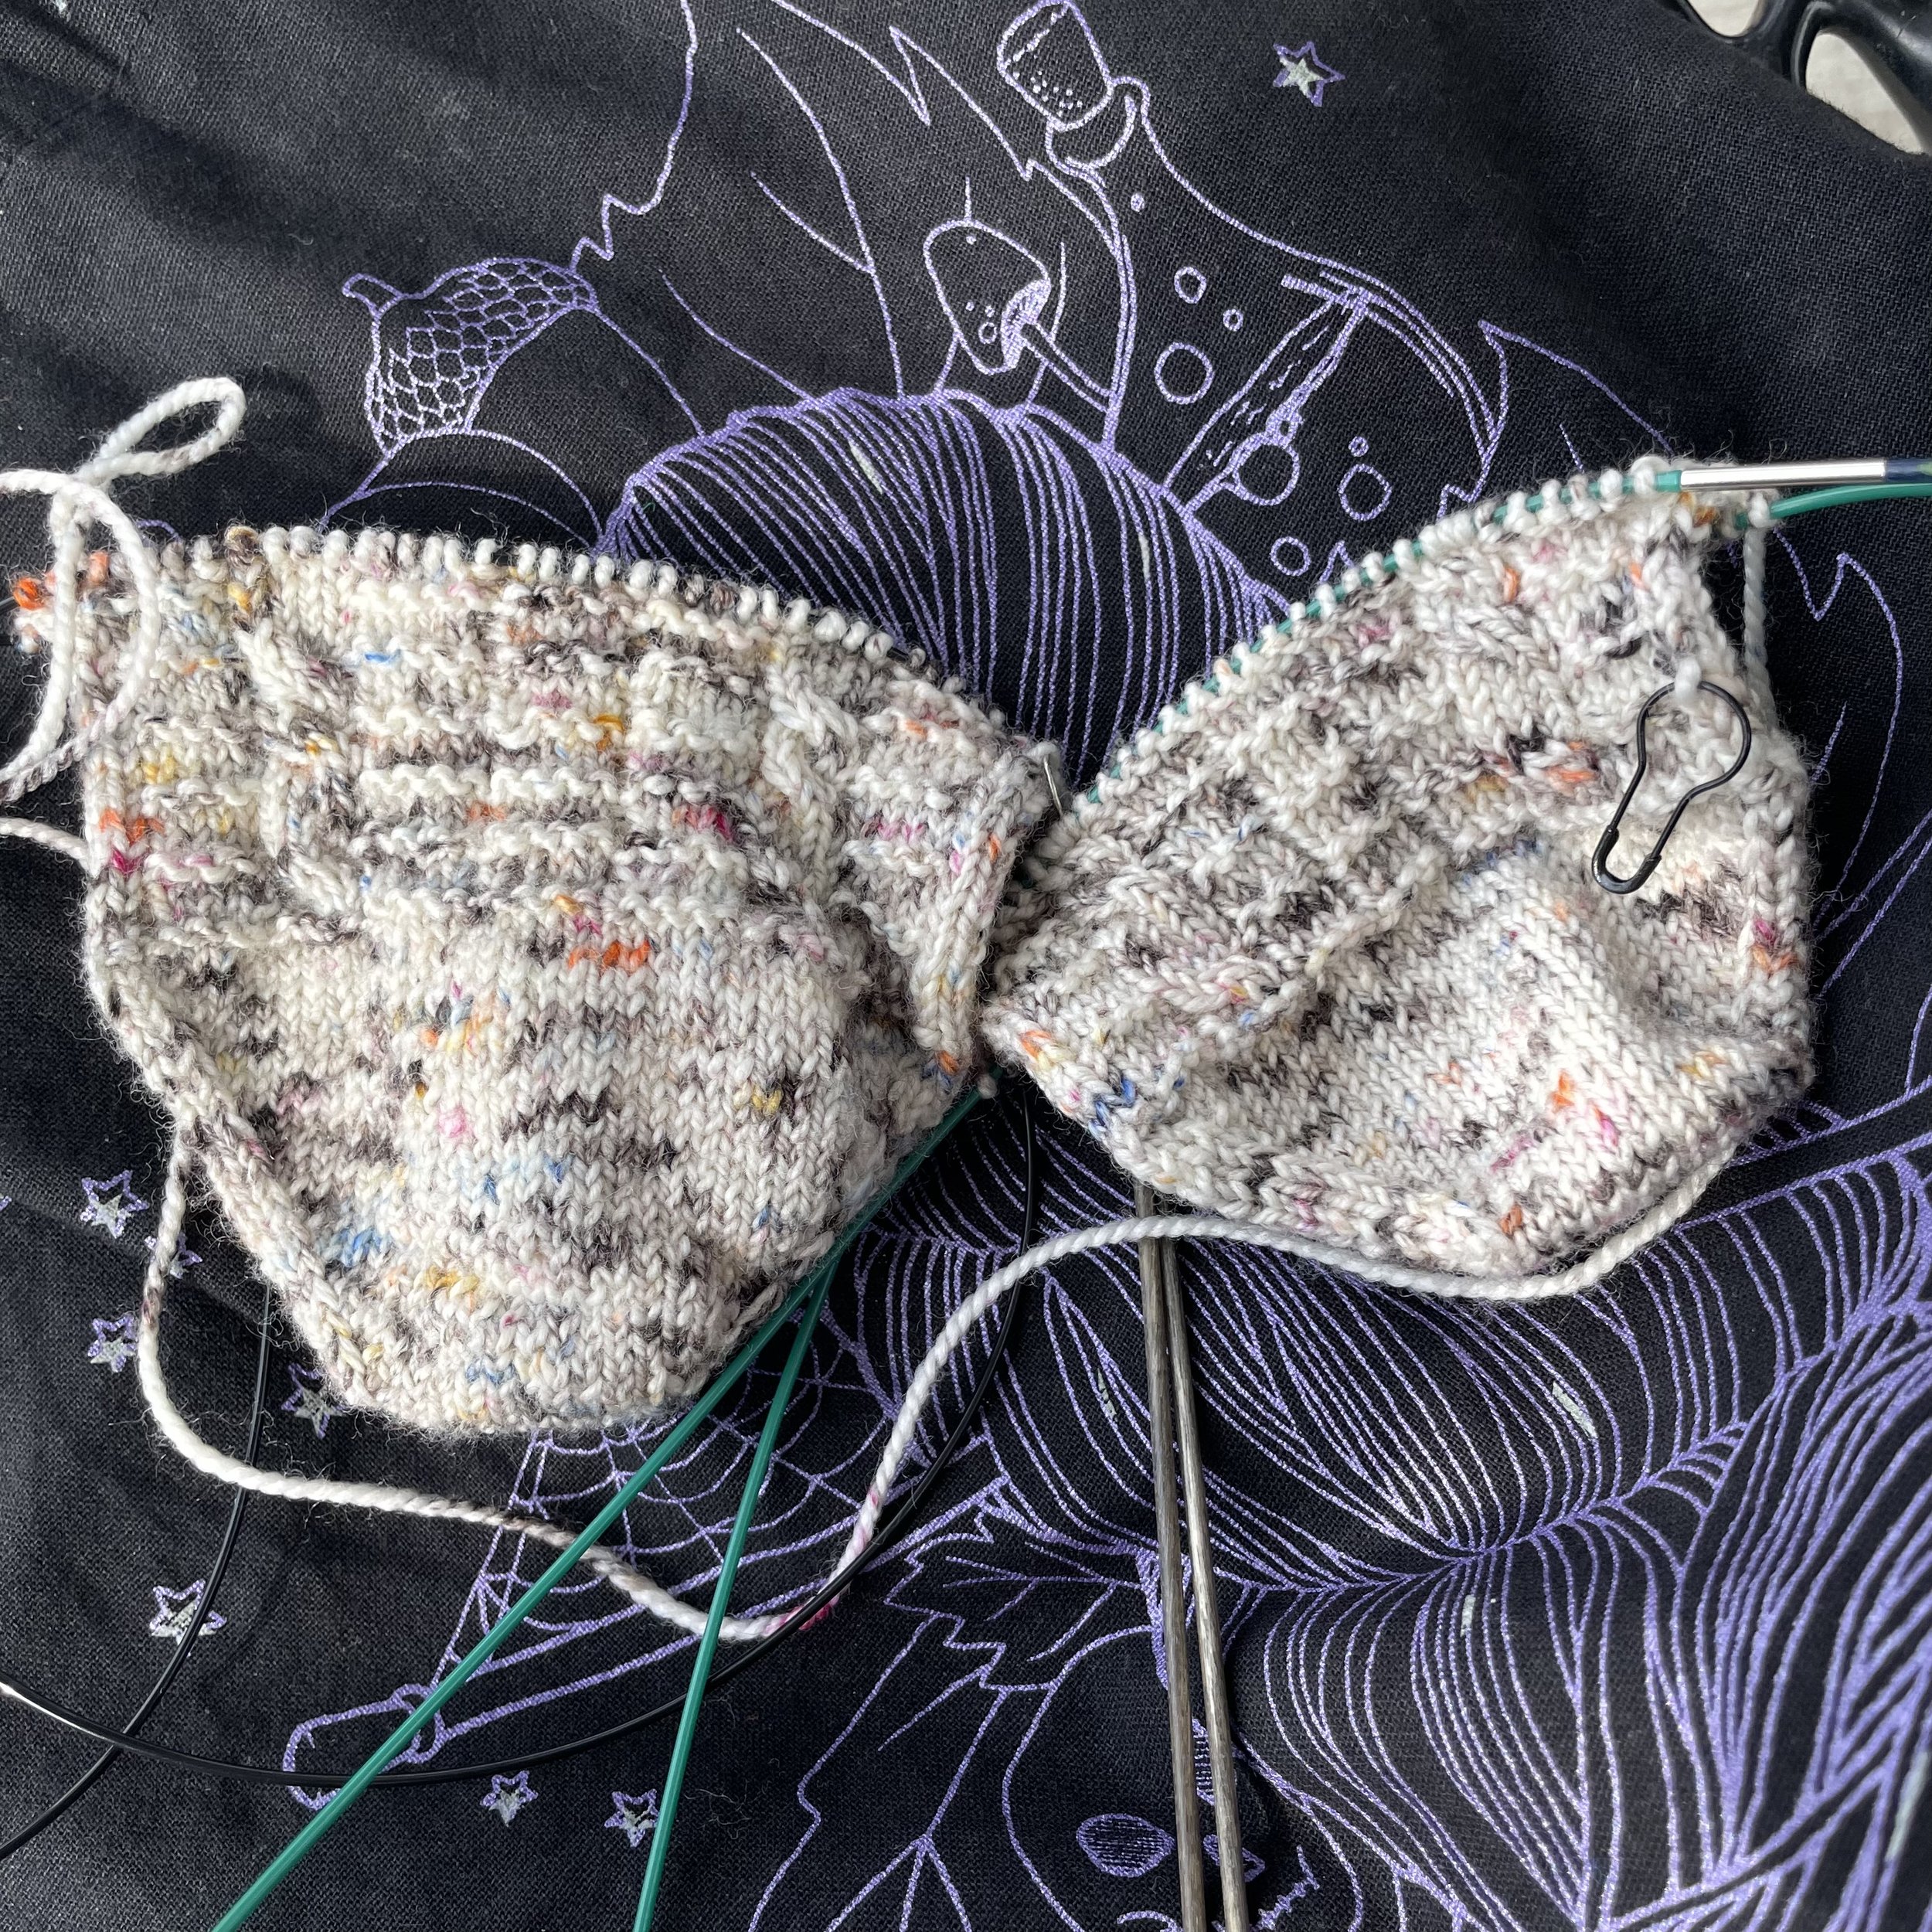
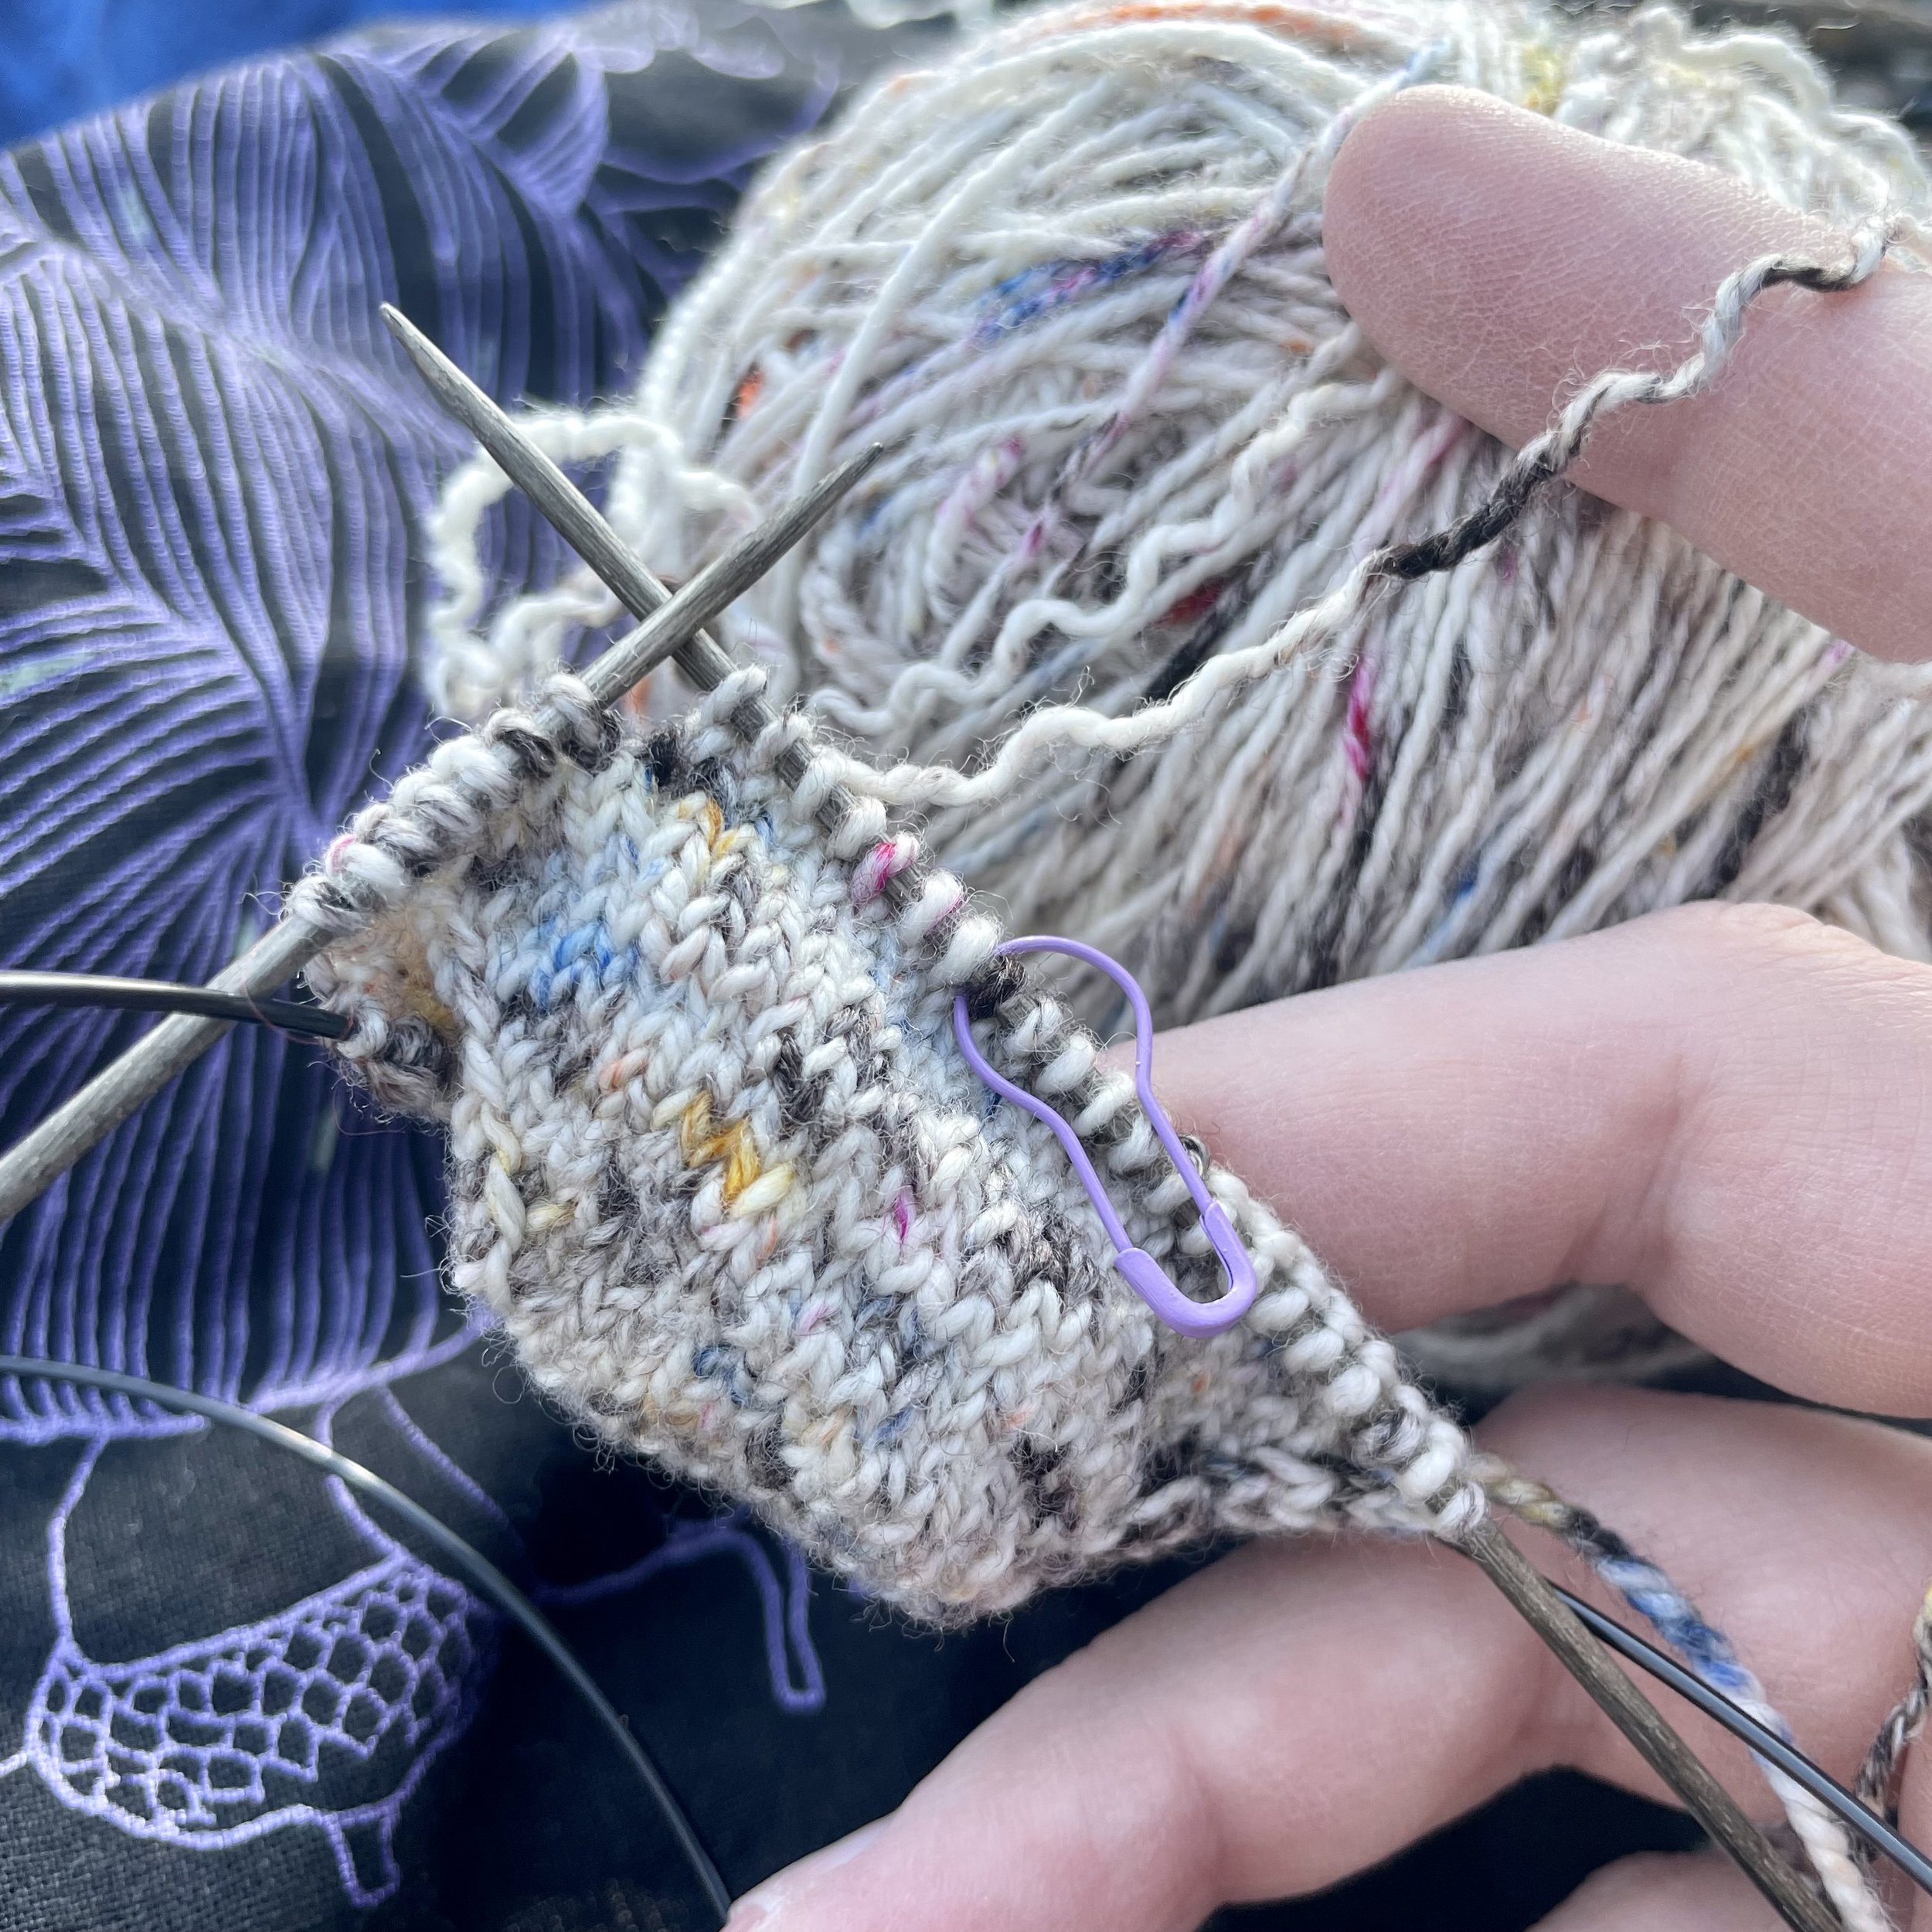
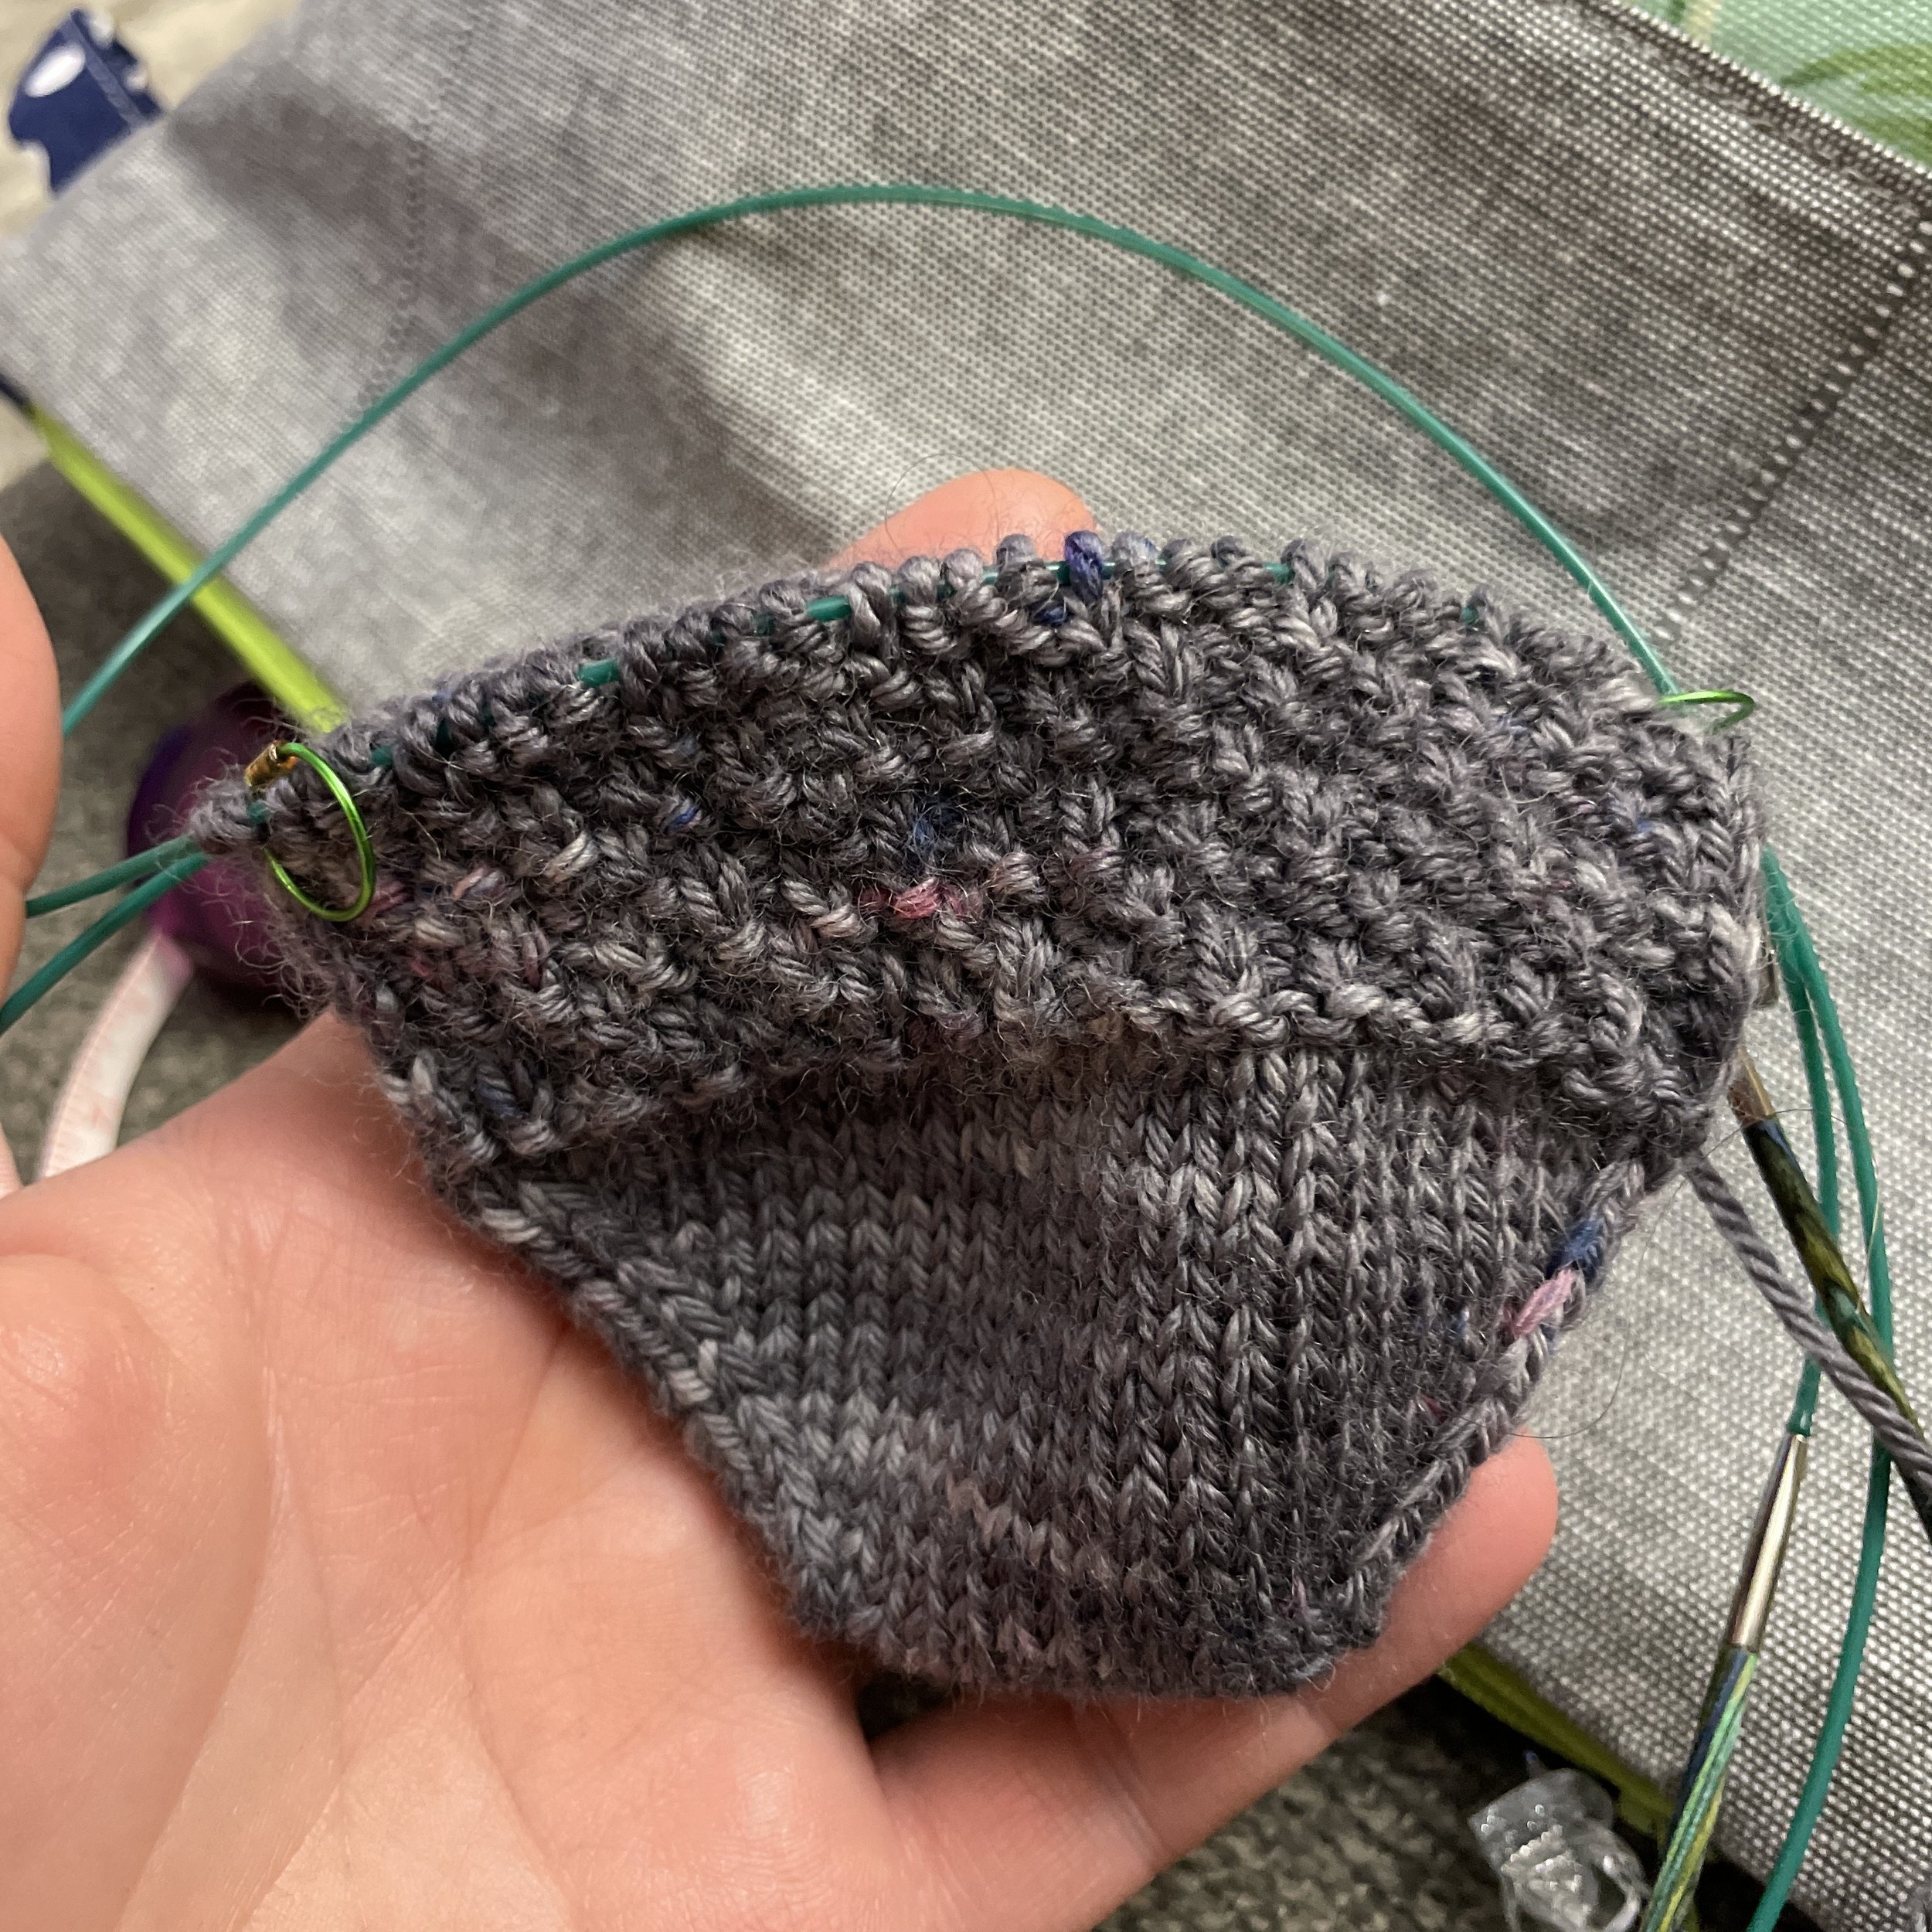
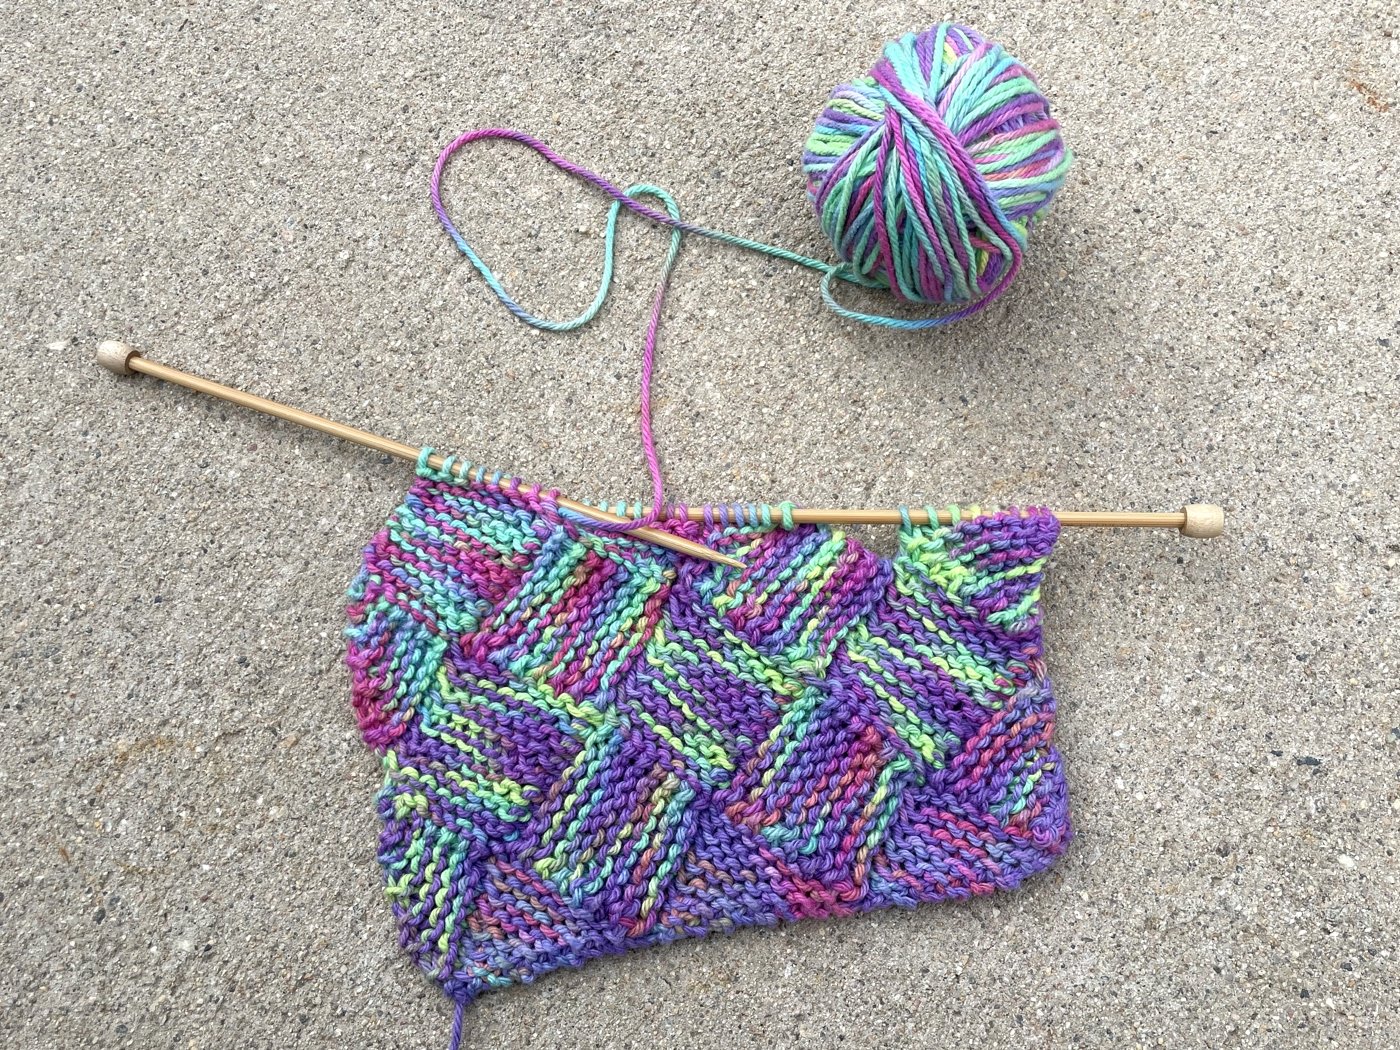
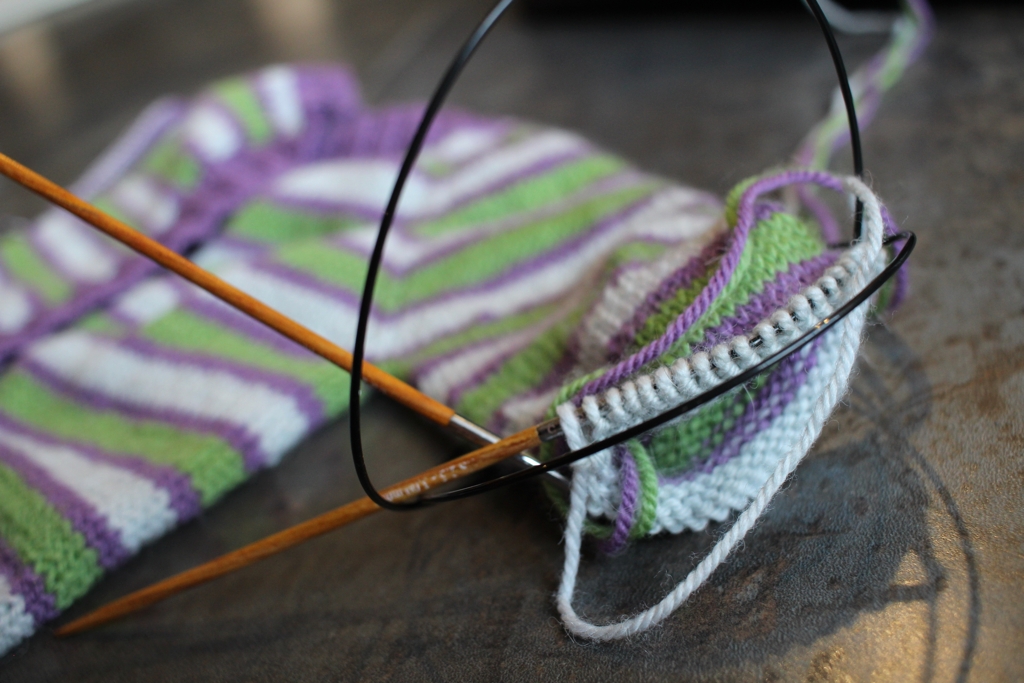
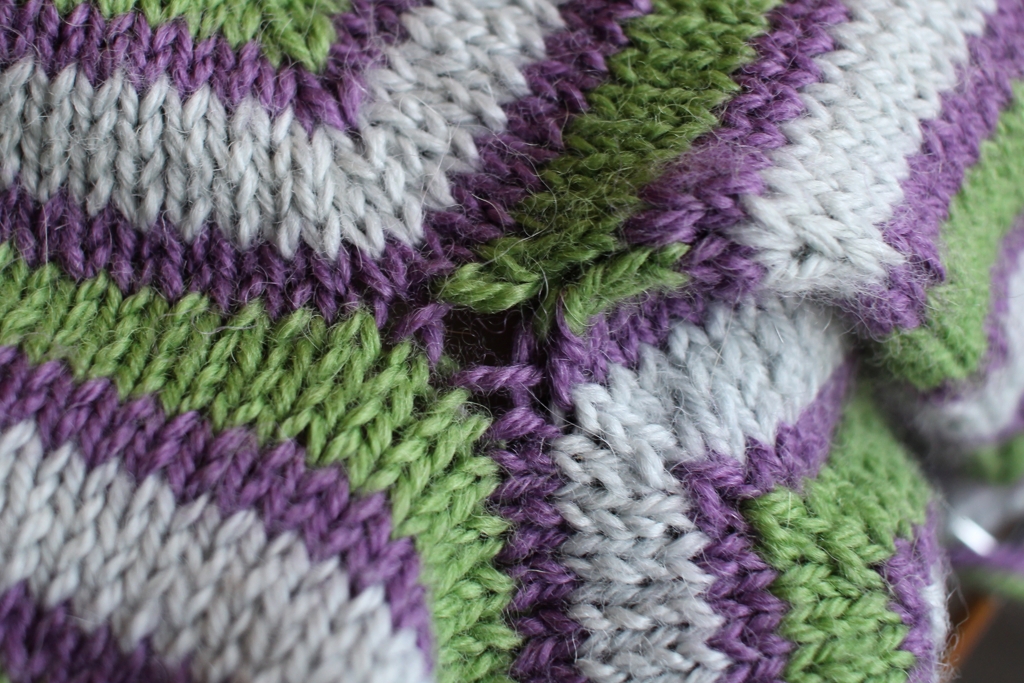
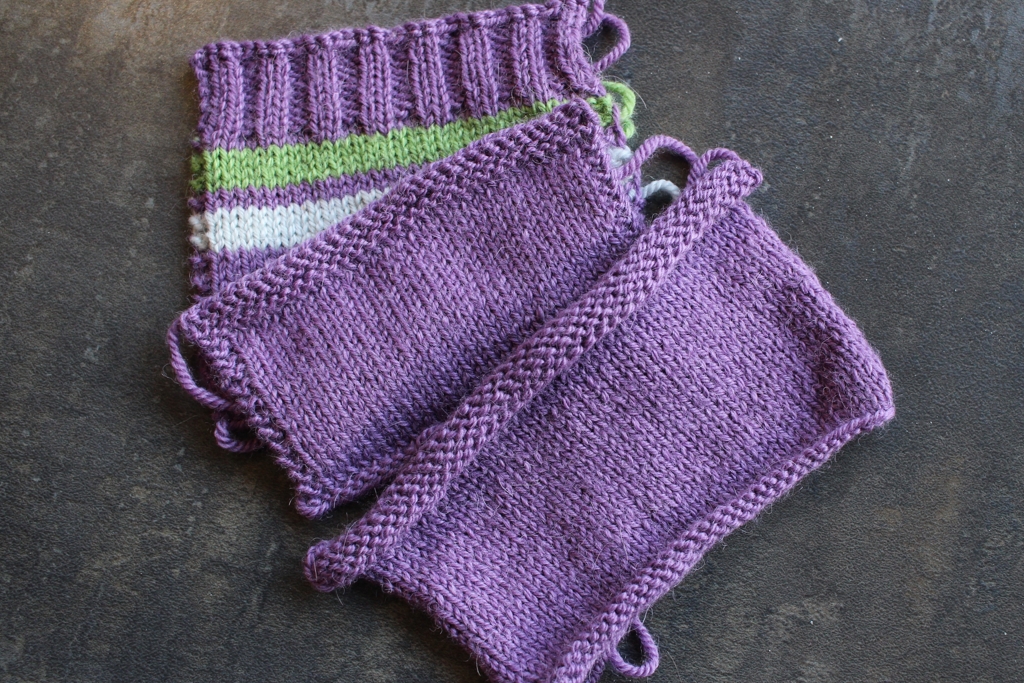
Maybe I should take a break from knitting socks for a bit. This is my second attempt at knitting what I’m calling my Low-Key Halloween Socks. I frogged my first try because my gauge was wildly different from the pattern I wanted to use. This time, I modded the Smokestack Socks to fit my larger stitch count and denser gauge. Seemed to be working well until I noticed my gauge relaxed by a whole stitch per inch. Instead of starting over again, I cast on for the second sock with the smaller stitch count to see if my gauge kept the relaxed 8 sts/in or the denser 9 sts/in. A toe and one repeat in, still 9 sts/in on sock number two and .75” of difference in width. Ugh.

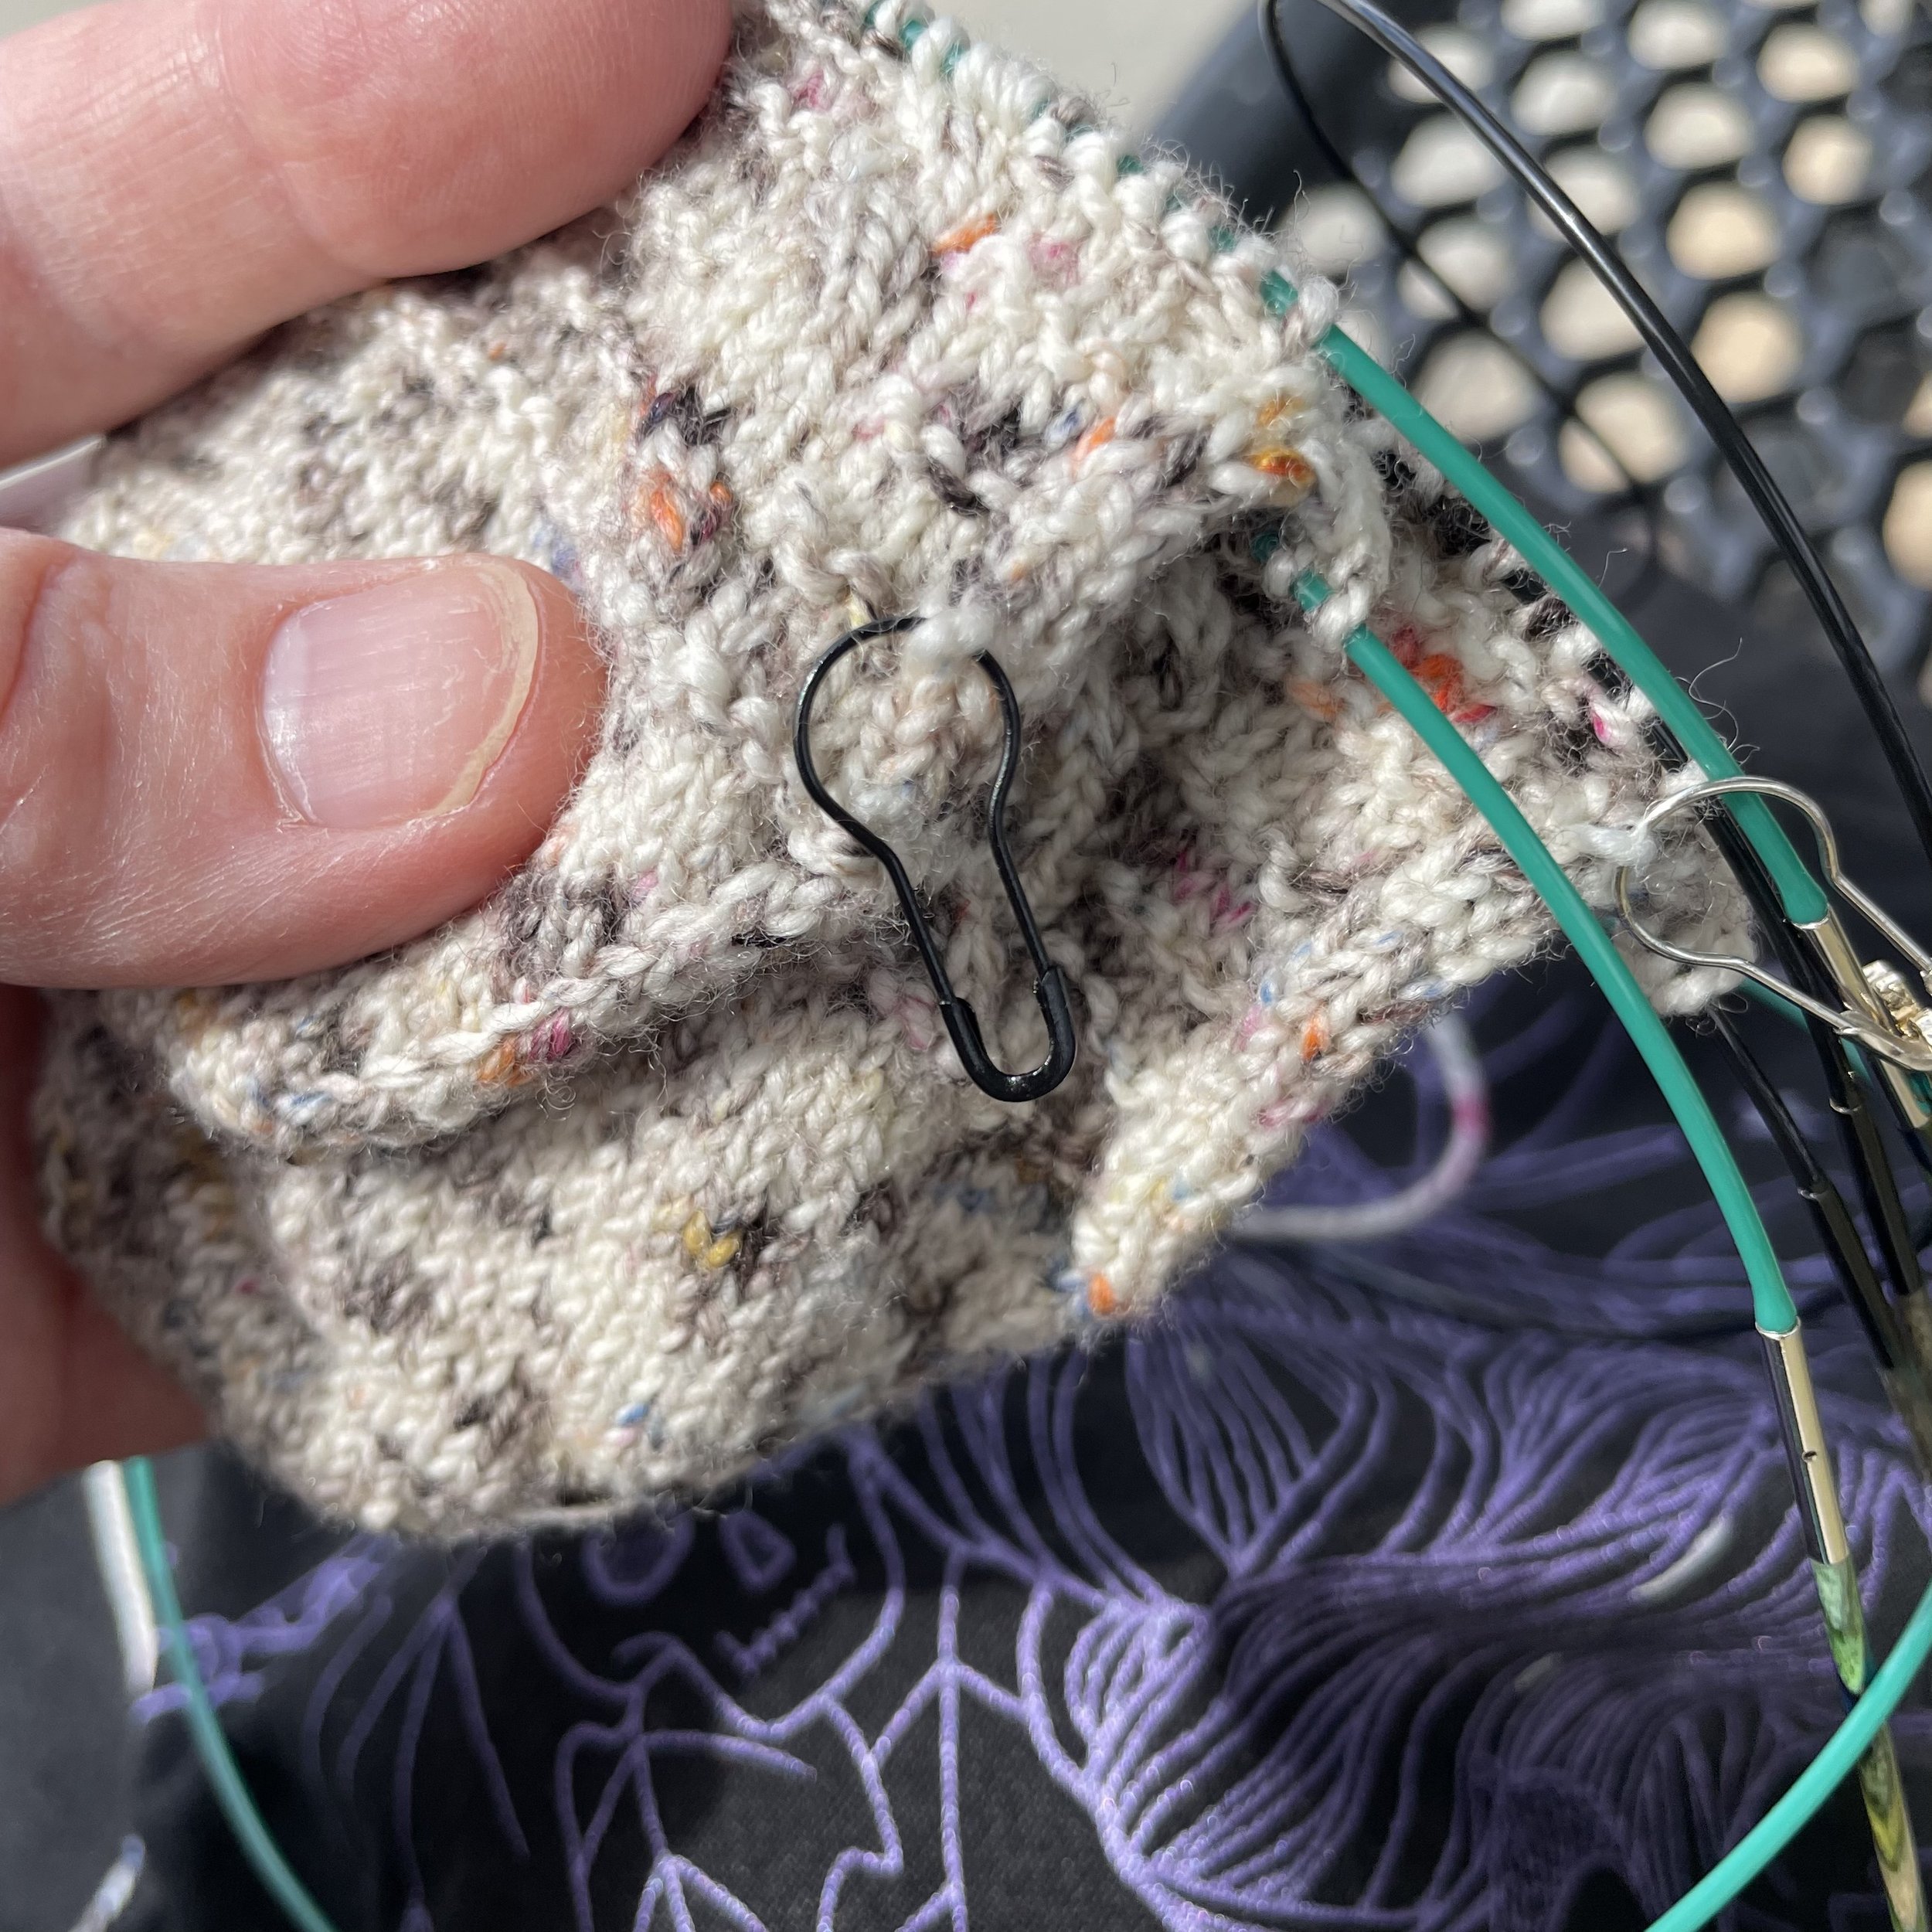
Should I rip the first sock back to the toe or to where it matches a gauge of 9 sts/in? Should I rip the second sock back to the toe and increase until it’s the same stitch count as the first sock? Should I rip it all, put the yarn in time out, and knit Andrea Mowry’s new DRK Everyday Cowl instead? Decisions, decisions.

Hard Reset

The beginnings of a toe-up sock on Circular needles in front of a spooky Project Bag and a Yarn ball.

This yarn and baby sock toe used to be a rather troublesome sock WIP, and there wasn’t even that much of it. Just the toe, an attempt at a little texture, and just enough stockinette to cover the ball of my left foot; however, the mental space the sock occupied was huge. When I cast-on, I did so with the aim of trying out the new-to-me heel of the Vanilla Reversed socks (<-Ravelry link) by Anneh Fletcher. The pair was supposed to be a simple knit, but that definitely didn’t happen. My gauge was nowhere near the pattern’s stitch or row gauge. Since I’d never knit this type of heel before, I had no idea how to adjust the numbers and measurements to make them fit this drastically different gauge. So, the sock WIP went into time out while I puzzled out possible solutions with no success.

One day I put the project bag in a chair when I needed room at the table. Then I just left it there and, basically forgot about it, until I needed to move the chair. I’d see the project bag, get the mental ping asking if I’d figured it out yet, but the answer was always nope. That got old fast and loomed a little larger in my head every time. Never got around to moving the bag somewhere else though.

I eventually had the brain space to poke at this WIP. The answer wasn’t a spreadsheet or a complicated formula. The answer was try the pattern again later with a different yarn that matched the gauge, or at least came close. I still wanted to use this yarn though. So I frogged the whole thing and changed everything except the needles. I’m using a different yet still spooky project bag, a favorite pattern, and a completely new tape measure. The old setup just made me tired and needed a hard reset back to zero. This new bundle makes me excited, and I’m happy to finally have some knitting I can stuff in my purse again.

A Palette Cleanser

On a complete lark at the beginning of November, I challenged myself to knit every day of the month. There were a few close calls, but I always got a few rounds in on something before heading to bed. The challenge helped me cross a few holiday gifts off my list and finish a pair of socks for the Bearded One that just seemed to drag on and on. More on those beauties later.

After finishing all the projects that I could easily stuff in my bag, it was time to start a new one so I wouldn’t break my knitting streak. After spending so long knitting large socks on tiny needles with tiny yarn, I was not ready to immediately start another pair. I needed a palette cleanser that came in the form of a pretty skein of grey DK weight yarn that would be perfect for a pair of house socks for me. One can’t forgot oneself on the gift knitting list after all.

An in progressed hand knit toe-up sock with a messed up stitch pattern

Not wanting to pick the same ol’ stitch patterns I always do, I tried something new with a little bit of texture. Because I’d never knit this particular stitch pattern before, it took me a repeat and a half to figure out that I wasn’t doing it right.

Here’s a helpful tip I was annoyingly reminded of: Always check if the stitch instructions are for knitting flat or in the round.

Yeah. I was following the flat instructions for Seersucker stitch instead of for in the round. Ugh. So I ripped it back to the toe, restarted with the correct version of the stitch, and have since knit three beautiful repeats. They look they’re supposed to even if they are hiding in the grey yarn.

Fun With Tie-Dyed Yarn

I could only pass by the cotton yarn I tie-dyed (you can read all about that multi-step process here) for so long, before I couldn’t resist winding it up into a ball any longer. There had been plenty of time for me to pick out a pattern or two while I waited on this yarn to dry. Over the many years that I’ve been knitting washcloths and kitchen towels, I’ve definitely figured out what I like. Washcloths can be most any shape, lacey, or textured so long as they are just the right size. That sweet spot is about 7” (about 18cm) square. Kitchen towels I like long and narrow (around 8-9” [20-23cm]wide) so I can easily throw them over my shoulder or hang over the oven door handle. Even better if garter stitch is involved. Sounds boring to make, but hear me out. Garter stitch doesn’t curl, makes a thick fabric, and won’t have any annoying gaps in it (assuming you knit it at a tight-ish gauge). Plus, there’s so many ways to make a garter stitch kitchen towel look cool. It doesn’t have to be knit stitch across every row. Try mosaic knitting, entrelac, a log cabin motif, stripes, chevrons, or knitting on the bias. Throw solid and variegated yarns into the mix, and you’ve got a lot of possibilities to make a really great, functional kitchen towel. Didn’t expect to find my soap box just then, but there you go.

A hand holding up a skein of tie-dyed yarn and a ball of ecru cotton yarn.

My plan for this particular skein was to knit the Slip Stitch Dishcloth with this Lisa Frank-inspired skein and the ecru yarn. I’d get to see all the awesome colors, knit something fun from my queue, and use up some stash yarn. That’s all good stuff in my book.

The skein of tie-dyed yarn wound into an equally pretty ball.

I wound the yarn by hand, a rarity for me, and am super happy I did. Even the ball is pretty, which made me even more excited to knit with it.

The first repeat of the Slip Stitch Dishcloth on the needle and sitting next to the balls of yarn.

So I cast on for the kitchen towel and knit the first repeat. And…meh. I usually like pairing a solid color with an over the top variegated yarn, but this just didn’t work. Knitting another repeat seemed like a waste of time which meant it was time to rip out the whole thing. Not even a little sad about it because I had another pattern in mind, The Garterlac Dishcloth(here’s a not Ravelry link). This will be the third time I’ve knit this pattern, and it’s great for showing off variegated yarn. Cast on when I had time to parse the directions and my previous mods. This time around, I’m completely smitten. The yarn gets to shine and I get to knit something really fun.

The first few repeats of the Garterlac Dishcloth on the knitting needles.

Just a few repeats in here and you can already see the ombre start with a deep purple and start fading to a more recognizable tie-die aesthetic.

The almost finished Garterlac cloth with a noticeably curving shape.

I was happy to be knitting this (and I finally got the chance to watch The Bob’s Burgers Movie) that I kept on knitting through the weekend. I had a really hard time putting this WIP down. It wasn’t until I was working the top edge that I noticed something was a little off. Okay, way off. I know knitting can look a little wonky until it gets a good wash, but a trip through the washing machine isn’t going to fix this very skewed kitchen towel. That’s when I noticed this:

A close up of the towel with an outline around the messed up area with an extra square.

See this spot with the star? I added an extra square to one of the rows without realizing which threw off every row above it. Ugh. Explains that weird gap that was bothering me too. The Bearded One votes to leave it the way it is, but I just know that I’m going to go “ugh” every time I see it. I can’t not rip it out. Plus, I’m pretty sure I didn’t quite follow the instructions correctly for the first few rows anyway. And that wobbly side edge is bothering me too. This kitchen towel’s fate is sealed. On the upside, I get to knit this pretty yarn again. Can’t be angry about that. Still irritated about ripping it out though.

The Start of Something New

A curly knitted swatch on circular needles sticking out of an cake of orange yarn.

Ever have your heart set on using a specific yarn for a very specific pattern? I have these past few weeks.

The Balsam Point Cardigan (<Ravelry Link) by Kerri Blumer came across my radar recently, and I love the cropped style and neat details. This sweater is something I’d wear all the time. Since I’m shopping my stash (AKA Yarn Fort) first, I stumbled across three skeins of Araucania Nature Wool in a beautiful orange. I love this discontinued yarn and was happy to finally have something to do with it. There was a problem though. Balsam Point calls for an aran weight yarn, and Nature Wool only claims to be an aran weight yarn. No harm in swatching though, right? Well, it didn’t work out. I got row gauge, but stitch gauge was way off. I’d have to go up several more needle sizes to get close, and the fabric was already looser than I’d like for a sweater. So, this yarn gets to hang out in the stash for a bit longer.

A hand holding up a giant hank of green wool yarn in front of a green brick wall.

The Nature Wool wasn’t the only option in the stash though. I’ve also been hanging on to a couple of skeins of Cascade Eco+ since 2011. Originally, this yarn was going to be an Owls Sweater (<Ravelry link), but there’s not quite enough yardage for that. There’s plenty to swatch and make Balsam Point with a little left over. Wish me luck. If this doesn’t work, I’ll have to dig through the stash a third time for this sweater.

The Start of Something New

A hand holding six bright, colorful mini skeins of yarn.

You ever have a serendipitous trip to a yarn shop? I somehow lucked into one after stopping at a coffee shop that just happened to be right next door to a yarn shop. I promise I didn’t plan it that way. Inside, there were some marvelously bright mini skeins which were perfect for a knitting pattern that had caught my attention. That project: small, easy, color work Christmas ornaments. I know it’s January, just hear me out.

The holidays and the end of 2021 didn’t leave me much space for knitting. Especially not small bite sized bits of color work. So, when I stumbled across the Nordic Snowflake ornament, I was smitten. I imagined little bits of bright, almost neon snowflakes popping out at me from an obviously fake white tree. Add in the fun of color work and the promise of a quick knit, well, I was hooked on the idea.

One ball of charcoal colored yarn lined up next to 6 bright mini skeins.

The only problem was that I don’t have a lot of bright, almost neon colors in my stash. So, lucking across a whole (on sale) selection to choose from absolutely made my day. The kiddo helped me pick out 6 colors and a charcoal yarn for contrast. The next day, she helped me wind the yarn into cakes. It’s a joint project now I guess. :)

Six wound mini skeins sitting in a black rope basket with a ball of charcoal colored yarn.

Some Sock Knitting Woe

An almost finished pair of yellow cabled hand knit socks.

An almost finished pair of yellow cabled hand knit socks.

Gather round (digitally of course) while I tell a tale of woe and sock knitting misfortune. At the center of it all is this pair of socks which the recipient has dubbed the Celtic Waffle socks because the intricate cables remind her of waffles. I’m inclined to agree.

Now these socks are no strangers to ripping. I was a good chunk of the way into the foot of the first toe-up sock when I realized it was too small. So out it came. The second attempt went much better with a larger stitch count even with the long break I had to take in the middle of the gusset. Things were smooth sailing once I got started again. I finished the gusset, turned the heel, knit two full chart repeats, worked some 2x2 ribbing at the top, and bound off. This first sock is a beautiful thing that took a lot of work, planning, and attention. So, not wanting to lose momentum and or take another six months to finish, I immediately started the second sock.

The inside off my sock knitting project bag holding one in progress sock and too little yarn to finish.

The inside off my sock knitting project bag holding one in progress sock and too little yarn to finish.

Sock number two was going great. By this point, I was well past the heel and so happy to be knitting this complicated chart for the last time. Then the yarn started to tangle. Obviously the thing to do was to take the yarn out of my project bag, sort it out, and resume knitting. Instead, I pulled out the yarn, and thought, “Where’s the rest of it?” No amount of shuffling through the papers and accoutrements turned up more hidden yarn or a portal to Yarnia. The rest of the cake definitely didn’t jump out and say, “Surprise! Here I am!” Ugh.

There I was holding a sock that needed three more inches before the bind off in one hand and nowhere near enough yarn to do so in the other. That’s when I figured out just how badly I’d messed up this time. And it was such a simple, but absolutely massive, mistake too. Here it is:

I thought the yarn came in 100g skeins because many skeins of fingering weight sock yarn do. This yarn however came in a 115g skein.

So I could put 57.5g toward a sock instead of 50g. But I forgot all of this when figuring out how tall to knit the first sock. So, when I looked at the grams on the scale, I thought I had way more than yarn to work with than I actually did. And I was so excited to just start that I didn’t way weigh the first sock like I usually go when knitting socks from one skein. That would have been an immediate red flag that something was off. How much yarn did that first sock use? 62 grams. Once again, ugh.

The first finished cabled sock that used way more yarn than I expected.

The first finished cabled sock that used way more yarn than I expected.

I have already decided that I am not ripping out the first sock. The cable would be okay but the leg would be way too short. The sock is just right aside from that whole used too much yarn thing. That means I need to get more indie dyed yarn whenever the dyer dyes more. I haven’t had any luck finding this base in this color for sale or trade anywhere else either. Now I get to play the waiting game for yarn updates.

Now that I’m stuck waiting instead of gleefully finishing this pair, I’m left trying to figure out how to not make this mistake again. I’ll let you in on a secret: this is the second time I’ve done this. That other pair of socks is still waiting for me to unpick the bind off and rip enough out to match both socks. For the third time, ugh.

The mostly finished sock and the little bit of remaining yarn.

The mostly finished sock and the little bit of remaining yarn.

I’ve come up with two things that might help. One, write down how many grams I can put towards each sock in my notes. I keep fairly detailed notes as it is, so this shouldn’t be too hard to remember to do. Two, divide 100g+ skeins in half. I have an accurate scale and scissors so it’s doable. More work upfront (and something I used to do), but better than not having enough yarn to finish a pair or socks.

How do keep your sock WIPs from eating more yarn than you have?

Sweater Weather

An orange ball of yarn and an in progress sweater yoke sit on a table covered in snow. #knittingSweater Weather || withwool.com

The world outside my windows is covered in falling snow for the third day in a row. All that white stuff is really stacking up so what better thing to do than hunker down inside and cast on for a sweater?

This bright orange number is for the Kiddo and she picked out the color herself when we went to Yarn Fest 2019. The festival was a few months ago, but I can tell she still likes the color because she would not stop staring at it while I knit through breakfast. Maybe the color means she’ll like wearing it more than any of the hats I’ve made her? A mom can dream.

An orange ball of yarn and an in progress sweater yoke sit on a table covered in snow. #knittingSweater Weather || withwool.com

The pattern is In Threes: A Baby Cardigan which has only been in my queue since 2011. I’ve been waiting for the right time to knit it which is apparently right now. The sweater’s simplicity and size make for quick knitting and very noticeable progress. It is also really nice to have something easy to knit during the day when I’m keeping an eye on an inquisitive toddler.

The other reason I started this sweater was because I finally wrote up my Christmas knitting plans. There, I wrote the dreaded words: Christmas knitting. Oh, there they are again. Though, in my case, this end of year dash should probably just be called “Stuff I Want Done Before 2020”. Hmm, not as catchy. There is some holiday knitting on said list, but it’s mostly a bunch of unfinished projects like 70% knit socks or long lingering hats. This sweater made the list because I wanted to knit Kiddo a Fall sweater. Looks like it might be a Winter sweater now though. Guess I better keep knitting.

An in progress orange sweater yoke being held up in front of a snow covered cityscape. #knittingSweater Weather || withwool.com

Sideways Swatching

I don’t always swatch for hats which means I sometimes end up ripping out the first few inches because the hat is comically too big. It’s not a big deal because I know it’s an easy fix to rip out and start over with a few less stitches. The hat I’m knitting this time though is a little different. Instead of working in the round from the bottom up, Cattywampus is worked sideways, on the bias, with short rows. Ripping out because it’s too big or too tall is not an easy task. You better believe I swatched.

A close up view of a red, white, and black knitted swatch soaking in the sink.Sideways Swatching || withwool.com#knitswatch #darkmatterknits

The reason for working side-to-side is that I’m making a hat that resembles the flag of Trinidad and Tobago for a friend. I’m not keen on working intarsia, especially intarsia with cotton/linen blends, and working sideways was the easiest way to pull off the diagonal stripes. I worked two sections of the short row crown shaping with all three colors. My gauge was right on the money, and I’m really hoping the swatch wasn’t lying to me.

Red, white, and black swatch dry with ends hanging out.Sideways Swatching || withwool.com#knitswatch #darkmatterknits

The other reason I swatched was to see if the colors would bleed. I only have enough yarn to make one hat and it would be really aggravating if the red and black dye bled on the white stripes. After 20+ minutes in a warm soak with Eucalan, the water was still clear without the faintest tint of red. The problem came when I squeezed water out of the swatch. You can just see the the barest pits of pink where the red and white yarn got squished together. Hmmm…

My hope is that if I squeeze out the water in a different way that the colors won’t bleed. Maybe that’s just wishful thinking. Do you have any tips or recommendations for soap that would stop the excess dye in its tracks?

A partially knit hat in red and white with short row crown shaping and a provisional cast on.Sideways Swatching || withwool.com#knitswatch #darkmatterknits

I did start the hat, and worked several repeats. I was almost done with the black stripe that I added after taking this photo. Yarns had been cut and most of the ends woven in. Then I noticed a rather aggravating issue. The short rows slope in the opposite direction of the flag’s diagonal stripes. The only fix is ripping out, reworking the pattern to slope in the opposite direction, and casting on again. Ugh. Looks like I get to restart this hat despite my best efforts.

Yarn Chicken Shawl

As a happy birthday gift to myself I finally wound the yarn to knit a Free Your Fade shawl by Andrea Mowry. Dyed by Sun Valley Fibers, the colors are earthy and lovely. The merino/cashmere/nylon blend has been a joy so far. I really enjoyed casting on and knitting the first few repeats during a day trip to Rocky Mountain National Park. However, this shawl is going to be more stressful to knit than I originally thought. Why? I have already played yarn chicken and lost on the first fade!

Ran out of yarn with just a few stitches left in the row. Sock yarn leftovers to the rescue! Yarn Chicken Shawl || withwool.com

I was tracking how much yarn I used every repeat (small digital kitchen scales (<<— affiliate link!*) are awesome for this) and estimated I’d have just enough yarn to finish Color 1. I was right except for the 26 stitches left at end of the last row. Bah. It was late so I went to bed instead of ripping back.

Ran out of yarn with just a few stitches left in the row. Sock yarn leftovers to the rescue! Yarn Chicken Shawl || withwool.com

Getting some sleep turned out to be the best option because, in the morning, I remembered all the leftover sock yarn I have stashed away. Maybe I could find some that matched? Turns out that I did have something close, and can’t tell the difference between the two in the shawl. The extra ends are the only sign I had to take drastic measures. Whew!

Ran out of yarn with just a few stitches left in the row. Sock yarn leftovers to the rescue! Yarn Chicken Shawl || withwool.com

I’m going to rename the shawl Yarn Chicken because, while I have the required amount of yarn, all six colors are the same yardage. Those rows are only going to get longer and longer too. I did find a few other matching leftovers so I do have some insurance, but knitting this is going to be...interesting. The scale and a spreadsheet will be my constant companions.

*This post contains an affiliate link which means, if you decide to buy through that link, I’ll get a small commission. Thanks!

The Shawl That Bronchitis Gave Me

The Curve of a Boat shawl has been a great distraction from all the coughing. | withwool.com#knitting #knitshawl #hedgehogfibers

I’ve got a piece of paper on my desk that lists most of my current knitting projects. Well, the projects with a deadline or just what I want to be done with already. Said list is about half completed - never mind that I wrote it the end of January - and it’s time to finish the last few lingering things so I can get back to a clean slate.

And yet, I’ve been feeling the urge to cast on for a new shawl. Or a blanket. Or a pair of vanilla stockinette socks. Something rhythmic to accompany the random minutes of free time that are scattered throughout the day and after dinner. I have pretty new yarn ready to be knit into a gradient shawl and plenty of sock yarn too, but no pattern called my name. So I stuck to the knit list. I’ve got a finished hat and an updated pattern to thank for it too.

The Curve of a Boat shawl has been a great distraction from all the coughing. | withwool.com#knitting #knitshawl #hedgehogfibers

Then two things happened. I came across the Curve of a Boat by Larissa Brown, and it was just what I was looking for. Clean lines, simple lace, and interesting details. I bought the pattern the day it came out which I hardly ever do anymore. That’s how much I wanted to knit this shawl. The second thing that happened was that I got bronchitis. Coughing up my lungs and everything else for a week straight sapped my willpower. So, hello new shawl. Fingerless mitts, I will get back to you soon.

Curve of a Boat and I are still very much in the newness of our relationship. I’m enjoying the short and sweet repeats that are slowly building a lovely foundation for the lace that is to come. The rows, even though they’re short, do require my attention because of all the slipped stitches and paired increases and decreases. The knitting is challenging in the best way because I have to keep up with someone else’s instructions instead of writing my own. It’s a nice change of pace. Along side the medications, this shawl has been so helpful to my recuperation. It’s a good distraction from all the coughing.

The Curve of a Boat shawl has been a great distraction from all the coughing. | withwool.com#knitting #knitshawl #hedgehogfibers

Plus, I get to admire this yarn. The yarn itself is loosely plied so I have to be careful not to split it during the more complicated stitches, but this subtle color is keeping me hooked. The blips of green, brown, and red hiding in the dark magenta are enchanting. It sounds so weird written out, but the combination completely works on the needles. What a sweater this would be! I’m glad to have it as a shawl though because it’s a perfect match to my favorite green jacket.

I’m really looking forward to working on this project during the drive to Estes Park Wool Market over the weekend. Here’s hoping the bronchitis won’t be coming with me.

Yarn, Knitting, and #The100DayProject

#The100DayProject is helping me feel like myself and remember what I like so much about yarn. | withwool.com

#The100DayProject, a project dedicated to 100 days of whatever you choose, kicked off earlier this month, and I decided to join last minute. I’ve tackled this project in previous years with the goals of daily art, and spinning. For this year’s project, I wasn’t sure what I wanted to commit 100 days to. All I knew was that I was so bored of starring at my phone when I plopped on the couch at the end of the day after putting the Mini to bed. I wanted to do something or make something instead of endlessly scrolling through whatever or playing another game for the Nth time. So there was my project. My goal for 100 days was to put down my phone and make something. It’s been an interesting and fun change of pace. I haven’t done a great job of posting my daily progress online (mainly because it’s already after 11PM when I’m done), but I have put down my phone to make tasty desserts, write tutorials, take photos, pick out buttons, and knit lots.

#The100DayProject is helping me feel like myself and remember what I like so much about yarn. | withwool.com

#The100DayProject might be bringing back my knitting mojo. I returned to a pair of floundering socks for the Bearded One. I finished a pair of slippers, and now just need to sew on 12 buttons. The main project that I’ve devoted the past few days to is a new sweater for the Mini. She’s almost outgrown the first sweater I made her, and I want something she can wear through the Summer and into Fall. All of my perusing through Ravelry for baby stuff while I was still pregnant left me with lots of options to choose from. I picked out three sweaters and first up is Marigold Fields by Taiga Hilliard I had the yarn and the pattern already, but the 100 Day Project gave me the kick I needed to actually start. Casting on turned out to be harder than expected because I couldn’t get a fabric I liked at the required gauge. So I came back the next day to figure out how to make the yarn and pattern work together.

#The100DayProject is helping me feel like myself and remember what I like so much about yarn. | withwool.com

And here we are now. The lace yoke is finished. The arm holes are bound off. My mods went off without a hitch. Now I’m zooming through the body with 3” left before the bottom edge. I’m making the 2T size which will probably be a bit big for her right now, but should hopefully fit her for a long time.

I’m glad I committed to #The100DayProject after taking a break from it last year. It’s helping me feel like my old self and remember what I like so much about yarn. Anyone else tackling the Project with me?

A Long Overdue WIP

After years of waiting, I finally cast on a pair of slippers for myself. The first one is so cosy! #knitting | withwool.com

Have you ever not started a knitting project because of the inertia of your couch? I have, last Saturday in fact. That morning I decided it was finally time to cast on for a pair of slippers while it was still cold outside, and I was going to do it that night. My cold feet have pleaded with for a pair of slippers for long enough. Later though, after putting the Mini to bed and cleaning up the kitchen, I plopped down on the couch and did not want to get back up. Printing the pattern, finding the yarn, and digging out the right needles seemed more like work than fun. The couch and a very cozy blanket had me trapped. So I watched a movie instead.

After years of waiting, I finally cast on a pair of slippers for myself. The first one is so cosy! #knitting | withwool.com

Sunday was a different story. I pulled out everything I needed before the end of the day when the couch sings its siren song. Casting on felt so good. I’m making the Prairie Boots by Cocoknits and using Malabrigo Chunky. The first slipper is speeding along too thanks to the bulky yarn. I finished the first sole and a good chunk of the foot that afternoon. Over the past few days I’ve finished the foot and am speeding my way up the leg. A single row squeezed in during the odd moments of the day really adds up.

After years of waiting, I finally cast on a pair of slippers for myself. The first one is so cosy! #knitting | withwool.com

I couldn’t resist trying it on and the slipper is as cosy as it looks. There will be no cold feet here…just as soon as I finish the second one. And pick out the right buttons. And sew on the suede bottoms. Okay, so it might be awhile before my feet get to bask in the warmth that is this pair of slippers, but it’ll be worth it. I’ve waited at least a year to pick out a pattern so a few more weeks is nothing my toes can’t handle.

After years of waiting, I finally cast on a pair of slippers for myself. The first one is so cosy! #knitting | withwool.com

Knitting A Gauge Swatch That Tells The Truth: The Results Are In

The sweater is washed and blocked. Did the different method of swatching tell the truth? Is my sweater the same size it was before washing? Yes and yes!&nbsp; #knitting | withwool.com

I knit myself a sweater a few years ago and did all the things a “good” knitter is supposed to do. I knit a reasonably sized swatch on the same needles I was going to use for the sweater. I washed and blocked the swatch the same way I was going to wash and block the sweater. I liked the results and got gauge, so I cast on for the real thing. Said sweater was cute and fit perfectly until I washed it. Instead of the cute cropped cardigan I wanted, I ended up with an oversized sweater that I still wore and enjoyed. So not a total loss, but not really a success either. Blasted lying swatch.

Then a few months ago, I read an article which helped explain why my swatch didn’t react the same way as my sweater when it hit the water. Seeing as how I was about to knit a baby sweater, I decided to try out this different swatching method that skipped the garter edges and blocking pins for what seemed like very logical reasons. You can read all about the swatching attempts here and an update from when I was halfway though the sweater here.

A few notes before we get down to the knitty gritty: I did not knit this sweater all at once, but in bits and pieces over a few months. I knit it while watching tv and not watching tv. I knit it on the same needles I swatched with. I knit it when I was tired and when I was wide awake. I can’t remember if I knit it on road trips. All of this is too say that my gauge had the opportunity to change a lot during knitting even though the sweater was stockinette.

The sweater is washed and blocked. Did the different method of swatching tell the truth? Is my sweater the same size it was before washing? Yes and yes!&nbsp; #knitting | withwool.com

I measured the stitch/row gauge and overall dimensions before dropping the sweater in the bath. Here are the numbers:

  • Stitch/row gauge (measured across the back): 29 sts and 38 rows = 4”
  • Stitch/row gauge of washed and blocked swatch: 28 sts and 37.5 rows = 4”
  • Sweater measurements across chest: 9.75”
  • Sweater length from neck cast on to body bind off: 11.5”
The sweater is washed and blocked. Did the different method of swatching tell the truth? Is my sweater the same size it was before washing? Yes and yes!&nbsp; #knitting | withwool.com

I washed the sweater the same way as the swatch. I soaked them both in cool, soapy water (I like unscented Eucalan (<<— affiliate link!*)) for 20 minutes. I rolled them in a towel and squeezed out the excess water. Then I laid them flat to dry without pinning them down (this is one of the important parts of this swatching method). The only change I made when blocking the sweater was gently pulling the button bands and collar into place to make them lie flat and even up both sides. See what a difference blocking made to how neat and even the stitches look? After the sweater dried, this is what I found:

  • Stitch/row gauge (also measured across the back): 28 sts & 38 rows = 4”
  • Sweater measurements across chest: 10.25”
  • Sweater length from neck cast on to body bind off: 11.75”

Wow! The only gauge difference between the washed and blocked swatch and the washed and blocked sweater was half a row over 4”. The chest measurement changed too, but the stitch gauge changed to match the swatch so I’m calling it true. Overall, the length of the entire sweater only changed by .25” which could have happened for several reasons - me tugging out the edges, the ribbing growing, etc. I’m not worrying over an extra .25” on a baby sweater.

I also measured the sleeves. Their length and diameter stayed the same; however, I’m not counting this info towards the swatch experiment because they were knit in the round and not flat like the swatch.

I’d say this method of swatching - skipping the garter edging and not pinning the swatch into a rectangle - is the most accurate and truthful method of swatching I’ve ever tried. You can read about the full method and why it it works here. It’s definitely how I’m going to swatch for all my future sweaters and anything else that has to fit. Definitely give it a try.

I’m looking forward to seeing how truthful the swatches are when I knit a sweater for myself. I suppose that will be the true test, and I’m more than willing to give it a shot.

The sweater is washed and blocked. Did the different method of swatching tell the truth? Is my sweater the same size it was before washing? Yes and yes!&nbsp; #knitting | withwool.com

*This post contains an affiliate link which means, if you decide to buy through that link, I’ll get a small commission. My opinions are unbiased, my own, and formed after years of use. I wouldn’t recommend this soap if I didn't think it worked. Thanks!

A Little Studio Reorganization

I reorganized my studio with the help of some stacking shelves. | withwool.com

I’ve been feeling the itch to reorganize my studio space for months. I stared at it all for a bit before moving on to measuring and mentally rearranging all the furniture. Unfortunately, nothing drastic was going to happen without moving furniture to a different room which just wasn’t an option. But, I wasn't completely out of luck because I was able to stack a second shelf on top of one I already had. That little bit of extra storage space has made all the difference.

I’m not done rearranging, clearing out the clutter, and moving stuff around, by my studio feels so much cleaner and better organized. No more random piles of stuff shoved into corners. Yarn Fort can actually be Yarn Fort instead of a stack of all the things. The tip top shelf is the new spot for all my WIP’s and in-progress designs. My craft supplies, sketchbooks, and art supplies have a designated space that I can get to without moving other stuff out of the way first. And I have some extra shelf space to work with too. It’s great. The only downside of this new setup is that I haven’t figured out where to put the drum carder. It can’t chill on the couch for much longer.

It’s been awhile since Yarn Fort made an appearance, so here’s the stash in all it’s 5’ 7” glory. That’s 1.7 meters for my metric friends. While Yarn Fort hasn’t gotten noticeably smaller since 2016, it is better organized at least.

I reorganized my studio with the help of some stacking shelves. | withwool.com

A Solution to WIP Overwhelm

Feeling overwhelmed and stuck in your #knitting projects? Try working on them 20 minutes at a time. | withwool.com

Normally, I’m a knitter and spinner that has a lot of projects going at any one time because what I want to work on changes. I’ve got simple projects for autopilot knitting, small projects for travel knitting, and complicated projects for a challenge. The large number of these different project usually doesn’t bother me. Usually. At the moment though I’m feeling rather overwhelmed by them all. There’s the baby sweater that’s also a gauge swatch experiment. There’s the shark that still needs a sweater. There’s unfinished gift knitting leftover from the holidays. There’s a bunch of alpaca singles waiting to be plied. There’s all the knitting patterns that I’m in the middle of designing. And never mind the general day-to-day routine and work and projects that aren’t fiber related. Being stuck in the middle of all these different projects with all their deadlines has been weighing me down. So, last week, I took a break to watch tv, waste time online, and play games. The down time helped me think.

Feeling overwhelmed and stuck in your #knitting projects? Try working on them 20 minutes at a time. | withwool.com

The only way to finish these all these different projects is by focusing on just one of them at a time. Rushing to do bits and pieces on 20 things at the same time is just dragging things out. So I’m picking the baby sweater to work on until it’s done. While I can’t finish it in a night, the sweater is the closest to the finish line of everything. Plus, I didn’t have to tackle a bunch of other to-do’s first in order to get back to knitting.

Still, this grand decision didn’t make it any easier to get going again. Being in “the middle” is a slog. When I need a kick in the butt to get to work, I use the pomodoro technique to help me focus. The technique boils down to 20 minutes of work followed by a short break. And repeat. That’s it. I use an app called Focus Keeper which lets me set the length of my work sessions, breaks, repeats, and tailor lots of other nifty options. I use it when I need to get to work or just don’t want to do something necessary, like cleaning the bathroom.

Feeling overwhelmed and stuck in your #knitting projects? Try working on them 20 minutes at a time. | withwool.com

This time I used the app for my knitting. All I had to do was work on the sweater for 25 minutes. After that, I could stop or keep going. Surprise, surprise - I kept going and finished the decreases on the first sleeve. I’m glad I had the timer to keep me accountable because I would have put the sleeve down halfway through otherwise. Figuring out how to work jogless stripes that happened in the same spot as the decreases while I kept track of rounds and carried the other colors up the sleeve took all of my attention.

Feeling overwhelmed and stuck in your #knitting projects? Try working on them 20 minutes at a time. | withwool.com

I’m pleased with how the sleeve turned out except for this hole where I started knitting again. Picking up a stitch at the beginning and end of the round did nothing. I’m going to sew it up with a yarn tail when I weave in the ends. Do you know any tips or tutorials so this hole doesn’t happen on the second sleeve?

Feeling overwhelmed and stuck in your #knitting projects? Try working on them 20 minutes at a time. | withwool.com

Oh, I picked up some buttons too! I found these cute little wood hearts at my local yarn shop. They’re a cute match, and I’m glad they’re the right size since I had to guess if they'd fit.

There’s still a good chunk of knitting to do on the sleeves before I can get to washing and blocking this baby. And I’m going to keep using the timer because it’s helping me get through the slog. Maybe it’ll become a daily goal of one 25 minute session until the sweater is done and buttoned. If you’re stuck in the middle like I am, give the pomodoro technique a try. Even 5 or 10 minutes will get you closer to the finish line and out from under the overwhelm.

A Gauge Swatch Update and Yarn Chicken

Want to know if you’ve got enough yarn for your #knitting project? Here’s a simple way to find out. | withwool.com

I’ve been working on the Pacific Coast sweater for the past week. The “just one more row” litany has been good motivation to keep knitting. After regularly checking that the stitch counts were correct, I finished the raglan increases and put the sleeves on waste yarn. Now my little WIP is finally starting to look like a cute sweater! And I’m loving the stripes more and more with every row.

Since I’m using this sweater is part of a little swatching experiment, which you can read all about here, here’s an update. The sweater is about 6” from cast on to my current row, and my gauge has remained consistent across the entire length and width. Said gauge still matches up with swatch #3, the un-pinned chunk of stockinette. I was curious if the switch to working fewer body stitches would change my gauge after the constant increasing of the raglan. So far, no.

Want to know if you’ve got enough yarn for your #knitting project? Here’s a simple way to find out. | withwool.com

One thing that has been nagging me though is if I have enough yarn to knit all the stripes. I’ve got plenty of purple, but only one ball each of the green and grey. And I really don’t want to buy more. Before casting on, I made sure I had the required yardage, but I still couldn't help but wonder if I’m playing yarn chicken. So I’m falling back to my tried and true method for estimating yardage.

Want to know if you’ve got enough yarn for your #knitting project? Here’s a simple way to find out. | withwool.com

Step 1: Weigh the yarn ball in grams (the math is a lot easier in metric). I’ve got 35g of light grey.
Step 2: Knit a 4 row stripe and weigh the yarn again. Now I’ve got 32g of grey which means each 4-row stripe uses about 3g of yarn.
Step 3: Now it’s time to make math work for me. I’m knitting 10 more 4-row stripes so I’ll need a total of 30g of green and grey combined to finish the body. I’ve got 70g which leaves plenty of yarn to knit both the body and the sleeves. Definitely not playing yarn chicken and I’m rather pleased about that.

P.S. If you're not working by the stripe, work by the inch or centimeter and with the final length of the project instead. 

This is a simplified version of how I usually calculate and estimate yardage. I’ve written up a tutorial for the more detailed method which you can find here.

Now that I’m not worried about running out of yarn, I can get on with the rest of this sweater and enjoy the knitting. And since this is made with fingering weight yarn, there’s lots of knitting to enjoy.    


Knitting A Gauge Swatch That Tells The Truth

#Knitting a gauge swatch is an important first step in making a sweater. So how do you make an accurate swatch? | withwool.com

This year’s knit list includes a sweater or two because I haven’t made very many of them, and I want to change that. I’ve only knit 1 sweater for myself in the *ahem* decade+ since I first learned to knit. It was the Amiga sweater, and it was cute and just the right size until I blocked it. Afterwards it was still cute, but had turned into an oversized cardigan. I definitely wore it, but it wasn’t what I set out to make or wear. I did all the things the knitting police said you’re supposed to do: knit a big swatch, used the same needles, and blocked the swatch the same as the finished sweater. I got gauge, or so I thought, but the swatch didn’t tell the truth. So for this first sweater of 2018, I’m taking a more rigorous and experimental approach to swatching. Instead of making just one swatch, I made three.

#Knitting a gauge swatch is an important first step in making a sweater. So how do you make an accurate swatch? | withwool.com

For swatch #1 I cast on enough stitches to equal 4” and a little extra for a garter stitch border. I added stripes as in the pattern and a section of 2x2 rib knit on smaller needles.  Then I washed and blocked the swatch the same way I would the finished sweater. The square was a little uneven at the sides so I pinned it out to straighten the edges. This first swatch answered a few different questions.

Would the dye bleed between the different colors? No.
Would I like knitting the fabric on the needles I had? Yes.
Would I like the fabric after washing and blocking? Yes
Did I like the stripe pattern? Yes
Did I have the right needles to knit the ribbing at a tighter gauge? Yes.
Did I get stitch and row gauge? No, my gauge was off on both counts.

#Knitting a gauge swatch is an important first step in making a sweater. So how do you make an accurate swatch? | withwool.com

With swatch #2 I was only trying to answer the gauge question. So I went down two needle sizes and tried again. Same stitch count. Same garter border. Same blocking method. This time my gauge was too tight. And I didn’t like the finished fabric - too stiff - or knitting it.

#Knitting a gauge swatch is an important first step in making a sweater. So how do you make an accurate swatch? | withwool.com

I didn’t cast on for swatch #3 right away because I didn’t have the right size needle. My needle collection has been lacking a 3mm circular for years and this was project the first reason I had to buy one. In between refreshing the package tracking, I happened to read this article on how to knit accurate swatches and how to keep them from lying to you. Contrary to a lot of what I’d read up to this point, the advice was to skip the garter stitch border and not pin the swatch at all during blocking. The article is definitely worth the read and explains the why’s behind all of these tips.

So I switched things up and followed the advice in the article: skipped the border, worked 6” worth of stitches instead of 4”, and plopped a swatch of stockinette in the sink to soak. I didn’t pin it out or even try to control the roll as it dried. Know what? I finally got both stitch and row gauge. The fabric was nice to knit and has good drape. Win win.

So why do I “trust” this method of swatching to tell the truth? It’s given me numbers and measurements that didn’t require pinning and pulling on the fabric. Plus, the accuracy for swatches knit with borders and pinned is far from 100%. There’s no reason to not try it out. And if the sweater does grow, at least it’s a baby sweater and a little extra room isn’t a bad thing. 

#Knitting a gauge swatch is an important first step in making a sweater. So how do you make an accurate swatch? | withwool.com

Since it seemed like I made an accurate swatch, I finally cast on for that sweater. It’s the Pacific Coast baby cardigan by Gabrielle Danskknit. It starts at the neck with a bit of ribbing before moving on to the stripes and raglan increases. My gauge is spot on. There’s still a lot of knitting to do before this beauty gets the blocking treatment, but I’ll let you know if gauge swatch #3 lied or told the truth.

17 Fiber Arts Things That Made 2017 Great

I’ve enjoyed making lists since I was kid and I don’t see that changing any time soon. I wanted to write up a 2017 review, but couldn’t muster up the energy or motivation to write about in paragraph form. So, I’m taking a page from Austin Kleon’s blog and making a list of the knitting and spinning that made 2017 great. Somehow the 2017 list was 17 items long without any extra help from me.

All the #knitting and #spinning that made 2017 a great year. | withwool.com

1. The Bearded One and I going to our first fiber festival, Estes Park Wool Market.

2. Completing 100 Days of Spinning where I spun and worked with handspun yarn for almost all of those 100 days.

3. Putting in the work to design more knitting patterns. Most of them didn’t make it past the layout stage, but they’re so close to being released in 2018.

All the #knitting and #spinning that made 2017 a great year. | withwool.com

4. Releasing the Melded Scarf, a free pattern for a striped reversible scarf, in February.

5. Knitting a Boneyard shawl with my own handspun yarn.

6. Mostly staying on the sheep and being more conscious about my yarn and fiber buying. The stash is still worthy of the name Yarn Fort, but it hasn’t taken over any more space.

All the #knitting and #spinning that made 2017 a great year. | withwool.com

7. Spinning along with Tour de Fleece for the 5th row in year.

8. Pushing my spinning boundaries to try new batts and more textured yarns.

9. Going to Interweave Yarn Fest.

10. Finally playing around with the drum carder and figuring out how to use it.

All the #knitting and #spinning that made 2017 a great year. | withwool.com

11. Digging into my fiber stash and spinning a beautiful gradient from one giant batt. 8 matching skeins!

12. Taking my first ever spinning class about different ways to spin color with Maggie Casey.

13. Going to meetings and being a member of my local fiber guild.

All the #knitting and #spinning that made 2017 a great year. | withwool.com

14. The KIS hat and Mosaic Sisters patterns being used to teach classes on color work and mosaic knitting respectively.

15. Getting a whole room to use as my studio where I can work and get to all my art supplies, yarn, books, and notions. Wanted this for years so it’s great, but scary too.

16. Developing a new appreciation for hats knit with fingering weight yarn.

17. Wearing and enjoying my own hand knits. And seeing the Bearded One wearing and enjoying his hand knits too.

A Half-Finished Hat

Cables, owls, and beautiful yarn make a hat that’s hard to put down. #knitting | withwool.com

I’ve been planning and working on other projects this past week, but the Owl In The Thicket hat has been my go-to knitting. The complicated chart means it’s not great for travel knitting so I’ve been using it as reward knitting instead. Got 5 minutes before the next pomodoro timer starts? Put a round on the hat. Crashing on the couch at the end of the day with some tv? This WIP is going to be in my hands. At first glance the chart and instructions look really complicated, and they do require attention. The secret is that the hat is worked in bite-sized repeats which makes even complex rounds doable. So all those random chunks of time have added up rather quickly. Knitting to see the owls and leaves appear in the stitches might have had something to do with it too. I’m not far from the crown decreases when I was sure that I’d be working on this hat for at least a month instead of a few weeks.

Cables, owls, and beautiful yarn make a hat that’s hard to put down. #knitting | withwool.com

While I love the complexity of this pattern, the yarn is another big reason that I’m enjoying this knit. For once I’m actually using the recommended yarn, Anzula Cricket. It’s a DK weight yarn and a blend of merino, nylon, and cashmere. It is wonderfully soft and feels great moving through my fingers. Plus it was a lovely luster and a semi-solid dye job that I really love. The yarn adds interest to the pattern without detracting from it.

Working on this hat has also come with one unexpected benefit. It’s given me a perfect opportunity to practice cabling without a cable needle. There are lots of different cable twists, even on the same rounds, but they’re all easy to do. The hardest part was just getting all the symbols straight in my head. After a few dozen rounds, I have twisting cables without a cable needle down pat. Those complicated sections are definitely going a lot faster without that extra needle in the mix.

Cables, owls, and beautiful yarn make a hat that’s hard to put down. #knitting | withwool.com

I missed my chance to wear this hat during the most recent snow fall, but it was also nice to work on this project and watch the snow coming down. Pretty sure the hat will be ready for the next storm though at the speed I'm going .