New Pattern: The Old Friend Hat

Old-Friend-Hat-Side-View.jpg

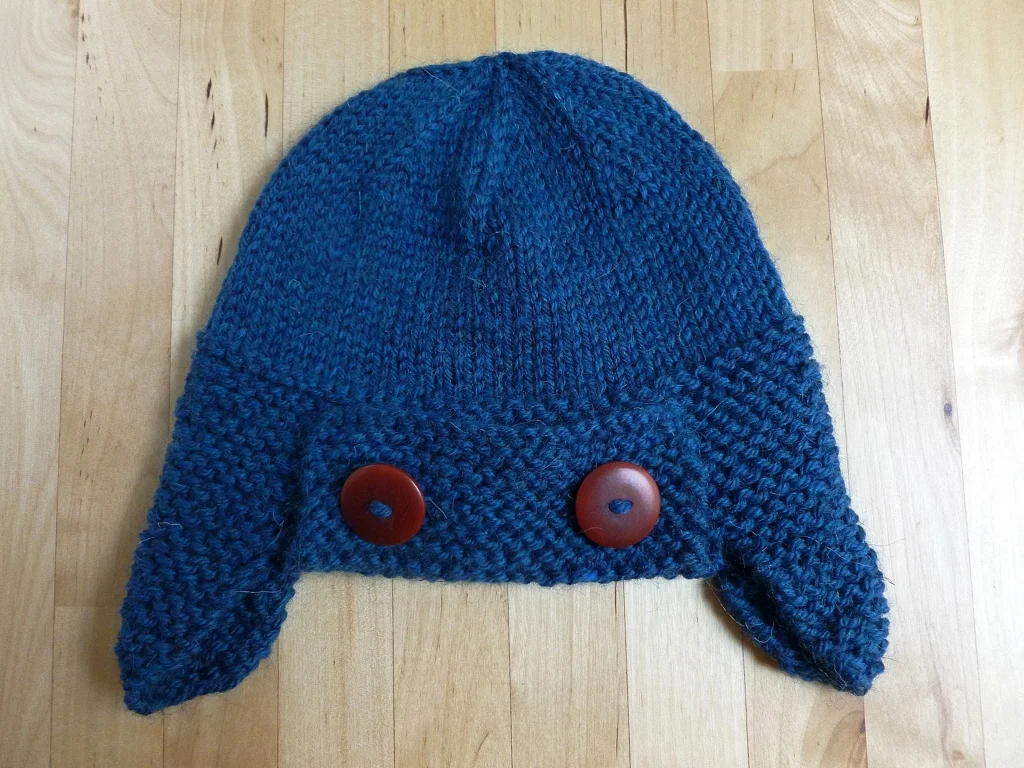
It all started with a hat I knit for the Bearded One nine years ago. He saw a hat he liked on an old British tv show from the 70’s*, and said he would totally wear a hat like that. I, a knitter with a little too much time on her hands, said I could make that happen. After taking a few screen caps, I got to work. The hat wasn’t an exact recreation since I had to guess at some of the details, but it was close and a big success. He wore that hat everywhere and usually kept it in his back pocket just in case he’d need it.

Old-Friend-Hat-Crown-Portrait.jpg

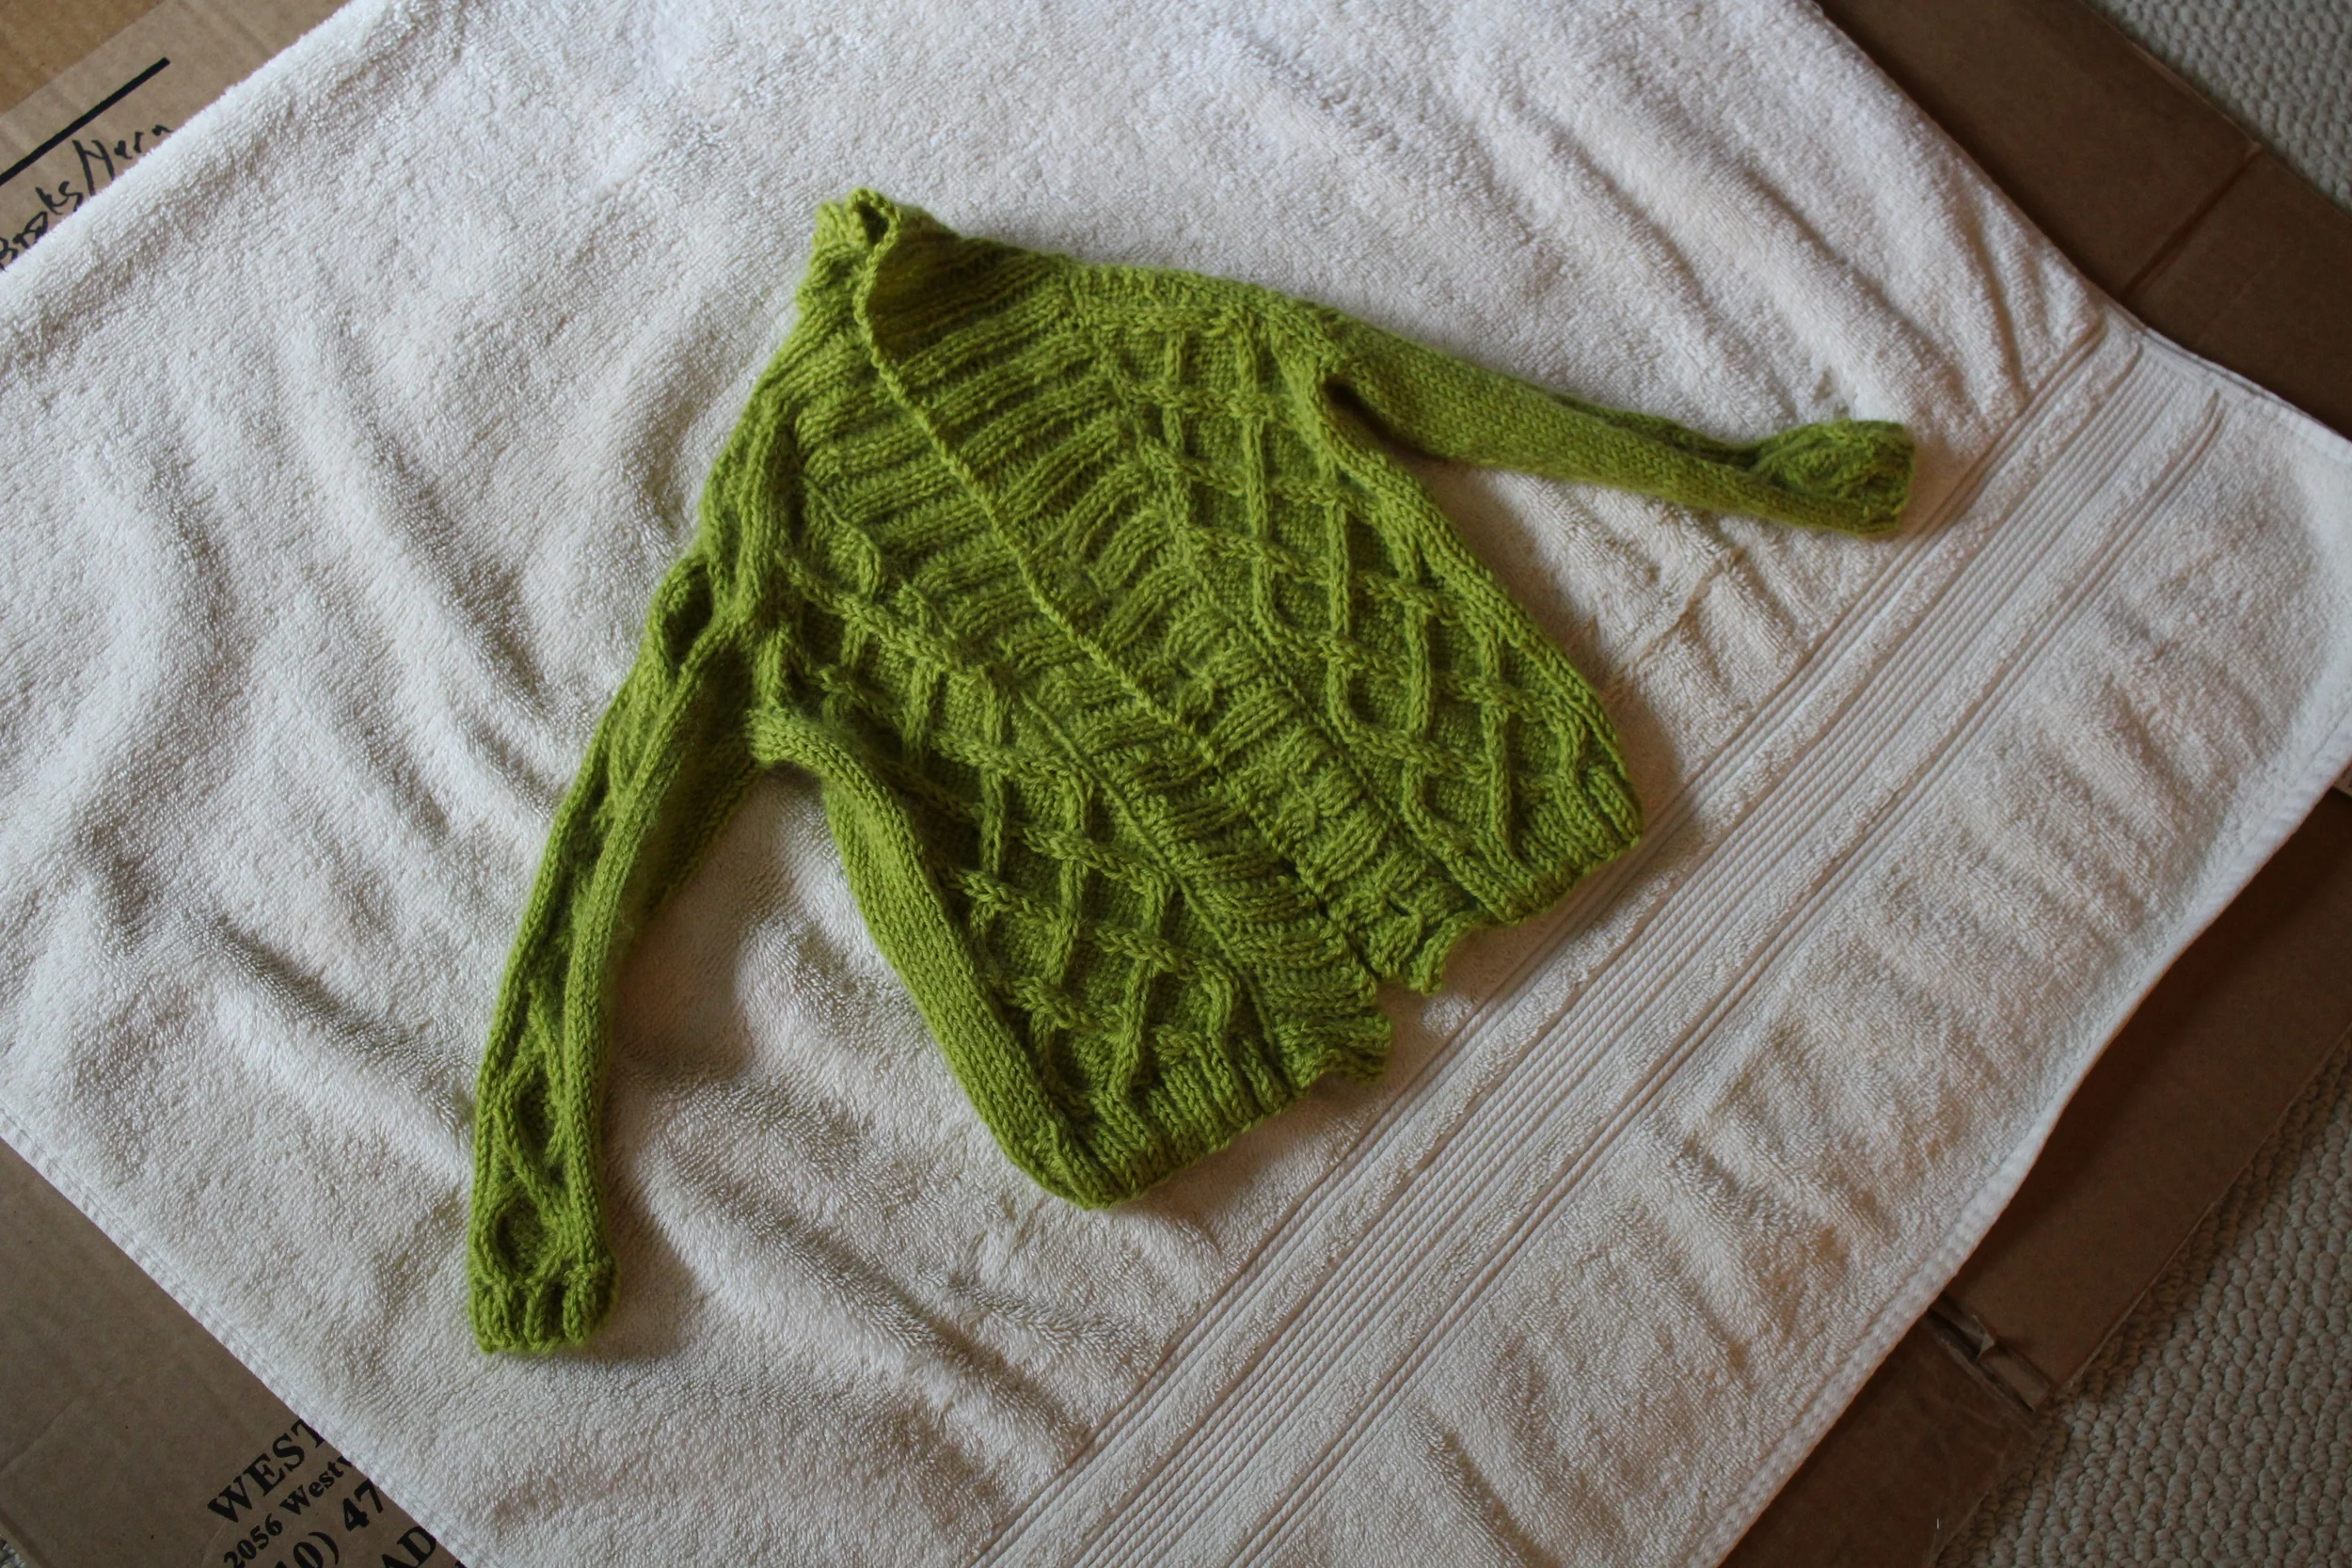
Well, after nine years of constant wear, the hat was an old friend but also showing it’s age. So it was time to knit him another one. While I worked on the new hat, I couldn’t help but imagine a longer slouchier version for me. And how could I not whip up a matching hat for the kiddo too. So I took the opportunity to clean up and expand the pattern to fit small baby heads all the way up to big adult noggins. There’s both a snug fitted version and a long slouchy version. And how could I not name the pattern “Old Friend”. The hat has been with us for 9 years already, and I’ve got the yarn to knit several more. Sounds like this hat is going to be sticking around for a long time.

Old-Friend-Group-Horizontal.jpg

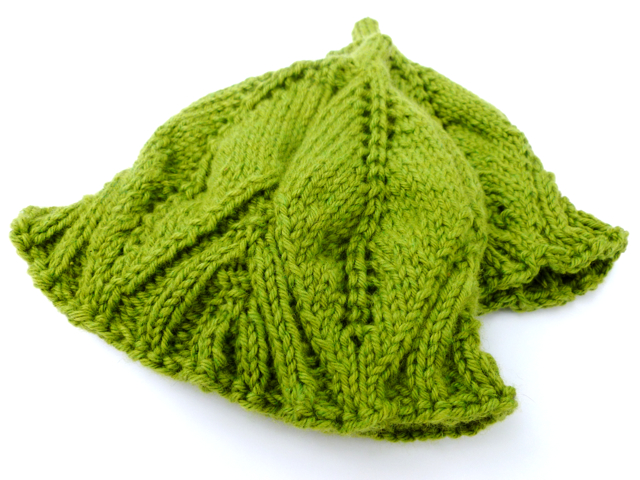
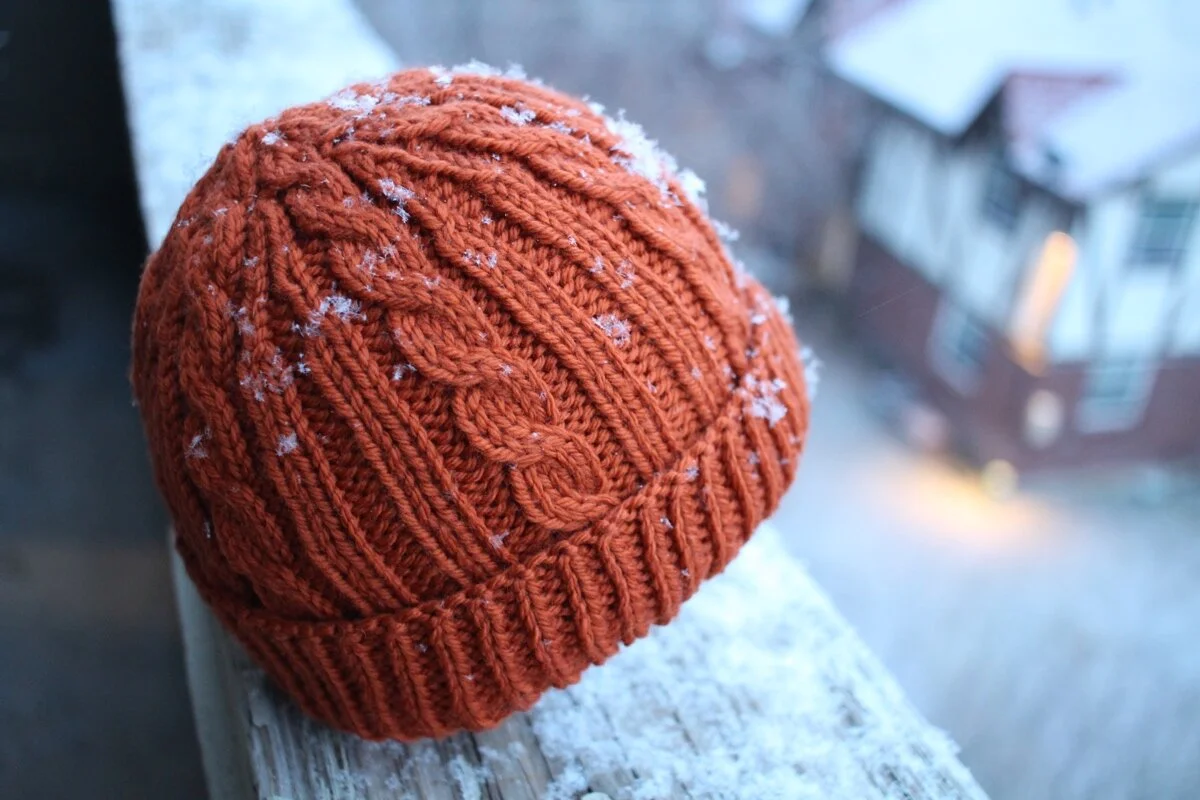
While I’ve only been wearing my Old Friend hat for a few months, I am absolutely in love. The cables look great with pretty much everything. I wear it slouchy most of the time, but am really glad of the extra ribbing when I want an extra layer over my ears. Even the kiddo, who won’t wear most hats for more than five seconds at a time, wears her Old Friend hat when it’s cold. Though our hats are all different colors and lengths, they still match without having to be exactly the same.

Oh, and after nine years, I am so happy to finally share the pattern with you! Whether you choose to knit it short and fitted or long and slouchy, this cabled hat is sure to become an old friend that’s always by your side.

To celebrate the release of Old Friend, the pattern will be on sale October 13 - 20th, 2019 MST . Use code FRIENDLY when you check out to get 20% off the pattern!

Sizes:

Baby/Toddler: (16 - 18”) [41 - 46 cm]

Child: (18 - 20”) [46 - 51 cm]

Adult S/M: (20 - 22”) [51 - 56 cm]

Adult L: (22 - 24”) [56 - 61 cm]

Gauge: 4 sts and 6 rows = 1” in pattern

Yarn:

For Fitted Hat: 60 (85, 120, 140) yds / 55 [78, 104, 119] m worsted weight yarn

  • Shown in Knit Picks Swish Worsted - Allspice, and Stonehedge Fiber Mill Shepherd’s Wool Worsted - Garnet

For Slouchy Hat: 70 (100, 140, 172) yds / 64 [91, 128, 157] m worsted weight yarn

  • Shown in Knit Picks Swish Worsted - Dove Heather

Needles and Notions:

  • US 7 (4.5mm) 32” circular needles OR 16” circular needles/DPN’s

  • Tapestry Needle

  • Regular and Locking Stitch Markers (Optional)

*Said show is “Last of the Summer Wine”, and I’m totally guessing that the episodes I was watching were from the 70’s.

A Finished Sweater for the Mini

A cool and comfy baby sweater with room to grow. #knitting | withwool.com

#The100DayProject has been a great kick in the pants for my knitting. Not only am I knitting at night again, instead of scrolling through my phone, I’m actually finishing stuff. My first finished item is a Marigold Fields sweater for the Mini. I know baby/kid sweaters can be ridiculously fast knits, but the push to do something every day kept me from tucking this away to work on later. I got through the hard work of swatching, and figuring out mods for gauge, and actually starting which was the hardest thing of all. Working on the sweater, even as the yoke rows seemed to get longer and longer and longer, was the easy part.

This is only the second sweater that I’ve ever knit for the kiddo. I’ve got plans for a few others to make over the summer and fall, but this is the second which makes it special. The first sweater I finished before she was born, and it’s a special sweater too. That sweater was about what I wanted to make, and I planned it just so from the yarn to the pattern. It’s a warm, cosy welcome to the family even if she did have to grow into it. Now, well, she’s just about grown out of it. This second sweater isn’t just about what I want to make because now I have an idea of what she likes. And she likes the color yellow. So, I can make a sweater more for her and less about me. I’m looking forward to seeing what she wants in the years to come.

A cool and comfy baby sweater with room to grow. #knitting | withwool.com

I couldn’t resist dressing up her in the sweater the other day after I’d wove in the ends. While she didn’t immediately wriggle out of it, she did put the sweater through its paces. I’m hoping she’ll like it better now that it has buttons. I haven’t actually put it on her since sewing on the buttons, because I made the next size up. So, it’s a bit big which is so much better than a bit small. She’ll have the rest of spring and the whole summer to grow into it. Probably won’t take that long though.

Finishing the sweater turned out to be more interesting and collaborative than usual. I did the usual first step of dropping it in some cool water with a squirt of Eucalan, and gave it 20 minutes to soak. Then I laid it out to dry on a mat on my studio floor. That only lasted until the Mini crawled in and got a good grab of it. To prevent any more drastic adjustments to the shape, I put the whole blocking rig on top of my printer. The problem was that the sweater was much bigger and stretched out than it had been before going in the bath. Plus, it was still rather damp even after sitting out all night and most of the morning. Something had to change. The yarn, Knit Picks Comfy, is a blend of cotton and acrylic. I’ve had good luck putting similar blends in the dryer before so I chucked this one in the dryer too. On low, of course. The dryer did the trick! The yarn plumped up, the stitches got neater, and the sweater went back to its original size. That’s a win on all fronts. Once I had some free time that night, I sewed on the buttons. The cuteness was complete.

A cool and comfy baby sweater with room to grow. #knitting | withwool.com

What am I going to do for #The100DayProject now that this sweater is finished and documented? Next on the list is sewing buttons on a pair of slippers so I can finally wear them…next fall. Then I need to get started on a pair of fingerless mitts, including rewriting the pattern for scratch, to match a lace hat. My plans after that are still nebulous, but I’ve got some time to figure it out.

The Specs:

Pattern: Marigold Fields by Taiga Hilliard

Yarn: 251 yds Knit Picks Comfy - Semolina

Needles: US 8 (5mm) and US 9 (5.5mm)

Dates: April 13 - 30, 2019

Full modifications and notes listed on Ravelry

Yarn, Knitting, and #The100DayProject

#The100DayProject is helping me feel like myself and remember what I like so much about yarn. | withwool.com

#The100DayProject, a project dedicated to 100 days of whatever you choose, kicked off earlier this month, and I decided to join last minute. I’ve tackled this project in previous years with the goals of daily art, and spinning. For this year’s project, I wasn’t sure what I wanted to commit 100 days to. All I knew was that I was so bored of starring at my phone when I plopped on the couch at the end of the day after putting the Mini to bed. I wanted to do something or make something instead of endlessly scrolling through whatever or playing another game for the Nth time. So there was my project. My goal for 100 days was to put down my phone and make something. It’s been an interesting and fun change of pace. I haven’t done a great job of posting my daily progress online (mainly because it’s already after 11PM when I’m done), but I have put down my phone to make tasty desserts, write tutorials, take photos, pick out buttons, and knit lots.

#The100DayProject is helping me feel like myself and remember what I like so much about yarn. | withwool.com

#The100DayProject might be bringing back my knitting mojo. I returned to a pair of floundering socks for the Bearded One. I finished a pair of slippers, and now just need to sew on 12 buttons. The main project that I’ve devoted the past few days to is a new sweater for the Mini. She’s almost outgrown the first sweater I made her, and I want something she can wear through the Summer and into Fall. All of my perusing through Ravelry for baby stuff while I was still pregnant left me with lots of options to choose from. I picked out three sweaters and first up is Marigold Fields by Taiga Hilliard I had the yarn and the pattern already, but the 100 Day Project gave me the kick I needed to actually start. Casting on turned out to be harder than expected because I couldn’t get a fabric I liked at the required gauge. So I came back the next day to figure out how to make the yarn and pattern work together.

#The100DayProject is helping me feel like myself and remember what I like so much about yarn. | withwool.com

And here we are now. The lace yoke is finished. The arm holes are bound off. My mods went off without a hitch. Now I’m zooming through the body with 3” left before the bottom edge. I’m making the 2T size which will probably be a bit big for her right now, but should hopefully fit her for a long time.

I’m glad I committed to #The100DayProject after taking a break from it last year. It’s helping me feel like my old self and remember what I like so much about yarn. Anyone else tackling the Project with me?

Big News + What's Next

The Pacific Coast sweater is finally done and I couldn’t be happier! | withwool.com

This sweater has shown up a lot during the past few months. I used it to test out a more truthful and accurate method of swatching.  When I was feeling overwhelmed by all of my knitting projects, I focused on this sweater to feel like I was making progress. Plus, there were the random WIP updates. In all that, I never shared who I was making this sweater for. Well, I’m not mailing it cross-country, and I’m not giving it away at a baby shower. This little beauty is staying right here with me for my own little one!

The Pacific Coast sweater is finally done and I couldn’t be happier! | withwool.com

Aside from a few fiddly details of my own making, the pattern - Pacific Coast - was a pretty easy knit. I made a few changes, but mostly followed the instructions since I haven’t knit a lot of sweaters of any size. You can check out all of my notes, mods, and more photos here on the sweater’s project page.

The Pacific Coast sweater is finally done and I couldn’t be happier! | withwool.com

Since it’s almost baby time, there’s going to be a few changes around here too. First, this will mostly likely be the last blog post for awhile. Second, I’m not sure when I’ll be back to regular posting or what that schedule will be. I’m just going to play it by ear. There might be a random post here and there over the summer or maybe not. We’ll see. Third, the With Wool Weekly newsletter will also be taking a break and will return eventually.

Happy knitting and happy spinning. I’ll see you on the other side and on Instagram.

Knitting A Gauge Swatch That Tells The Truth: The Results Are In

The sweater is washed and blocked. Did the different method of swatching tell the truth? Is my sweater the same size it was before washing? Yes and yes!  #knitting | withwool.com

I knit myself a sweater a few years ago and did all the things a “good” knitter is supposed to do. I knit a reasonably sized swatch on the same needles I was going to use for the sweater. I washed and blocked the swatch the same way I was going to wash and block the sweater. I liked the results and got gauge, so I cast on for the real thing. Said sweater was cute and fit perfectly until I washed it. Instead of the cute cropped cardigan I wanted, I ended up with an oversized sweater that I still wore and enjoyed. So not a total loss, but not really a success either. Blasted lying swatch.

Then a few months ago, I read an article which helped explain why my swatch didn’t react the same way as my sweater when it hit the water. Seeing as how I was about to knit a baby sweater, I decided to try out this different swatching method that skipped the garter edges and blocking pins for what seemed like very logical reasons. You can read all about the swatching attempts here and an update from when I was halfway though the sweater here.

A few notes before we get down to the knitty gritty: I did not knit this sweater all at once, but in bits and pieces over a few months. I knit it while watching tv and not watching tv. I knit it on the same needles I swatched with. I knit it when I was tired and when I was wide awake. I can’t remember if I knit it on road trips. All of this is too say that my gauge had the opportunity to change a lot during knitting even though the sweater was stockinette.

The sweater is washed and blocked. Did the different method of swatching tell the truth? Is my sweater the same size it was before washing? Yes and yes!  #knitting | withwool.com

I measured the stitch/row gauge and overall dimensions before dropping the sweater in the bath. Here are the numbers:

  • Stitch/row gauge (measured across the back): 29 sts and 38 rows = 4”
  • Stitch/row gauge of washed and blocked swatch: 28 sts and 37.5 rows = 4”
  • Sweater measurements across chest: 9.75”
  • Sweater length from neck cast on to body bind off: 11.5”
The sweater is washed and blocked. Did the different method of swatching tell the truth? Is my sweater the same size it was before washing? Yes and yes!  #knitting | withwool.com

I washed the sweater the same way as the swatch. I soaked them both in cool, soapy water (I like unscented Eucalan (<<— affiliate link!*)) for 20 minutes. I rolled them in a towel and squeezed out the excess water. Then I laid them flat to dry without pinning them down (this is one of the important parts of this swatching method). The only change I made when blocking the sweater was gently pulling the button bands and collar into place to make them lie flat and even up both sides. See what a difference blocking made to how neat and even the stitches look? After the sweater dried, this is what I found:

  • Stitch/row gauge (also measured across the back): 28 sts & 38 rows = 4”
  • Sweater measurements across chest: 10.25”
  • Sweater length from neck cast on to body bind off: 11.75”

Wow! The only gauge difference between the washed and blocked swatch and the washed and blocked sweater was half a row over 4”. The chest measurement changed too, but the stitch gauge changed to match the swatch so I’m calling it true. Overall, the length of the entire sweater only changed by .25” which could have happened for several reasons - me tugging out the edges, the ribbing growing, etc. I’m not worrying over an extra .25” on a baby sweater.

I also measured the sleeves. Their length and diameter stayed the same; however, I’m not counting this info towards the swatch experiment because they were knit in the round and not flat like the swatch.

I’d say this method of swatching - skipping the garter edging and not pinning the swatch into a rectangle - is the most accurate and truthful method of swatching I’ve ever tried. You can read about the full method and why it it works here. It’s definitely how I’m going to swatch for all my future sweaters and anything else that has to fit. Definitely give it a try.

I’m looking forward to seeing how truthful the swatches are when I knit a sweater for myself. I suppose that will be the true test, and I’m more than willing to give it a shot.

The sweater is washed and blocked. Did the different method of swatching tell the truth? Is my sweater the same size it was before washing? Yes and yes!&nbsp; #knitting | withwool.com

*This post contains an affiliate link which means, if you decide to buy through that link, I’ll get a small commission. My opinions are unbiased, my own, and formed after years of use. I wouldn’t recommend this soap if I didn't think it worked. Thanks!

A Solution to WIP Overwhelm

Feeling overwhelmed and stuck in your #knitting projects? Try working on them 20 minutes at a time. | withwool.com

Normally, I’m a knitter and spinner that has a lot of projects going at any one time because what I want to work on changes. I’ve got simple projects for autopilot knitting, small projects for travel knitting, and complicated projects for a challenge. The large number of these different project usually doesn’t bother me. Usually. At the moment though I’m feeling rather overwhelmed by them all. There’s the baby sweater that’s also a gauge swatch experiment. There’s the shark that still needs a sweater. There’s unfinished gift knitting leftover from the holidays. There’s a bunch of alpaca singles waiting to be plied. There’s all the knitting patterns that I’m in the middle of designing. And never mind the general day-to-day routine and work and projects that aren’t fiber related. Being stuck in the middle of all these different projects with all their deadlines has been weighing me down. So, last week, I took a break to watch tv, waste time online, and play games. The down time helped me think.

Feeling overwhelmed and stuck in your #knitting projects? Try working on them 20 minutes at a time. | withwool.com

The only way to finish these all these different projects is by focusing on just one of them at a time. Rushing to do bits and pieces on 20 things at the same time is just dragging things out. So I’m picking the baby sweater to work on until it’s done. While I can’t finish it in a night, the sweater is the closest to the finish line of everything. Plus, I didn’t have to tackle a bunch of other to-do’s first in order to get back to knitting.

Still, this grand decision didn’t make it any easier to get going again. Being in “the middle” is a slog. When I need a kick in the butt to get to work, I use the pomodoro technique to help me focus. The technique boils down to 20 minutes of work followed by a short break. And repeat. That’s it. I use an app called Focus Keeper which lets me set the length of my work sessions, breaks, repeats, and tailor lots of other nifty options. I use it when I need to get to work or just don’t want to do something necessary, like cleaning the bathroom.

Feeling overwhelmed and stuck in your #knitting projects? Try working on them 20 minutes at a time. | withwool.com

This time I used the app for my knitting. All I had to do was work on the sweater for 25 minutes. After that, I could stop or keep going. Surprise, surprise - I kept going and finished the decreases on the first sleeve. I’m glad I had the timer to keep me accountable because I would have put the sleeve down halfway through otherwise. Figuring out how to work jogless stripes that happened in the same spot as the decreases while I kept track of rounds and carried the other colors up the sleeve took all of my attention.

Feeling overwhelmed and stuck in your #knitting projects? Try working on them 20 minutes at a time. | withwool.com

I’m pleased with how the sleeve turned out except for this hole where I started knitting again. Picking up a stitch at the beginning and end of the round did nothing. I’m going to sew it up with a yarn tail when I weave in the ends. Do you know any tips or tutorials so this hole doesn’t happen on the second sleeve?

Feeling overwhelmed and stuck in your #knitting projects? Try working on them 20 minutes at a time. | withwool.com

Oh, I picked up some buttons too! I found these cute little wood hearts at my local yarn shop. They’re a cute match, and I’m glad they’re the right size since I had to guess if they'd fit.

There’s still a good chunk of knitting to do on the sleeves before I can get to washing and blocking this baby. And I’m going to keep using the timer because it’s helping me get through the slog. Maybe it’ll become a daily goal of one 25 minute session until the sweater is done and buttoned. If you’re stuck in the middle like I am, give the pomodoro technique a try. Even 5 or 10 minutes will get you closer to the finish line and out from under the overwhelm.

Knitting A Gauge Swatch That Tells The Truth

#Knitting a gauge swatch is an important first step in making a sweater. So how do you make an accurate swatch? | withwool.com

This year’s knit list includes a sweater or two because I haven’t made very many of them, and I want to change that. I’ve only knit 1 sweater for myself in the *ahem* decade+ since I first learned to knit. It was the Amiga sweater, and it was cute and just the right size until I blocked it. Afterwards it was still cute, but had turned into an oversized cardigan. I definitely wore it, but it wasn’t what I set out to make or wear. I did all the things the knitting police said you’re supposed to do: knit a big swatch, used the same needles, and blocked the swatch the same as the finished sweater. I got gauge, or so I thought, but the swatch didn’t tell the truth. So for this first sweater of 2018, I’m taking a more rigorous and experimental approach to swatching. Instead of making just one swatch, I made three.

#Knitting a gauge swatch is an important first step in making a sweater. So how do you make an accurate swatch? | withwool.com

For swatch #1 I cast on enough stitches to equal 4” and a little extra for a garter stitch border. I added stripes as in the pattern and a section of 2x2 rib knit on smaller needles.  Then I washed and blocked the swatch the same way I would the finished sweater. The square was a little uneven at the sides so I pinned it out to straighten the edges. This first swatch answered a few different questions.

Would the dye bleed between the different colors? No.
Would I like knitting the fabric on the needles I had? Yes.
Would I like the fabric after washing and blocking? Yes
Did I like the stripe pattern? Yes
Did I have the right needles to knit the ribbing at a tighter gauge? Yes.
Did I get stitch and row gauge? No, my gauge was off on both counts.

#Knitting a gauge swatch is an important first step in making a sweater. So how do you make an accurate swatch? | withwool.com

With swatch #2 I was only trying to answer the gauge question. So I went down two needle sizes and tried again. Same stitch count. Same garter border. Same blocking method. This time my gauge was too tight. And I didn’t like the finished fabric - too stiff - or knitting it.

#Knitting a gauge swatch is an important first step in making a sweater. So how do you make an accurate swatch? | withwool.com

I didn’t cast on for swatch #3 right away because I didn’t have the right size needle. My needle collection has been lacking a 3mm circular for years and this was project the first reason I had to buy one. In between refreshing the package tracking, I happened to read this article on how to knit accurate swatches and how to keep them from lying to you. Contrary to a lot of what I’d read up to this point, the advice was to skip the garter stitch border and not pin the swatch at all during blocking. The article is definitely worth the read and explains the why’s behind all of these tips.

So I switched things up and followed the advice in the article: skipped the border, worked 6” worth of stitches instead of 4”, and plopped a swatch of stockinette in the sink to soak. I didn’t pin it out or even try to control the roll as it dried. Know what? I finally got both stitch and row gauge. The fabric was nice to knit and has good drape. Win win.

So why do I “trust” this method of swatching to tell the truth? It’s given me numbers and measurements that didn’t require pinning and pulling on the fabric. Plus, the accuracy for swatches knit with borders and pinned is far from 100%. There’s no reason to not try it out. And if the sweater does grow, at least it’s a baby sweater and a little extra room isn’t a bad thing. 

#Knitting a gauge swatch is an important first step in making a sweater. So how do you make an accurate swatch? | withwool.com

Since it seemed like I made an accurate swatch, I finally cast on for that sweater. It’s the Pacific Coast baby cardigan by Gabrielle Danskknit. It starts at the neck with a bit of ribbing before moving on to the stripes and raglan increases. My gauge is spot on. There’s still a lot of knitting to do before this beauty gets the blocking treatment, but I’ll let you know if gauge swatch #3 lied or told the truth.

The Inseparable Duo

Rebecca Danger’s patterns never let me down with I need a cute gift. Say hello to Beatrice and Bernard! | withwool.com

I knew I was going to have leftover yarn. Not a tiny little ball I could put in my hand and post to Instagram tagged #socute. Nope. After binding off the February Baby Sweater, I had about 125 yards to work with and I want to make something cute to match. I thought about booties and hats but shelved the idea. I wanted something that could be used and enjoyed for more than a few minutes before being tucked away in a drawer to keep safe for later. A cute, soft toy seemed like just the thing.

Rebecca Danger’s patterns never let me down with I need a cute gift. Say hello to Beatrice and Bernard! | withwool.com

Every toy I’ve made from a Rebecca Danger pattern has been a big hit. Like this cat that’s now a favorite. And this tiger. I picked The Inseparable Beatrice and Bernard this time because they’re adorable and not too big. The fact that the duo is a relatively quick and easy project might have had something to do with it too. Didn’t hurt that I already had the right safety eyes too. 

I knit the arms and tail first just to get the fiddly bits out of the way. Knitting the bodies went fast once I actually sat down to do it. I followed all my usual mods, which I’ve listed on the Ravelry project page, and ended up with 2 adorable buddies. And who could resist that cute bunny tail!

A post shared by April Klich (@aprilklich) on

Pattern: The Inseparable Beatrice and Bernard by Rebecca Danger

Yarn: 57 yds Cascade 220 Superwash - Lake Chelan Heather

Needles: US 4 (3.5 mm)

Dates: March 28 - April 28, 2017

All mods listed on Ravelry

The Famous February Baby Sweater

Pithy instructions, a little garter stitch, and a bunch of lace make up the famous February Baby Sweater. It’s a good test of knitting skill too. | withwool.com

I spent the first few months of 2017 working on secret knitting. It was a baby gift for a good friend of mine, and now that the sweater is at it’s new home, I can share it with you too. When I first heard that my friend was having a baby, I thought about making a blanket. She had plenty of those coming in though so I decided to make a cute sweater instead. After scrolling through page after page of baby sweaters on Ravelry I picked Elizabeth Zimmerman’s February Baby Sweater. The pattern has been in my queue for awhile but that’s not why I picked it. It looked cute and I wanted to make something with lace for a dedicated lace knitter.  

I went into this project knowing EZ’s patterns have a reputation of being, as she calls them, “pithy”. Concise, terse, succinct, condensed… Having made a Pi Shawl a few years ago, I thought I knew what I was getting into. I was mistaken. 

Pithy instructions, a little garter stitch, and a bunch of lace make up the famous February Baby Sweater. It’s a good test of knitting skill too. | withwool.com

After years of knitting from (and writing) more detailed row-by-row instructions, the 3 paragraph pattern took some getting used to. It wasn’t that the pattern was hard to understand - the gist of it was definitely there - I just had a lot of questions about specific details. So I had to answer them for myself. Thankfully, lots of other people have knit this sweater and I found helpful mods and size charts to make a 9-month sized sweater. Swatching was definitely a requirement. 

Pithy instructions, a little garter stitch, and a bunch of lace make up the famous February Baby Sweater. It’s a good test of knitting skill too. | withwool.com

Since I was writing more detailed instructions to work from, I made a few of my own modifications to knit the sweater to my own preferences. You can find the full details on the project page.

  • Cast on more stitches and worked fewer rows before starting the first yoke increase row to get a wider neck opening.
  • Switched out the "M1" for "kfb" because it looked neater. 
  • Worked the button band over more stitches and made larger button holes.
  • I knit the body of the sweater flat, but worked the sleeves in the round. After reaching the spot to set up for the sleeves, I knit those stitches with waste yarn and decreased to get the stitch count of the sleeves. Then I came back, picked out the waste yarn, and put the live stitches on the needles to knit the sleeves just like an afterthought heel. Finicky? A little, but I got a neat, seamless join that didn’t break the lace pattern. Totally worth it in my book. 
Pithy instructions, a little garter stitch, and a bunch of lace make up the famous February Baby Sweater. It’s a good test of knitting skill too. | withwool.com

The February Baby Sweater is definitely worth the effort, and I encourage you to make one yourself. I say this counting the time that I frogged the sweater back to the cast on because I had to re-do the yoke increases. Figuring out how to get exactly what you want out of this pattern is a good test of skill that will up your knitting game. Plus, the lace and garter stitch are an absolutely beautiful combination. I am proud to give this sweater to a good friend who is also an amazing knitter. 

P.S. Since this post has gotten on the long side, I’ll show you what I did with the leftovers next. 

Pattern: Baby Sweater on Two Needles (February) by Elizabeth Zimmerman

Yarn: 317 yds Cascade 220 Superwash - Lake Chelan Heather

Needles: US 6 (4 mm)

Dates: January 18 - April 28, 2017

@Ravelry

FO: Gramps Cardigan

Adorable baby sweaters and adorable! I made the Gramps Cardigan as a gift and am absolutely thrilled with how it turned out. FO: Gramps Cardigan | withwool.com

My secret knitting is no longer secret! The sweater can get its time in the spotlight now that it’s arrived at its new home. If I hadn’t been keeping this a surprise, it would have shown up several times and probably with a poem titled ‘An Ode To Ripping’. I haven’t written said poem but could have thanks to all the inspiration knitting the sweater gave me. All the frogging aside, the Gramps cardigan turned out to be a lovely sweater that I was proud to give to a very good friend and her new baby.

Adorable baby sweaters and adorable! I made the Gramps Cardigan as a gift and am absolutely thrilled with how it turned out. FO: Gramps Cardigan | withwool.com

When I was trying to decide what to make, I had to cross blankets off the list because I didn’t have the time. A hat or booties didn’t seem like enough, but a sweater seemed just right. After a couple hours looking through baby sweater patterns on Ravelry, I picked the Gramps Cardigan by Kate Oates. The finished sweaters all looked really cute. Plus, I like the idea of dressing up babies in vintage “old-man” style sweaters. Sold. I ordered the yarn, knit a swatch, and cast on. 

The knitting was pretty easy and the cables were fun to work once I got the pattern in my head. All the times I had to rip were my own fault for not reading ahead. I ripped because I didn’t like how I’d handled the cable pattern next to the neck decreases. I ripped again because I knit the first sleeve before knowing where I’d have to match up the cable patterns and said sleeve turned out way too long. I ripped a third and forth time because I kept messing up the short row shawl collar. Tinking short rows worked in 2x2 rib is not my jam, but binge watching Haven helped get me through it. 

Adorable baby sweaters and adorable! I made the Gramps Cardigan as a gift and am absolutely thrilled with how it turned out. FO: Gramps Cardigan | withwool.com

It’s been awhile since I’ve blocked a sweater and it wasn’t as complicated as this one. The cables definitely needed some tidying up and the shawl collar needed a little preening too. It got a good bath with a capful of Eucalan before I squeezed all the water out that I could. I was holding my breath when I unrolled it and did my initial measurements so I could block it to size. It hadn’t grown, or shrunk, and the sleeves hadn’t added any extra inches. Whew. I used my blocking wires and this tutorial from Tin Can Knits to get the cables looking crisp and even. The wires also added just the right amount of structure to support the shawl collar while it dried. 

Adorable baby sweaters and adorable! I made the Gramps Cardigan as a gift and am absolutely thrilled with how it turned out. FO: Gramps Cardigan | withwool.com

The last step was sewing on the buttons which I did after the sweater had dried. Then I just had to mail it and it got there just in time. Now, I’m not saying this sweater has baby summoning powers but I’m not going to explicitly deny it either. 

The Specs

Pattern: Gramps Cardigan by Kate Oates 

Yarn: 363 yds Cascade 220 Superwash - Citron

Needles: US 6 (4mm) Circulars

Date: April 12 - May 12, 2016

@Ravelry

Journey of the Aviator Hat

Now that this aviator hat has gone on its own cross-country journey, I can finally write about it. Knit for a brand-new baby boy, it was an easy knit that came out adorable. The hardest part was picking just the right buttons. My only mod was to tack down the corner edges of the front flap so it didn’t stick out due to sturdy button stitching. Thanks to the multiple sizes, all the way up to an adult small, I’m sure I’ll be making many more for both boys and girls.

It wasn’t until the hat was in front of the camera that I noticed something. The hat was staring back at me. Now I can’t un-see that face with it’s stubby legs and bulky body. What does it want? Cuddles, I hope, and maybe cookies. When I picked out this pattern, I never noticed the face. It was just a cute hat. To be fair, it’s still a cute hat and not all of the finished projects on Ravelry look like silly creatures. I’m glad this one does though.

The Specs:

Pattern: The Journey of the Aviator by Gabrielle Danskknit

Yarn: Rowan Pure Wool Worsted - Electric (143)

Needles: US 7 & 6

Dates: July 17 - August, 2014

@Ravelry

A Slouchy Baby Hat

SlouchyBaby2.jpg

All of my current knitting is large, complicated, or a slog. It was a nice change to knit a cute and, importantly, little hat for a friend’s new baby. Did I mention it was little? For the pattern, I turned to a cute and simple hat I published last year, the Slouchy Babe.

SlouchyBaby1.jpg

I made a few modifications to the pattern because, apparently, I can’t knit any pattern as written. Not even my own. First change was the yarn. I went with Cool Wool which is a DK instead of worsted. I love using Cool Wool, a 50/50 blend of wool and cotton, for baby items because of the yarn’s soft feel and lovely drape. You can even through it through the washing machine, though I generally hand wash, if push comes to shove. To make up for the thinner yarn, I increased to 88 stitches since the gauge was closer to 4.5 sts/inch than the pattern’s 5.25 sts/inch. My last change was knit the body to 6.75” before the ribbing for a little extra slouch. 

You can download the Slouchy Babe pattern here. It comes sized for newborns, toddlers, kids, and adults. The Slouchy I made for myself is one of my favorite hats.

SlouchyBaby3.jpg

Three

SaplingWIP2.jpg

Three is the magic number. It’s the number of dedicated projects I can focus on at one time and still get things done. Anything more than that and things start to go off the rails. I lose focus, get bored, and generally accomplish nothing. Eventually, I’ll come to center and shove all the extra projects off to the side. It’s an “out of sight, out of mind” kind of thing. When I do finish something, it’s time pick a new project or come back to something on the to-do list. Then the cycle begins again.

Right now the three major projects are daily photography practice, the sixth Sapling Hat, and a bit of covert cross stitch. Putting a concerted effort into improving my photography throughout this month is still a very new project. I’m researching and experimenting. I’m also trying to find the timing of how to fit regular photography into my day. We’re still getting to know each other. 

The other two projects aren’t so long term. The hat is bound off and drying after a good bath. The cross stitch just needs a bit of finishing and a frame. Can’t wait to be done with both of these projects because I’ve already got a few more lined up. There may or may not be a few more knitting patterns, tutorials, and random goodness coming up. 

E_Progress.jpg

Growing

SaplingWIP1.jpg

The babies are coming! The babies are coming! So, it’s time to knit some hats. 

I’ve knit quite a few Sapling hats in the past three years - Ravelry tells me this will be the sixth hat - and will probably continue to do so. In fact, the whole reason I came up with this pattern was to make a pair of hats for a friend’s nieces. The hat is complicated enough that I’m not bored knitting it for the sixth time but still small enough that I don’t have to slog through it. Also, I just like being able to start at the crown of a hat instead of the bottom. Only have to cast on a fraction of the stitches that way. 

I’m using Elsebeth Lavold Cool Wool which is a slightly thinner yarn than called for in the pattern. To compensate, I working the larger size and knitting the hat entirely on the smaller needles rather than switching needles partway through. No other mods are necessary. 

Time to get back to knitting. Can’t let baby have a cold head after all.

Pattern: Slouchy Babe

SlouchyBabe7.jpg

Things started out simply enough. My mom was going to her niece’s baby shower and requested a cute baby hat. But only if I had one in stock. I didn’t and decided to remedy the situation promptly. So, I started perusing Ravelry with a few ideas in mind: simple, slouchy, eyelets, and baby sized. There was nothing quite like I wanted so out came the sketchbook, the calculator, the needles, and the yarn. After more swatching, ripping, and pages of notes than I’d like to admit, I had a simple, slouchy, baby sized hat with eyelets. Knit from the top-down too.

SlouchyBabe3.jpg

Mom headed off to the baby shower, hat in hand, a few days later and I kept knitting. Soon there was another baby hat, a toddler hat, a kid hat, and an adult sized hat because I wanted one too. I wore it to the breast cancer 5k, hiking in the woods, all around town, and even took it to Denver with me. It’s warm, it’s comfy, and it looks good. What’s not to love?

SlouchyBabe6.jpg

Slouchy Babe

Sizes: 0-6 mo (16”), 6-18 mo (18.5”), 18-4 yrs, 4 yrs & up (20”) 

Worsted Weight Yarn (60, 75, 100, 130 yds)

Shown in Berroco Vintage and Berroco Ultra Alpaca

Gauge: 21 sts = 4” in eyelet pattern

US 6 (4 mm) needles

download  |  @ravelry

SlouchyBabe4.jpg

Make A Bow

Despite what all those posts about spinning might have told you, I do still knit. Some of is secret, some of it for commission, and some of it I just haven’t gotten around to photographing yet. These two little Saplings fall into the commission pile. Now that they’re finished and delivered I can show these off. 

I used my favorite yarn for baby hats, Elsebeth Lavold Cool Wool, which is a soft worsted weight wool cotton blend and great for spring time southern weather. It has wonderful stitch definition, holds it’s shape, and is machine washable. It does have a smaller gauge than recommended in the pattern though so I had to work the larger size to get a nicely sized and stretchy hat.

Since the hats were going to be a gift, a little tag with fiber content and care instructions was in order. Anything worth doing, is worth doing well. So, I wanted the tag to match the hat and share a theme. A cute little bow made from the same yarn as the hat fit the bill wonderfully.   

      Materials

  • 2x4” piece of card stock (I used kraft paper)
  • 4-6” length of leftover yarn used to make the gift
  • Tapestry needle
  • 1/8” hole punch
  • Pen
  1. Using the hole punch, make 2 holes in the card stock a half inch apart and a half inch from the top.
  2. Under the holes, write the recipient’s name (I left this part blank), the fiber content, and care instructions underneath. 
  3. Thread the yarn though the needle and push it through the holes so that both ends are hanging on the same side as the writing.
  4. Tie a bow. Done!

Pattern: Sapling

Sapling | ravelry |

Nichol was one of the first friends I made when I started at a new high school in a new state. We've continued to be good friends through college and beyond. All told, it's been seven years since we met and, during that time, I learned to knit and she learned to crochet. So, several months ago when she proposed crocheted goodness in exchange for knitted baby goodness for her soon to be born nieces, I jumped at the chance. One of the requests was a hat. I didn't want to make just any hat. It had to be special. Soon, there were several ideas floating around in my head - stripes, short rows, lace - before I decided on a cute leaf motif. After all, it was almost Spring. After a bit of trial and error, both hats were finished and just in time for two little Spring babies.

The hat is knit from the stem down and uses a variety of techniques: knitting, purling, working in the round, yarn overs, a variety of lifted increases, decreases, and EZ's sewn cast off. The pattern isn't written for any specific way of knitting (DPN's, Magic Loop, 2 Circulars, etc) so you can easily use your favorite method without translation. 4 stitch markers are necessary whichever method you choose. Plus, yardage is minimal. The hat uses far less than one skein which makes for great stash busting of that errant, leftover yarn.

$6.00

Also, many thanks to the test knitters for their help: JemeAngelaLenaLPetiteTricoteuseKimberly, and Evelyn.

_______

Errata: In printed versions of the pattern (through 6/5/2011), Row 21 of the 0-6 month size is incorrect. It should read - Row 21: *p2, k2, p2, LLinc, LRinc, p2, k2, p2, ssk, k3, k2tog*

The digital version of the pattern has been updated and is correct.