Time To Spin A Gradient

It’s been way too long since I sat down at my wheel, but a lovely, low-key gradient is bringing me back. | withwool.com

Interweave Yarn Fest is at the end of the month and I’m ready. I’ve decided which day to go, bought my ticket, and am making up a shopping list. That list is pretty short so far: an orifice hook for my wheel, roving from Brown Sheep Yarn Company, and fiber for a commissioned spinning project. Of course this list could definitely grow. :)

It’s been way too long since I sat down at my wheel, but a lovely, low-key gradient is bringing me back. | withwool.com

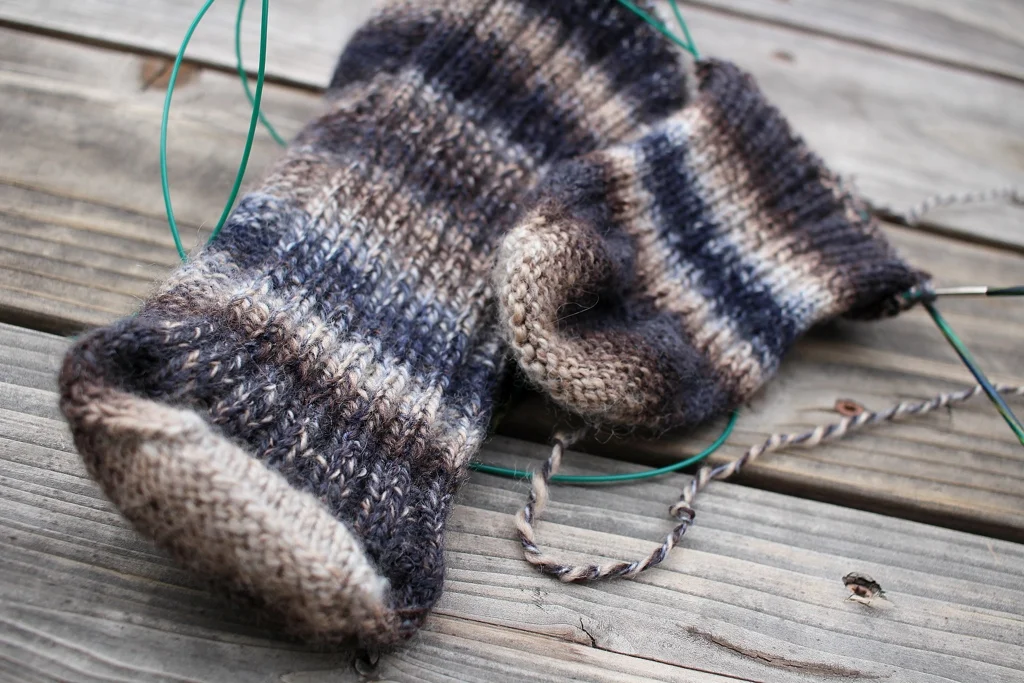
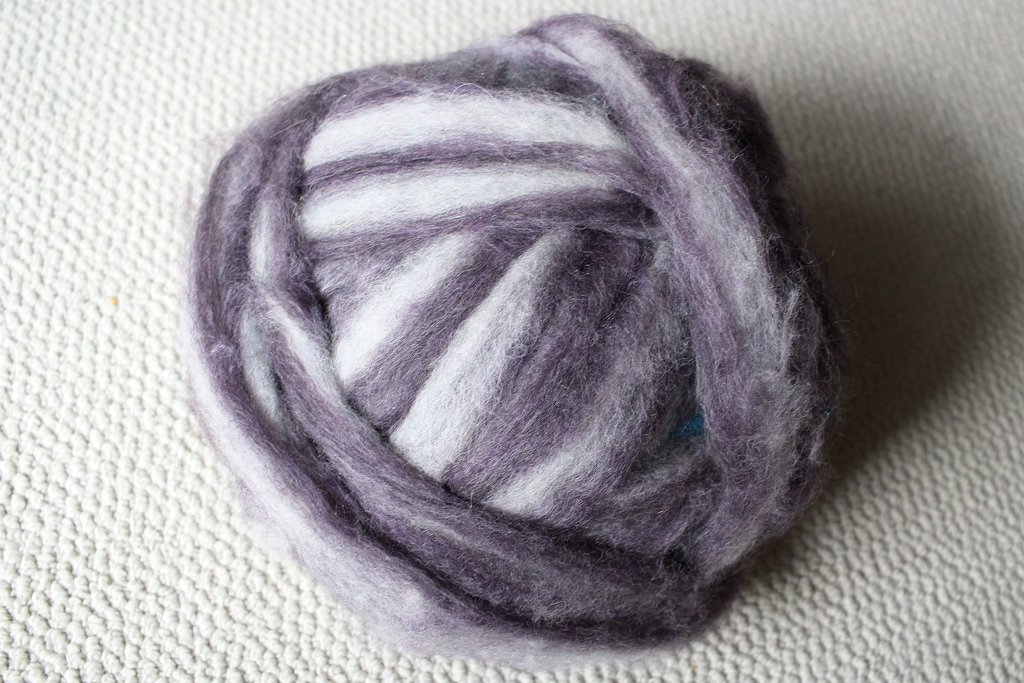
I enjoyed walking around the show last year and made some considerable stash enhancements. Unfortunately I haven’t knit or spun anything that I bought, which I’m aiming to change before going back to Yarn Fest this year. My knitting list is pretty full at the moment, but I’ve got room in my brain to spin. And plenty of empty bobbins to fill. After digging through the stash I was drawn to a ball of roving bigger than my head. 

It’s been way too long since I sat down at my wheel, but a lovely, low-key gradient is bringing me back. | withwool.com

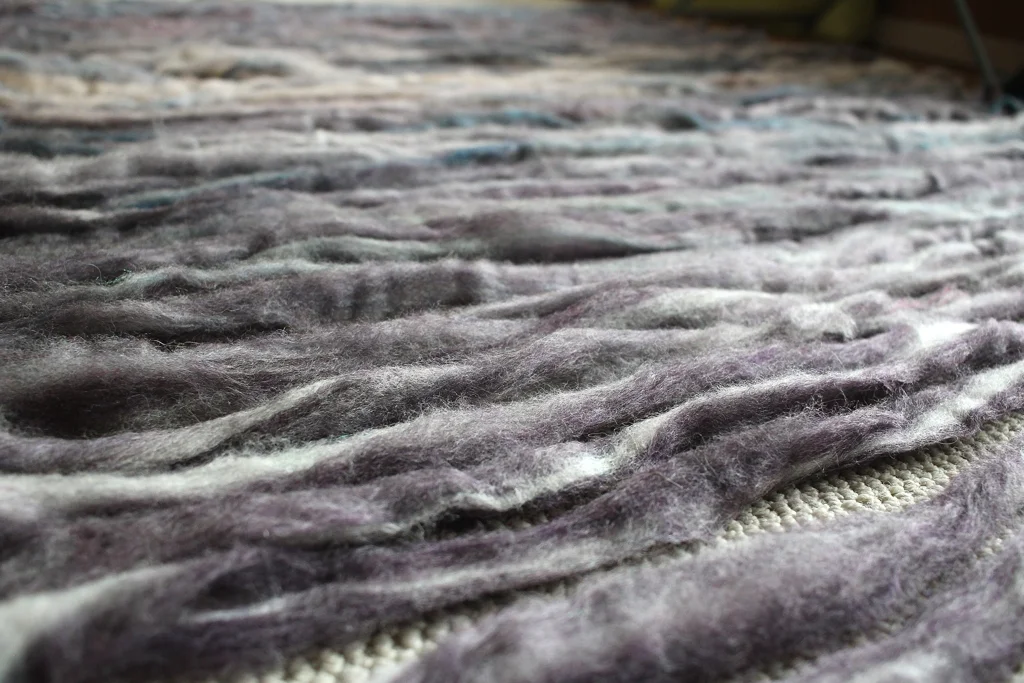
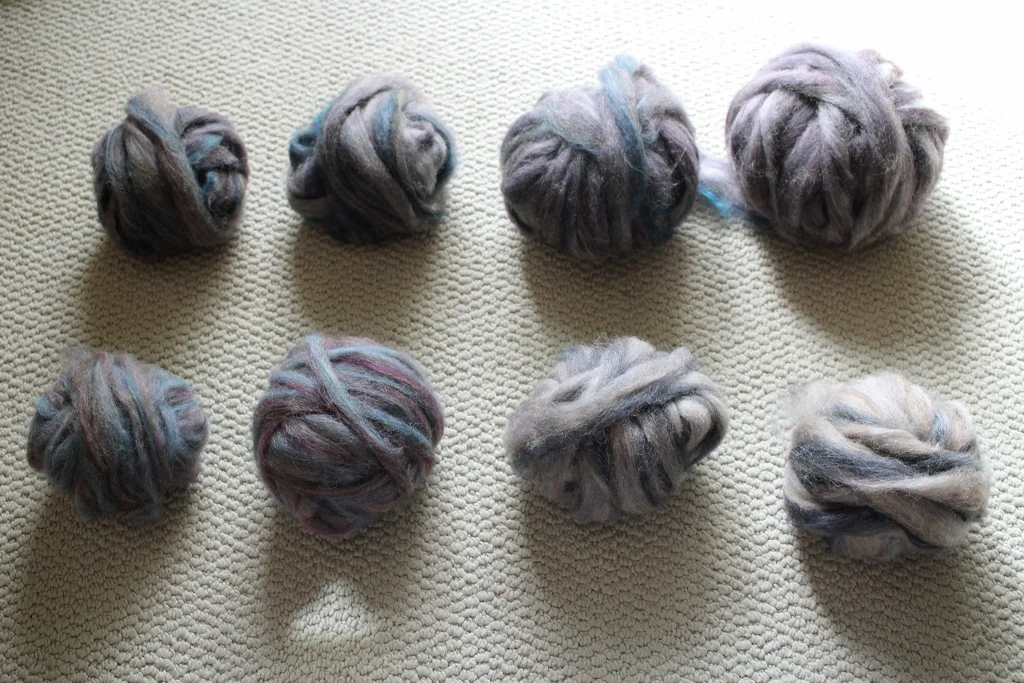
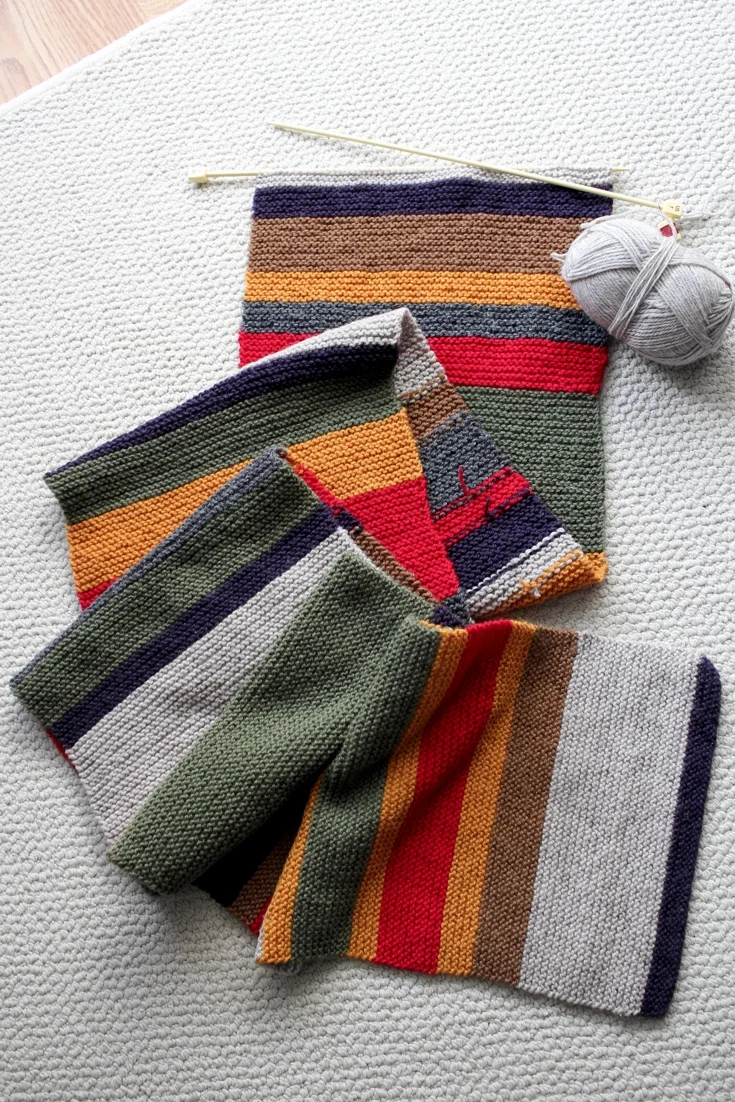
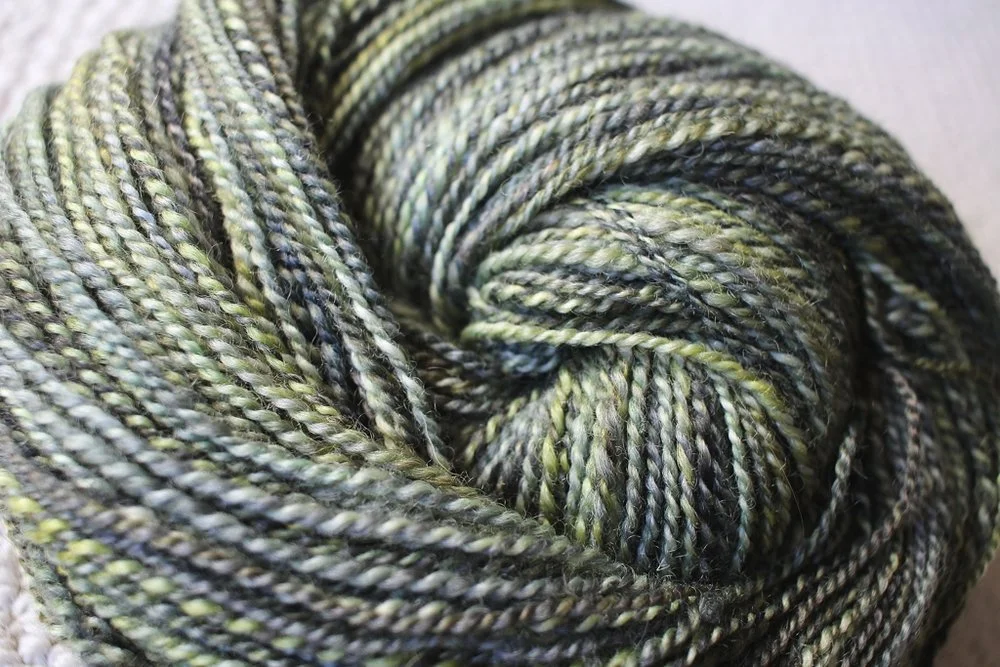
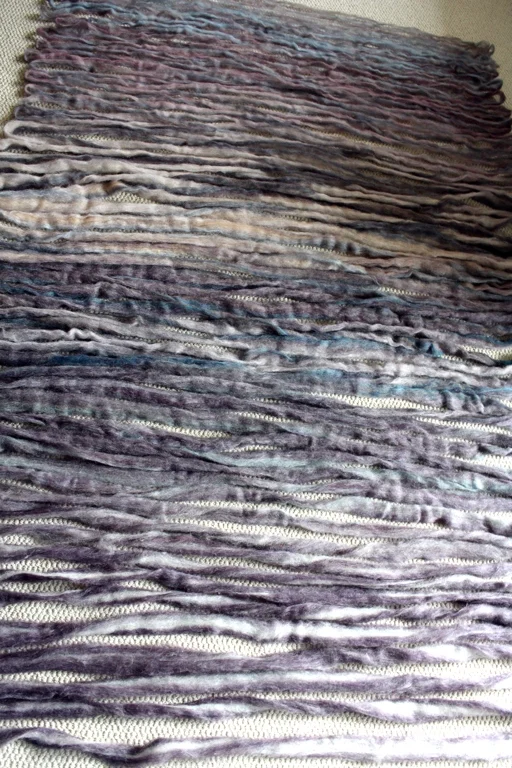
The next step was unrolling the ball and reminding myself what was inside. I kept unrolling and unrolling and rolling until the roving was laid out in 45” x 66” rectangle! What I found was a lovely, muted gradient. Before I unrolled the roving, my plan was to randomly pull sections and make 3 skeins of 2-ply. The gradient made me reconsider. I split the roving into the major color changes and wound them into nests. I’m going to spin each nest and chain-ply them in the order I found them. Don’t know if I’ll finish before I make it to Yarn Fest, but I’m going to try. As for what the yarn will become, well, a semi-circular shawl sounds pretty good right now. 

It’s been way too long since I sat down at my wheel, but a lovely, low-key gradient is bringing me back. | withwool.com

Sockhead in Progress

Yarn from the deep stash finally told me what it wants to be - a Sockhead Hat! | withwool.com

My sock knitting mojo has disappeared. Once I bound off the last pair, cosy and nice as they are, I wasn’t excited to start another pair. So I didn’t, but I still wanted some auto-pilot purse knitting. 

The good thing about having a sizable stash is that I can still find yarn I want to use even if a particular kind of project doesn’t appeal. This time a skein from the deep stash circa 2012 was calling my name. I had wandered into my favorite yarn shop way back when because it seemed like something fun to do and found this beauty on the clearance shelf. I loved it and bought it even though I had no clue what to do with it which is how a lot of yarn came into my stash. I figured the yarn would tell me what it wanted to be eventually. Didn’t expect it to take 5 years though. 

Yarn from the deep stash finally told me what it wants to be - a Sockhead Hat! | withwool.com

The yarn wanted to be a simple, slouchy hat which is great because my hat knitting mojo is on the rise. The marled colors would hide anything detailed or lacy so I kept things simple and went the with Sockhead Hat. The 13,573+ projects on Ravelry can’t be wrong, right? Sockhead has been in my queue for awhile, but I could never pick a yarn to use until now. Plus, I’m in the mood for auto-pilot knitting at the moment and this is the perfect project. 

A post shared by April Klich (@aprilklich) on

I knit a mini swatch to find the right needle size and get gauge before casting on. If only the swatch hadn’t lied to me. I’d almost finished the 4” of ribbing when I tried it on. My slouchy hat was tight and not slouchy at all. I put it in time out for a couple days and then ripped it out. Cast on again with 160 stitches the second time around, and it seems to be the magic number. The ribbing is cosy without feeling tight and the stockinette seems perfectly slouchy. Hope I have enough yarn to knit the hat as long as the pattern calls for. And that the longer circular needle I ordered arrives soon. Don’t want to tug the slightly too short cable just so every round for magic loop.  

Yarn from the deep stash finally told me what it wants to be - a Sockhead Hat! | withwool.com

FO: Meadow Multi Socks

Toe-up socks with afterthought cuffs make perfect travel knitting. | withwool.com

It’s March and it feels a little strange to be thinking about holiday parties right now, but that’s when I cast on for these socks. I needed something to keep my hands busy at a potluck last December and a pair of toe-up socks were just the thing. Then the pair was my constant companion, even if I didn’t always take them out of my purse. They flew cross-country and back, went to movies, binge watched tv, and went skiing with me too. I’ve got a lot of memories knit into these socks even if they are just a simple 2x2 rib.    

Toe-up socks with afterthought cuffs make perfect travel knitting. | withwool.com

The pattern is my own default toe-up vanilla sock with an afterthought leg. Ever since trying Cat Bordhi’s Houdini Socks pattern, I really prefer it over working an afterthought heel. When you bind off the cuff, you’ve got a finished sock - aside from weaving in ends - that’s ready to wear. That beats having to come back and add a heel any day of the week. 

Toe-up socks with afterthought cuffs make perfect travel knitting. | withwool.com

The weather’s been on the weird side for the past few weeks. It snowed for a couple of days, and by the end of the week temps were in the 70’s. I didn’t need a jacket, let alone a pair of wool socks. And now it’s chilly again. Weird. At least the socks are ready to warm my toes when it does get cold. 

Toe-up socks with afterthought cuffs make perfect travel knitting. | withwool.com

The Specs

Pattern: My Default Toe-Up Sock with an Afterthought Cuff

Yarn: Knit Picks Stroll Multi - Meadow Multi

Needles: 2.25 mm circulars

Dates: December 13, 2016 - February 18, 2017 

@Ravelry

Handspun Experiments: Opposing 3-ply Sock Yarn

Is handspun 3-ply opposing sock yarn more durable than a traditional 3-ply construction? | withwool.com

The end goal for this yarn was always going to be a pair of socks. So I followed the internet’s advice which recommended spinning a high-twist opposing 3-ply construction. What makes this construction special is that one ply is spun in the opposite direction which is supposed to add elasticity and increased durability. I started with 8 oz of Louet Northern Lights Top, color Blue Spruce, which is space-dyed and a blend of similar wool types. It’s not as soft as Merino, but seemed much more durable. 

A post shared by April Klich (@aprilklich) on

I split the top lengthwise into 3 more or less equal sections for each of the 2 skeins. I spun each ply with a fairly firm twist to stand up to the extra wear and tear of socks. 2 of the plies had Z-twist, and 1 had S-twist. Plying a balanced yarn was a trial since the S-twist skein took in even more twist and would kink up when given half a chance. Next time, I’ll experiment with putting less twist on the opposing ply and make up for it during plying. You can read more about how I spun the yarn here.

Is handspun 3-ply opposing sock yarn more durable than a traditional 3-ply construction? | withwool.com

I didn’t photograph the pair (find all the knitty details here) when I finished them, and the socks got about a month of regular daily wear before camera time. While spinning the yarn, I was worried about holes. Now I’m pretty sure the socks will felt before a hole even thinks about opening up. The stitches on the bottom of the sole have already started felting together and loosing some of their stretch. The stitches on the side and top are still distinct and flexible though. Any eventual repairs I have to make will probably be more difficult because of the felting, but at least I’ll notice the holes before they get too big. 

Is handspun 3-ply opposing sock yarn more durable than a traditional 3-ply construction? | withwool.com

The jury is still out on whether or not the opposing ply yarn construction is more durable than a traditional 3-ply. I will keep you updated though as things develop. And when I spin a traditional 3-ply as sock yarn.

There’s one other skein of opposing 3-ply sock yarn stashed away for me. This skein is my first attempt at an opposing ply sock yarn. It’s a true fingering weight spun from Falkland top. Once I’m ready to whip up another pair of vanilla socks, I’ll give this yarn a try. I can’t be the only one without handspun socks in this house after all.

FO: My First Handspun Socks

My first pair of handspun socks is off the needles and on to happy feet! | withwool.com

When I was first learning spin, one of my far way goals was to spin durable yarn for socks. It took me a few years to reach the point with my skills and confidence to try and actually succeed. Then it took me another year (or was it two?) to spin more sock yarn and finally use it for socks. This pair was for the Bearded One, which is why I finally took the plunge and cast on. When I knit to keep my own toes warm, other sock yarns and fun patterns somehow keep distracting me.

My first pair of handspun socks is off the needles and on to happy feet! | withwool.com

The yarn was always going to be the star of the show. When I sat down to design the pattern, I knew that the striping and mottled colors would only obscure a more detailed stitch. So I went with my standard vanilla sock with 2x2 rib which would also make for a well-fitting sock. I also added a princess sole, where the stockinette side of the fabric is against the foot, to smooth out any bumps that might have come with using a sometimes thick-and-thin yarn. The downside to the princess sole was that it slowed me down since I had to purl a big chunk of every row. That changed when I knit the second sock inside out, and worked the reverse of pretty much every stitch. Take my word for it, it’s much easier working lifted increases on the knit side of a fabric. 

My first pair of handspun socks is off the needles and on to happy feet! | withwool.com

I had a few worries when I cast on for this pair. One, would the half pound of yarn I spun be enough? It’s not like a I could go to the store and buy more. Two, would knitting smooth out the unevenly plied and unruly sections of yarn? Now I know the answers to both those questions are an obvious yes, but figuring that out definitely kept me on my toes. I have a few yards leftover for darning. Plus, I can’t point out the sections where the yarn was more snarled than smooth. 

The best part is that all that work - picking a yarn construction, spinning the yarn, setting the twist, designing the pattern, and then knitting two huge socks - has been rewarded. This pair is the Bearded One’s new favorite out of the many pairs of socks I’ve made for him. Knowing that does a spinner/knitter’s heart good, and makes sure the hand knit socks keep coming. 

My first pair of handspun socks is off the needles and on to happy feet! | withwool.com

Pattern: My own basic vanilla sock with 2x2 ribbing and a princess sole

Yarn: Tour de Fleece 2016 Sock Yarn 

Needles: 2.75 circulars

Dates: September 22 - December 11, 2016

@Ravelry 

How To Block A Ribbed Scarf

How to Block a Ribbed Scarf. And what does it mean to block knitting anyway? | withwool.com

I was thrilled to bind off the Melded Scarf, you can get the pattern here, but I knew I wasn’t done. The first few inches I reknit after frogging looked wonky. There were rows that stood out more than the rest. I could tell where I stopped knitting one night and picked it up again the next day. I knew I had to block the scarf to wash it and get it looking and feeling it’s best.

What is blocking?

Blocking is a finishing technique that makes a piece of knitting go from good to great. Blocking evens out stitches and gives the knitting - scarf, shawl, or sweater - it’s final shape. I think many knitters picture complicated lace shawls that have been stretched and pinned to the limit when someone mentions blocking.  But blocking doesn’t equal stretching. It’s wetting, laying out the knitting in the shape you want it to be, and letting the piece dry. 

Every natural fiber yarn benefits from blocking. Blocking can drastically change natural fiber yarns. Yarn can “bloom” and get softer. Stitches can grow and stretch. Gauge can definitely change and affect the size of a finished piece.  So always knit a big swatch and block it the way you’d block the finished project.  Blocking will even out stitches worked in synthetic blends like acrylic, but it won’t do much more then that.

There are several different ways to block knitting and different fibers do better with different methods. The Melded Scarf I’m working with is 100% non-superwash wool which reacts well to wet blocking, the method I’m using here. Check the care instructions for your yarn to choose the best method for your project.

Materials:

  • the scarf
  • a no-rinse wash (I use Eucalan. ) 
  • a large flat surface that you can put pins in (foam mats, carpet, or a DIY board
  • a towel
  • a tape measure
  • a ruler
  • a few rustproof pins

Step-by-Step

1. Fill a sink or small tub with cool water and add a capful or two of no-rinse wash. Submerge the scarf and let it soak for about 20 minutes. 

2. Take the scarf out of the water in one big lump. Squeeze out as much water as possible, but don’t wring it, before laying it out on a towel. Roll the scarf up in the towel, and squeeze out even more water. Standing on the scarf burrito works well for me. 

How to Block a Ribbed Scarf. And what does it mean to block knitting anyway? | withwool.com

3. Unroll the towel where you’re going to block. Then lay the scarf out flat, making sure that it’s in a straight line. Also make sure that there aren’t any parts of the ribbing that look more stretched out. 

If, like the Melded Scarf, your scarf has 2 distinct halves, use the tape measure to make sure both halves are the same length. If one half is longer than the other, carefully pull on small sections of the shorter side. Work from the middle to the end. The scarf is vary malleable at this point so you won’t have to do much to gain an extra inch or two. 

How to Block a Ribbed Scarf. And what does it mean to block knitting anyway? | withwool.com

4. Time to break out the ruler. Hold it across the scarf to make sure the width is the same from end to end. For this scarf, that’s about 6”. Where the scarf is narrower, pull out both edges to the width you want. Working an inch or two in from the edge will keep the ribbing from looking more stretched out than the rest of the scarf. 

How-to-block-a-ribbed-scarf-step-5.jpg

5. To get crisp corners at the ends, pull each corner to the shape you want and pin it. 

6. Let it dry, take out the pins, and you’ve got a cosy new scarf.

How to Block a Ribbed Scarf. And what does it mean to block knitting anyway? | withwool.com

Video Tutorial: Carrying Yarn Up The Side Of Your Knitting

 Learn how to work stripes and carry yarn up the side of your knitting with this video tutorial. | withwool.com

With the release of the Melded Scarf pattern, which you can find here, I decided to create a video tutorial of how to carry yarn up the side of your knitting when working short and tall stripes. Why learn how? There won’t be near as many ends to weave in at the end. Plus the yarns neatly twist together and are ready to use when you need them.

If you’d like to learn how to carry yarn up the side from step-by-step photos instead, here’s a link to that tutorial.

Learn how to work stripes and carry yarn up the side of your knitting with this video tutorial. | withwool.com

The Melded Scarf is worked in 1x1 rib with a selvedge stitch on each edge which hides the carried yarn really well. You can see blips of the carried yarn on the taller stripes, but they don’t stand out. Definitely less noticeable and less work than weaving in a bunch of ends. 

How To Work "sl1 wyif"

What the knitting abbreviation “sl1 wyif” means and how to work it. | withwool.com

The Melded Scarf, get the pattern here, is a straight forward pattern to knit with 1x1 ribbing and stripes. So why is there a “sl1 wyif” worked at the end of each row and what does that mean? “sl1 wyif” is an abbreviation which means slip 1 stitch purl-wise with yarn in front. Because the "sl1 wyif" is worked at the end of the row, that slipped stitch creates a selvedge edge which gives the scarf a neat, finished edge. It also has the neat side effect of pushing and hiding the carried yarns from the stripes (video tutorial coming Thursday) away from the edge of the scarf. 

The "sl1 wyif" along with it's opposite "sl1 wyib" - slip 1 stitch purl-wise with yarn in back - is also a big part of Mosaic Knitting, which you can learn more about here.

What the knitting abbreviation “sl1 wyif” means and how to work it. | withwool.com

So how do you work a "sl1 wyif"?

A post shared by April Klich (@aprilklich) on

1. Bring yarn to the front of the stitch

2. Slip stitch purl-wise to the right needle

Since this stitch is sitting on the end of a row, you’ll turn the scarf and start knitting the next row. No other special techniques required.  

Free Pattern: The Melded Scarf

Introducing the Melded Scarf - a free scarf pattern designed for the Foster Care 2 Success’ Red Scarf Project. | withwool.com

The Melded Scarf is what happens when two colors meet in the middle and come together to make a cosy and bold striped scarf. Worked in 1x1 rib the scarf is reversible, and looks great on anyone. The Melded Scarf is also a great showcase for variegated and gradient yarns.

Check it out on Ravelry and add it to your queue!

Introducing the Melded Scarf - a free scarf pattern designed for the Foster Care 2 Success’ Red Scarf Project. | withwool.com

I originally designed this pattern for Foster Care to Success’s Red Scarf Project which collects red scarves to send college-bound foster youth for Valentine’s Day. I first read about the project several years ago when I was a college student myself.  I probably should have been studying, but I was hunched over my laptop reading knitting blogs instead. A huge part of the reason I got into college and made it through 5 grueling years was because I had the support of my parents. Without them and their support everything from buying books, to final exams, to pulling all-nighters (saw so many sunrises from my studio desk) would have been so much more difficult. And it was so nice getting notes and surprise care packages from home. It was amazing and wonderful knowing that people were cheering me on. I wanted to share that feeling and support with others, and I still do. 

If you enjoy the pattern, please consider making a scarf for the Red Scarf Project or making a donation to the Foster Care to Success program. They provide scholarships, coaching, care packages, and an emergency fund to help foster kids get through college. And, according to Charity Navigator, the majority of the money F2C receives actually goes to it’s programs and services.

Introducing the Melded Scarf - a free scarf pattern designed for the Foster Care 2 Success’ Red Scarf Project. | withwool.com

The Doctor Who Scarf Saga: Part 2

Doctor Who Scarf Update Part 2! The scarf is finally halfway done, though my gauge is very different after 7 years. | withwool.com

Sound the trumpets! My Doctor Who Scarf is finally past the halfway point, and it’s 91.5” long. Also known as 7.6’ or 2.5 yards or 2.3 meters. Now I can make a reasonable guess that the final length (before blocking) will be about 15’. And that doesn’t include tassels either. I can only imagine how the weight of all that yarn and garter stitch’s natural tendency to stretch will change that number. Good thing I want a giant, cosy scarf. 

When I started knitting this scarf of so many years ago the uneven edges really bothered me. I was still a relatively new knitter at the time, and creating a straight edge was a point of pride. I chalked it up to using different balls of yarn since some colors pulled in and others expanded at the edges. Blocking will fix this, I thought. Now, the uneven edge doesn’t really bother me because the edges on the original scarves weren’t even either. Plus, uneven edges won’t be that noticeable when I’m wearing it. 

 Doctor Who Scarf Update Part 2! The scarf is finally halfway done, though my gauge is very different after 7 years. | withwool.com

I could have titled this post “My Gauge Is Not What It Was”. A wobbly edge is one thing, but as I knit more and more of the scarf it is impossible not to notice that my gauge has changed. The part of the scarf that was tucked away in a bag for years is about 10” across. The new stripes are about 11.5” across! Same number of stitches. Same yarn. Same needles. Different gauge 7 years later, give or take a few months.

Now I could rip back to the old section of knitting, switch to a smaller needle, and get knitting again. I could, but I’m not. I like this looser gauge and, more importantly, I’m fairly sure I’ll still have enough yarn to finish. That’s the important part after all. I might block just that one section of the scarf to get it to match the rest though I haven’t made up my mind yet. I’ve got a bit of time to figure that out.

Doctor Who Scarf Saga: Part 1

Long Term Project: The Doctor Who Scarf

Time to finish my Doctor Who scarf! | withwool.com

One of my goals for 2017 is to focus on big projects that I’ve been putting off or have put on the back burner. One of those projects is learning how to make batts on my drum carder. Another is finally darning that mountain of well-worn socks. And then there are other projects that have spent the past few years packed up in boxes. My season 16 Doctor Who scarf is one of these. 

I don't even have to look at my Ravelry notes to know that this is my oldest work in progress. The Bearded One bought me the yarn as a Christmas present years before we got married. I cast on in February 2009 (!!) and worked on it in spurts over the next year or two. It was good company to all my required reading college reading. The Scarf was several feet long by the time I put it down to work on other more interesting projects. It is nothing but garter stitch for literally miles of yarn after all. 2.62 miles of yarn if you want to be precise about it.

Time to finish my Doctor Who scarf! | withwool.com

I wasn’t trying to break any speed knitting records when I started. I figured it would be something I’d pick up and work on whenever the mood struck. Though I didn’t think it would take 8 years. But, yarn as my witness, it will not take 9. And as it turns out, my brain and fingers are craving simple auto-pilot knitting. All I have to do is count the rows for each stripe. 

Since I pulled The Scarf out of WIP limbo a couple weeks ago, I've made good progress. Past me was super helpful and included The Scarf, the pattern - complete with detailed row count progress - an accurate row counter, and one ball of each color in the bag. Evenings with tv, movies, and audiobooks have seen the scarf grow from one third complete to not quite halfway done. And it’s already 80” long. 80” long. It already makes a pretty good blanket piled up in my lap. And I can wear it while I knit on it which is pretty cosy. I can only imagine what wearing it in its full tasseled glory will be like. Well, I’d better get back to the knitting if I going to be able to wrap up in it by next winter. 

FO: Shawls for Two

I made an Elder Tree Shawl and a Myndie Shawl as gifts for two excellent friends. | withwool.com

An Elder Tree Shawl and a Myndie Shawl. These were the 2 big projects I made for the holiday gift knitting rush. I was definitely rushing and around to finish things at the last minute, but these two were first on the list so I wouldn’t stress over them. Staying up late, counting, beads, and an impending sense of doom are not a good mix for me. So, once I’d finalized the knitting gift list and pulled the needed yarn from stash, I started on the Elder Tree Shawl. It was the most complicated project on the list and I didn’t want to rush it. 

I made an Elder Tree Shawl and a Myndie Shawl as gifts for two excellent friends. | withwool.com

Elder Tree turned out to be a fairly easy knit once I got the pattern straight in my head. Except for this one repeat. It was almost finished and I was all too happy to mark my progress. Then I got to the far edge of the pattern and noticed my stitch count wasn’t quite right. My first inclination was to fudge it and keep going, but no such luck. The leaves were mashed together and I had no choice but to rip back. Still, I didn’t want to lose a night’s progress and tried ripping just that one portion. Probably would have worked too if there’d been enough yarn to work all the stitches. I ripped and reknit that one section 2 or 3 times and it never looked right. So, out came the needles, all of those rows turned into yarn again, and I spent the rest of the night making sure the yarn overs didn’t run away. Worth it. 

I made an Elder Tree Shawl and a Myndie Shawl as gifts for two excellent friends. | withwool.com

The yarn, Jojoland Melody Superwash, and the lace worked so well together. I happened to have purple beads from a previous project and they were the perfect added touch to the last repeat. This was the first time I’ve knit a beaded shawl and I love the look. Definitely need to add a few to the queue for myself. 

I made an Elder Tree Shawl and a Myndie Shawl as gifts for two excellent friends. | withwool.com

And now the Myndie Shawl. This pattern is also on the list of things I want to knit for myself this year. Once I figured out how to work the pattern in a heaver yarn, it was smooth sailing. I ended up using way less yardage than the pattern called for, but you wouldn’t be able to tell. Thanks to a firm blocking, this shawl grew from a sad looking lump to beautiful 80” long wrap. 

Knitting a shawl or anything else as a gift can be a stressful and time consuming endeavor, but I’m happy to do it for good friends and family. It’s not something I do lightly either, because every stitch is a declaration of how much I care for and appreciate the recipient. I’m not a human knitting machine after all. 

I made an Elder Tree Shawl and a Myndie Shawl as gifts for two excellent friends. | withwool.com

Pattern: The Elder Tree Shawl by Sylvia McFadden

Yarn: 431 yds Jojoland Melody Superwash - ms08

Needles: US 4 (3.5mm) circulars

Dates: September 21 - October 9, 2016

@Ravelry

Pattern: Myndie by Ambah O’Brien

Yarn: 358 yds Araucania Nature Wool - 07

Needles: US 8 (5 mm) circulars

Dates: October 10 - 16, 2016

@Ravelry  

Aubie The Captivating Tiger

Say hello to Aubie the Captivating Tiger! | withwool.com

Say hello to Aubie the Captivating Tiger! He was one of the last projects I made for the 2016 gift knitting rush, and definitely the cutest of the bunch.  At first Aubie was going to be a cat knit in a bright, unnatural color like this one, but then a few thoughts came at me all at once. One, said cat is going to be knit for the daughter of one of my best friends from college. Two, said college mascot is a tiger (War Eagle!) and there’s no lack of school spirit in their house. Three, I had yarn in perfect Auburn colors. There was no way I couldn’t knit Aubie.

Say hello to Aubie the Captivating Tiger! | withwool.com

I made the arms and tail first so I could sew them on as soon as the body was finished. I also spent a good chunk of time embroidering the face and getting the expression just so. He was technically done, but looked naked. So he got a bandana. I used my Show Off Boomerang shawl pattern as a base. When it was wide enough to cover the front half of the body, I cast on more stitches to wrap around the rest of the neck. Then I knit a few more rows, bound off, and added a button. Aubie was ready to hit the road.             

Say hello to Aubie the Captivating Tiger! | withwool.com

Since I’ve made several of Rebecca Danger’s toys, I have a few mods that I make every time. You can see the full list on the Ravelry project page. For Aubie, I also tried something new. I’ve always had a hard time sewing arms on toys with a nice looking seam. Were the arms on there? Sure, but it wasn’t always pretty. This time I used duplicate stitch, making sure to go through both layers of arm every time I made a new stitch. The seam is both sturdy and near invisible. This kind of seaming does make the arms stick up a little, but that only adds to the charm. 

The pattern base I used, Greta the Captivating Cat by Rebecca Danger, has never let me down. It’s cute in any yarn, a quick & easy project, and is a great canvas for special added touches. Plus, kids and adults love it. I was so tempted to keep this one for myself because it was too cute. I’ve got plenty of yarn to make a twin though and I’m sure I will.

Say hello to Aubie the Captivating Tiger! | withwool.com

Pattern: Greta The Captivating Cat by Rebecca Danger

Yarn: 93 yds Knit Picks Telemark, Tangelo and Skyline, and 17 yds Wool of the Andes Sport, White

Needles: US 3 (3.25 mm) circulars

Date: December 3 - 11, 2016

@Ravelry

Good Bye 2016, Hello 2017

A recap of With Wool’s 2016, and what to expect in 2017. | withwool.com #2016bestnine

In the last week of 2016, I read the Aroha Knits blog and Frenchie talked about acknowledging and celebrating her 2016 achievements. After reading her list (and everyone else’s 2016 wrap up posts) I wanted to tally up my own. Then I couldn’t think of a single thing! I knew wasn’t true. I just hadn't really kept track. So I went through a year’s worth of blog posts, my Ravelry designer profile, and random notes to figure out what I'd accomplished. 

The Show-Off Boomerang by April Klich | withwool.com

1. I published 3 knitting patterns - The Odd Couple Shawl, The Show Off Boomerang, and The Waffle Time Washcloth - in 2016 and did the ground work to release at least 3 more in 2017. 2015 was a pretty empty year with just 1 pattern release and I’m glad 2016 was more active. 

The Odd Couple Shawl by April Klich | withwool.com

2. While we’re on the topic of patterns, I’m also incredibly happy with the release of the Odd Couple shawl. After months of fiddling with the details and worrying if anyone would actually like it, Odd Couple received the best response of any pattern I’ve published! So, thank you!

3. I made a real effort to be consistent with this blog and my newsletter, With Wool Weekly, you can subscribe here. There were a few stumbles along the way, but I’m proud that I wrote, photographed, or filmed something for almost every week of the year. 

Swamp Thing Handspun - Superwash BFL | withwool.com

4. I spun this amazing skein of handspun, and it’s my favorite skein that I’ve spun so far. I’ve picked up a few more fibers in the same vein to keep experimenting and spinning what I love. It’s a great motivation to keep learning and sharing that process with you.

5. Growth. With Wool has grown by a third (basing this math off page view and daily user analytics) during the past year. The With Wool Weekly newsletter has grown to triple digit subscribers! I’m thrilled you’re all here and I’m going to keep working hard to bring you knitting, spinning, and wooly goodness.


All in all, I’m proud of what I accomplished and am buckling down to keep the momentum going in 2017. My word for the year is “Focus”. Focus on big, long-term projects. Focus on community. Focus on work. Focus on progress made through small daily steps. So what am I planning for 2017, besides from keeping better track of my achievements? 

  1. More knitting patterns. Like I said above, I’ve got 3 knitting patterns in the works right now and that’s not counting all the sketches and swatches ready for the next step. I also want to reach out and submit designs to magazines. I’ve gotten plenty of “no’s” on that front. Maybe this year I’ll get a “yes”.
  2. New tutorials for knitting, spinning, and whatever else I want to share. I’m trying to branch out with more video tutorials too.
  3. Grow and engage more with the With Wool community. Overall, I want to talk knitting and spinning, share fiber arts goodness, and be more active socially. I have a few ideas about how to do this which I'll be sharing soon.   

Now that I’ve pulled together my 2016 achievements and 2017 goals, I’m curious about your achievements and plans. What are you proud of or looking forward too? What’s your one word for 2017?

2016 Gift Tag Round-Up

It's almost time to put all those knitted, crocheted, and handmade goodies under the tree. So, I'm rounding up a few of my favorite printable gift tags to make wrapping faster and easier. Anything to get a few more minutes of knitting time is a good thing!   

And here's the last gift tag round up with even more goodies!

Lovely, and simple gift tags for puresweetjoy.com

I love the simplicity of this lovely gift tags from puresweetjoy.com.

Enjoy these cute fox and reindeer gift tags with Scandinavian flair from foxandhazel.com

Looking for something cute and colorful? foxandhazel.com has beautiful gift tag printables with a Scandinavian twist. 

Gift tags with just the right amount of snark from smallfriendly.com

Need a little snark to go with your handmade gift? smallfriendly.com has you covered. 

Printable gift tags with vintage flair from Sew DIY.

Want a vintage touch to your tags? Here are some simple, cuties from Sew DIY

Sweet and straight to the point gift tags from masondixonknitting.com

Simple and straight to the point gift tags are great too. Get this free tag from masondixonknitting.com.

Free Pattern: Waffle Time Washcloth

The Waffle Time Washcloth is just the right size with a stitch pattern that looks great on both sides. | withwool.com

After knitting more washcloths and kitchen towels than I care to count, I have some very definite opinions about washcloths. The stitch pattern doesn’t have to be reversible, but it should look good on both sides. Garter stitch borders are a plus. Cloths with a bit of texture are perfect for scrubbing. And any washcloth much larger than a 7” square is unwieldy and too big. 

The Waffle Time Washcloth is just the right size with a stitch pattern that looks great on both sides. | withwool.com

I wanted to make a few washcloths as gifts and couldn’t find a pattern that I matched all my criteria. So I picked a scrubby stitch pattern and went from there. The cloths were quick to knit, and they’ll be sweet gifts with some lotion and a nice bar of soap.

If you share any of my opinions on washcloths, you can get the pattern below. Happy knitting! 

The Waffle Time Washcloth is just the right size with a stitch pattern that looks great on both sides. | withwool.com

Still Gift Knitting

Just need to finish this tiger and I’ll be so close to finishing 2016’s gift knitting. | withwool.com

I’m knitting a tiger. Well, a cat with orange and blue stripes. The pattern, Greta the Captivating Cat by Rebecca Danger, is one I’ve knit before with great results. It’s cute, cuddly, and sweet too. Once you cast on, it’s also a fast and simple knit though it doesn’t seem that way if you knit the body and then the arms, tail, and ears. To speed things along and get a finished tiger sooner, or at least make it seem that way, I knit the arms and the tail first. Then I don’t have to wait to sew them on. Anything to make holiday gift knitting in December a smoother process is fine by me. 

As for the rest of this year’s gift knitting, I’m calling it. All the big stuff I wanted to do, is done aside from a good soak and blocking. It’s all the little things that I kept adding to the list that I’m skipping. The endless variations of ornaments and “wouldn’t this be neat” things were stressing me out. So they’re gone. I’m going to knit a few ornaments, finish that pair of handspun socks, and call it good. Besides, I’d much rather stay up late playing Final Fantasy XV than worry over my knitting. My wrists and shoulders are already thanking me. 

Knitting Handspun Socks Part 2

I’m knitting a sock inside out! | withwool.com

I’m still knitting my first pair of socks from handspun (you can read part 1 of the tale here). It’s also the first time I’ve tried adding a princess sole - the smooth side of stockinette stitch is against the sole of the foot instead of the bumps - to a pair of socks. The socks have been great purse knitting, but the making the first sock was slow going because off all the purling on the sole and gusset increases. 

I’m knitting a sock inside out! | withwool.com

Why is so easy to overlook the simplest solution to a problem and instead go with a more complicated fix? After I turned the heel and knit the heel flap, a light bulb went off in my head. I could knit the second sock inside out! The only purling I’d have to do would be for the top half of the toe and the ribbing. I used the same cast on at the toe and the same increases. Instead of purling the sole, I purled the top half of the toe. I reversed the rib pattern from *k2, p2* to *p2, k2*. I’m glad I went with a simple stitch pattern over the foot otherwise knitting the sock inside out would be a little more complicated. 

I’m knitting a sock inside out! | withwool.com

The little bit of effort I put in upfront has been worth it because the second sock is zooming along. It’s almost time to knit the gusset which will actually be easier to work inside out. The combination of purled increases and marled yarn made it really hard to tell if I’d correctly worked an increase row on the first sock. Or if I was even on an increase row. Happy to have solved that problem this time around.

Okay, now it’s time to double check my gusset math and get back to the gift knitting. 

With Wool Winter Sale!

With-Wool-Winter-Sale-2016.jpg

Clockwise: Odd Couple Shawl, Mosaic Sisters, Sapling, and Diagonal Socks

Working through your holiday gift knitting? Just getting started? Or knitting something for yourself? All With Wool patterns are on sale! $2 off all patterns, no coupon code required. Add the patterns to your Ravelry cart (no account required) and the discount will be applied automatically. Happy Knitting and Happy Holidays! 

The sale runs through Tuesday, November 22 to Wednesday, November 30 midnight MST.  

For The Red Scarf Project

I’m knitting a cushy scarf in red and grey for the Red Scarf Project. | withwool.com

Better late than never. One of the first things to go on the holiday knitting list this year was a scarf for the Red Scarf Project. The project, run by Foster Care to Success, sends college bound foster youth red scarves as part of a Valentine’s Day care package. I first read about the project years ago when I was cooped up in my own college dorm room, so the project struck a nerve. It’s been a few years since I made a red scarf and it was time to fix that.

I found the perfect red in Yarn Fort, a ball of Patons Classic Wool in Bright Red. The problem was that I only had 1 ball which isn’t enough for a scarf.  Thankfully, the stash provided another ball of matching Classic Wool in Mercury. One problem solved. Second problem was the pattern. I couldn’t find a striped scarf pattern that I liked and fit the project criteria.  So I put on my designer hat and got to swatching…and frogging. Seriously, my design process involves a lot of swatching and a lot of frogging. How else can I can be sure that my idea will actually work? I came up with a design and an idea that I loved, and still do, but it turned out to be way more complicated than I originally thought. I kept putting off the last construction swatch. Then other holiday knitting came calling - specifically a pair of matching baby hats. Spoiler: I couldn’t find a pattern I like for those either. Rinse and repeat with the swatching and frogging. I finished the hats and a rough draft of that pattern last week, but that’s another blog post.  

So, back to the scarf. The deadline to send in the scarf is December 15 which is exactly a month from now. The time for complicated, half-written patterns passed weeks ago. Back to the drawing board. I’m keeping things simple this time which is more of a struggle for me than I’d like to admit. Going with the tried and true 1x1 rib scarf which is reversible, cushy, and good lucking. It’s also a fast knit that my fingers could do in their sleep. I’ll be changing up the stripe pattern to keep the scarf both interesting to knit and wear. Once it’s done, I’ll be sharing the pattern. That’s about 43 inches from now. Back to knitting with me and a whole lot of Netflix.