Wander the Web 6: Link Love Edition

Once again joining up with Crafty Pod and Link Love to share goodness from across the web. This week’s theme stays close to home and focuses on the most popular posts from yours truly. When I first read through the schedule several weeks ago, it got me thinking about how I haven’t made many tutorials in the past few months. That had to change so I started brainstorming and writing and photographing and editing. In the past two weeks I’ve managed to post two tutorials, How to Ply Leftover Singles and How to Clean Dye Off Spindles, and have a few more in the works. 

While I’m working on the new stuff, check out my most popular tutorials.

ButtonTutorial2.jpg

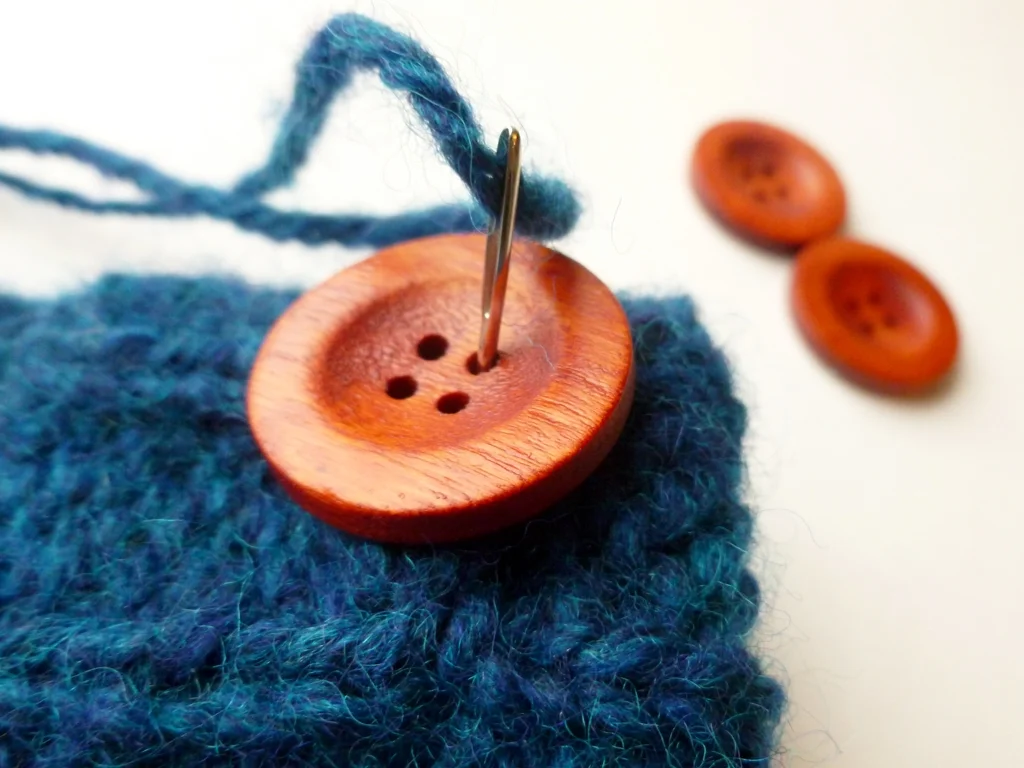
How To Sew On A Button With Yarn - Can’t find matching thread? Use yarn from your knitting or crochet project to sew on buttons without extra bulk. 

KumihimoBraid.jpg

Kumihimo Tutorial: Part One and Part Two - A step-by-step tutorial for making a round kumihimo braid complete with clasp.

PlyingOrigami.jpg

Origami For Plying - Learn how to fold a simple origami star to help ply yarn off a spindle.

AfterthoughtHeel.jpg

How to Knit Afterthought Heels - A how-to and tips for knitting afterthought heels that won’t suffer from gaps or require picking up stitches. Bring your scissors!

Make A Bow Label.jpg

Make a Bow Gift Tags - Use leftover yarn and bits of cardstock to make care labels and tags for knitted and crocheted gifts. 

Did you hear something?

Maybe it was the wind in the trees or a squirrel walking across the roof. Or, the most likely possibility, ninjas.

See? Ninjas. I knew it was ninjas. They’re everywhere. You just can’t see them most of the time. 

Pattern: Wasabi the Gregarious Pug by Rebecca Danger

Yarn: A mix of Patons Kroy Sock 4-Ply and Knit Picks Stroll

Full details @Ravelry

Silliness aside, I made these as gifts and, as far as I’m concerned, they are the pièce de résistance of 2011’s Christmas knitting. The idea to turn a dog and a llama (technically, the pattern is for an alpaca but close enough) into ninjas was really fun right off the bat. I only laughed maniacally most of the time. It wasn’t all roses though. They took a lot longer to knit then I thought they would. Plus, besides from the knitting, stuffing, sewing, and faces both of them have round braid kumihimo belts and katanas made from pipe cleaners covered with i-cord. For future reference, making braids out of sock yarn will take way longer than you think. 

Pattern: Zeke the Aloof Alpaca also by Rebecca Danger

Yarn: Also a mix of Patons Kroy Sock 4-Ply and Knit Picks Stroll

Full details also @Ravelry

Making a llama into a ninja was pretty cool but figuring out how to make a removable emo coif (after this first style) was even better. A few steps:

  1. Once you have knit enough of said llama’s (or some other creature’s) head, insert a small, yet powerful magnet inside and hold it in place with another magnet on the outside. You might have to adjust them a bit before stuffing but they’ll stay in place once the llama has stuffing for brains.
  2. Embroider the face with the magnets still holding on to each other.
  3. Remove the outside magnet and knit a case for it. I cast on with Judy’s Magic Cast On, knit and increased in the round. When it was big enough I started decreasing and then pulled the yarn through the remaining stitches. If the magnets are strong enough they should hold through 2 layers of knitting. 
  4. Cut lots of 6” strands of yarn for the hair. You’re going to need them.
  5. Thread a needle with both ends of a stand and push it part way through a stitch on the case to make a loop. Pull the ends through the loop. Repeat until your llama has a nice, full coif. 
  6. Give it a trim and appreciate the awesomeness. 

While I was making these, I was a bit nervous about how they’d be received. Shouldn’t have worried though since they were a big hit. Does a knitter’s heart good. 

Minty Fresh

I was going to start this off with a nice, little anecdote about feeling comfortable and on schedule with all the Christmas knitting before coming to realize that this was impossible. Instead, I’ll give you the knitty gritty. I think about this space a lot and about writing for this space a lot. I think up cool stuff, knit awesome things, and go on interesting adventures. I write out outlines in my head about this cool stuff/awesome knitting/interesting adventures with the intent of fleshing it out on the computer screen. Then, for whatever reason, I say I’ll do it tomorrow. Then the day after that. And so on. Eventually, a whole month goes by between posts. It’s embarrassing. 

When even my dear Bearded One says I should write a post, I know it’s been a long time.  Just for the record he said that last week. It wasn’t until last night when I felt suddenly and completely motivated to do something right NOW that I finally got off my butt and got moving. The house is clean, the dishes are done, the podcasts are all caught up, and the gift knitting is a little closer to completion(but not really). With all these things ticked off my to-do list, writing a post tonight and not tomorrow sounded like a great idea.

Way, way back in January at the year’s first fiber guild meeting, I volunteered to knit a few hats  for the guild’s Chemo Cap Project. I bought some yarn, looked at potential patterns, and put it all aside to knit later when the yarn wasn’t sticking to my hands. Later, turned out to be November when I remembered I only had one month to finish 6 chemo hats, 11 preemie hats, and all that gift knitting I had planned. Why do I do this to myself every year?

Enter Minty, a free pattern by Erica Jackofsky in the First Fall 2010 issue of Knitty. This hat caught my eye way back then and I added it to my queue to let it simmer for later. One year later on a night before I headed off for a weekend in Atlanta, it was ready. The pattern was simple enough to knit during the last episodes of Star Trek: TNG but interesting enough to keep me occupied through Atlanta traffic. With a striped and solid version, two different crown options, and the ability to squish everything up, there was room for variation and play. Plus, stripes are just fun and so was the little bit of color work at the top.

I ended up knitting all the hats as written...mostly. For the peppermint version, I just cast on with color B and kept going. Also, six combined feet of i-cord just wasn’t going to happen but a round kumihimo braid would. Hat #3 was an exercise in trying to use up as much yarn as possible so I followed the Minty Blue version and just switched colors when I ran out of yarn. I wasn’t entirely sure how it would work out but I’m rather fond of it now.

I’d probably still be knitting these hats if I hadn’t run out of yarn. Might even have six of them but I’m done stressing over it. I’ve done all I can do. Just need to start earlier next time. Oh, and buy more yarn.

Winners! Also, Kumihimo Tutorial: Part 2

Random.org has spoken! The two winners are GateArte and Katie M. of Brokeknits.com. Hope you have fun! Emails are on the way. 

-----

The focus of this tutorial is how to finish off your braid with crimps and a clasp. If you don't want to add any findings, you can just tie of the ends and go or just have fun experimenting. Anyway, here's what you'll need:

  • Your almost finished braid
  • Scissors
  • Super Glue
  • Scrap Thread
  • Clothes Pin
  • 1 Barrel Clasp
  • 2 8mm crimps
  • Small needle nose pliers

Once you’ve made the braid as long as you want, it’s time to finish it off. Make a little slack on the loom by pulling the working end of the braid straight up.

Then pull the braid and the extra thread back through the hole. Wrap the braid with the scrap thread several times and tie a double knot. Repeat until you have 3 or 4 knots.

Now for the scissors. Just past the wrap and all of the knots, cut off the excess floss but leave the scrap thread. Seal the ends with a drop of glue and pin the scrap thread up in the clothes pin. It makes a handy drying stand in a pinch.

While the glue dries, it’s time to join the crimps and the barrel clasp. The ends of the clasp that I’m using rotate freely so the two can go straight together. First, take apart the clasp so it’s easier to handle. Hold one half of the clasp’s eye with the pliers and pull back the other side until there’s enough space for the crimp. Slip the crimp on to the wire and bend the eye back into place. Repeat for the other half of the clasp and it’s time to attach it to the braid.

Cut off the scrap thread. Then put a drop of glue in the crimps and press in the braid ends. Do something fun while the glue dries.

Once everything is dry, crimp the crimps closed with the pliers.

Time to enjoy your handiwork!

Kumihimo Tutorial: Part 1

Seriously, I can’t stop wearing this thing. Everyday this past 2 weeks, I’ve found a way to wear it and make it work with my outfits. It’s so fun and practical that I can’t let it go. Now, if only I could come up with a name for it. Capital letters and “The” should definitely be involved. Lack of a proper name aside, I must make more. Kumihimo manages to keep my hands busy and give me something crafty to do when knitting isn’t an option but there’s still TV to watch. Rigorous testing has proved it to be a great companion to Buffy the Vampire Slayer.

I’ve fallen hard for Kumihimo and I want to share the love. So, I’m documenting the process with a tutorial and having a little giveaway. Included is almost everything you’ll need to make your own “thing.” The pliers, glue, and scrap thread are up to you. I’ve got two kits. So, just leave a comment - maybe suggest a name and which colors you want- and some way to contact you (email, ravelry ID) by July 30th.

There’s more than one type of braid. They can be round, flat, square, or hollow and, traditionally, they’re made on a round stand or marudai. In this post I’m going to focus on a particular kind of braid, an 8 strand round braid, that is made on a modern equivalent to the marudai - a foam disc. Let’s begin!

Supplies:

  • A kumihimo loom
  • 4 skeins embroidery floss (2 the same color)
  • Scrap thread
  • Yarn bobbins or clothes pins
  • Scissors

You won’t need these until after you’re finished braiding:

  • Super glue
  • 8mm crimps
  • Small barrel clasp
  • Pliers

The first thing to do is prepping your floss for braiding. You won’t a full skein for this project just most of one. Open the skein and make sure the ends are free to grab later. Stretch it around your fingers like yarn on a swift and pull both of the ends at the same time. The floss should come off your fingers tangle free and and nicely doubled.

Cut a nice long piece of thread about 18” and pull it through the loops. Tie the thread in a double knot and you’re ready for the next step - winding. 

Even doubled, the floss is way too long to braid without tangling. Separate the floss into 8 strands and wrap them around the bobbins or the clothes pins. As long as you tuck the working end of the floss into the tip of the clothes pin when you’re finished winding, it should hold itself in place while you braid.

Kumihimo looms and marudai are set up around the 4 cardinal points with numbers marking the individual slots. Pull the scrap thread through the center hole and place the 4 same colored strands (black in this case) on the North South Axis (slots 32:1 and 16:17). Both contrast colors go East to West (8:24 and 9:25).

Now that the floss has been doubled, tied, wound, and arranged on the loom, the hard part is over and you’re ready to braid. In one hand, hold the loom and scrap thread from underneath. Make sure to keep a snug hold on the scrap thread since it’ll help keep the loom in your hand and make it easier to start working.  With North at the top, move the North right strand (1) next to right South (15). There will be one strand at North and three at South.

Next, move left South (17) to left North (31). The strands should be be at two and two again.

Rotate the loom clockwise or you can turn counter-clockwise. Just keep the direction consistent.

Just keep repeating these steps - Right down. Left up. Rotate. - until the braid is as long as you want it. For me, the magic number for a chocker/necklace/bracelet/anklet thing is 45”. To figure out your length, take a piece of string and wear it around your neck (or wrist or ankle) exactly how you want to wear the finished braid. Cut the string at that length and use it to measure as you work.

Unless you’re making a much shorter braid, you probably won’t finish in one sitting. So you know where to begin when you pick up the loom again, move the right strand down and stop. When you’re ready to start again, move the left strand up and keep going as usual.

Good luck, have fun, and I’ll catch up with you next week with how to finish it off and add a handy clasp. Let’s see how many episodes of Buffy I can watch in the mean time. Hope you’re having a nice weekend!

Itchy

At first, I thought the red, itchy bumps covering my skin was an annoying case of poison ivy. This was bit odd since I hadn’t pulled any from the flower beds. What I did pull was up a lot of was Sumac. I can very distinctly remember thinking, “I have no idea what this is but what pretty flowers. Shame I have to pull it.” 5 days worth of insane itching later, I no longer agree with that statement. Just in case you don’t know what Sumac looks like either: photos and info. End PSA.

When the bumps were poison ivy, I tried cortisone cream and a flour paste. Both of these things helped but the itching persisted. When the bumps were upgraded to Sumac, I caved in and went to the doctor for a cortisone shot. Should have done that 5 days ago. It’s barely been a day and the itching is almost gone. I also came home with oatmeal soap and oatmeal bath soak. Just in case.

During those 5 itchy days I did everything I could to keep my mind occupied and my hands busy: playing Hoard, knitting secret things, deciding which book to read, even folding laundry. Anything to keep myself from scratching. So, I decided to work on one of my goals for this year explore different crafts. On that list is Kumihimo, or japanese braiding. It’s perfect since it keeps my hands occupied without being too complicated. Like knitting, it’s a simple set of movements that are easy to memorize and allows for great variety with a little practice. There’s also a meditative quality I rather like. Kind of like garter stitch. Also, I can watch Netflix at the same time.

So, this is Kumihimo and what I’ve been staring at since early June: a loom, 4 skeins of embroidery floss, and bobbins. When the mood struck or it was too hot to knit, I’d pick this up and add an inch or two. 45” later I was ready to tie it off.

When I bought the floss, I just liked the color combination and wanted to braid until I used it all up. After a few inches I liked it enough to wear. I ended up back at the store for crimps and a barrel clasp. The finished piece has become a necklace, a choker, a bracelet, and an anklet. Since it’s braided so densely, it has a nice structural quality and it seems like there’s a thin piece of wire inside. I am utterly smitten.

My photography assistant. I think he tries to look evil in every photo I take.

Eventually, he got bored. You know, when I stopped petting him. 

You’re still here?