Heavenly Handspinning Herbal Wheel Wax

Spinning-Wheel-Cleaning-Start.jpg

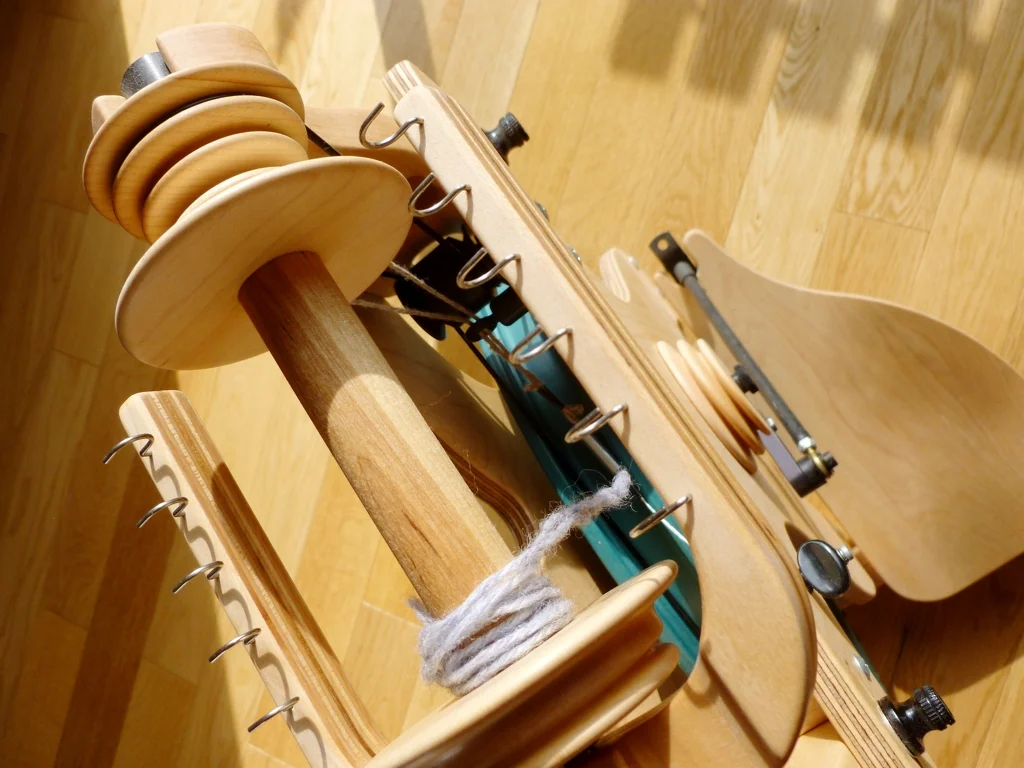
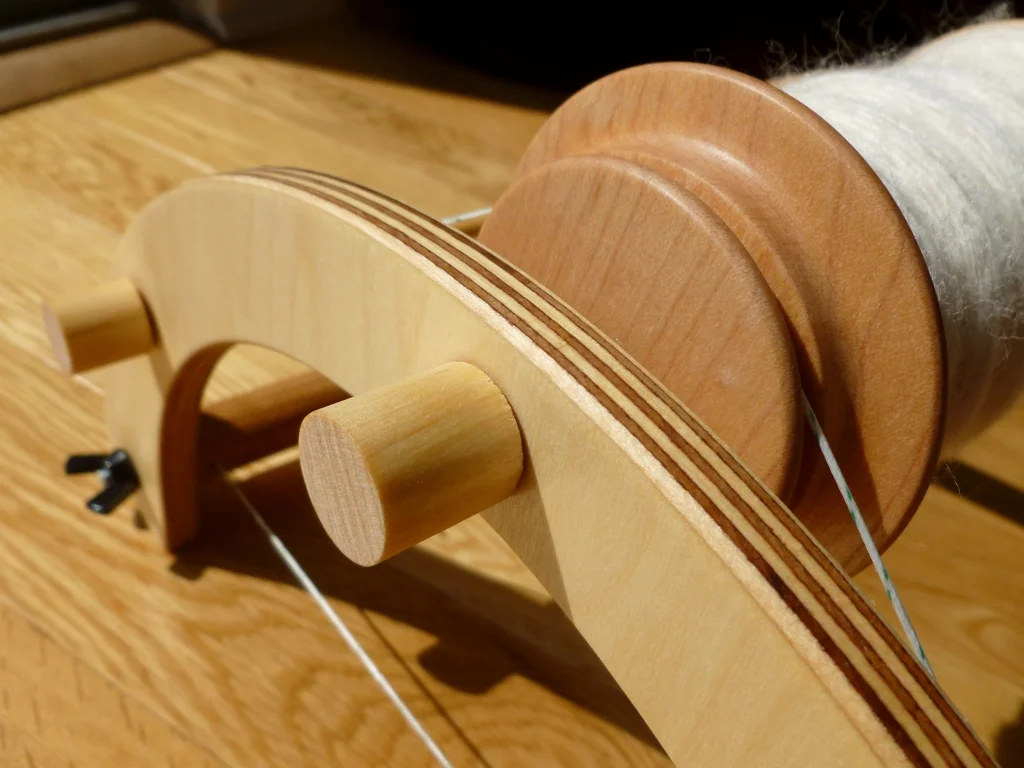
Thursday afternoon, I put a silly horror movie, they do exist, on in the background and sat down to clean my wheel. The process wasn’t as difficult or time consuming as I had imagined it to be. Just detailed. First, I dusted every surface, crevice, and joint I could reach. Happy with the lack of dust, on went the wood wax.

Heavenly-Handspinning-Wheel-Wax .jpg

Thanks to a demo at a fiber guild meeting last year, I was able to buy some Heavenly Handspinning Herbal Wheel Wax from The Yarn Marm. The hardest part of whole process was getting the tin open. Somehow, I managed to not spill half the liquid contents prying of the lid. The wax had a pleasant smell and was easy to apply. I let it sit of 5 minutes before rubbing it off with a soft cloth. Now the wood has a wonderful luster and a layer of protection against dry, salty air. 

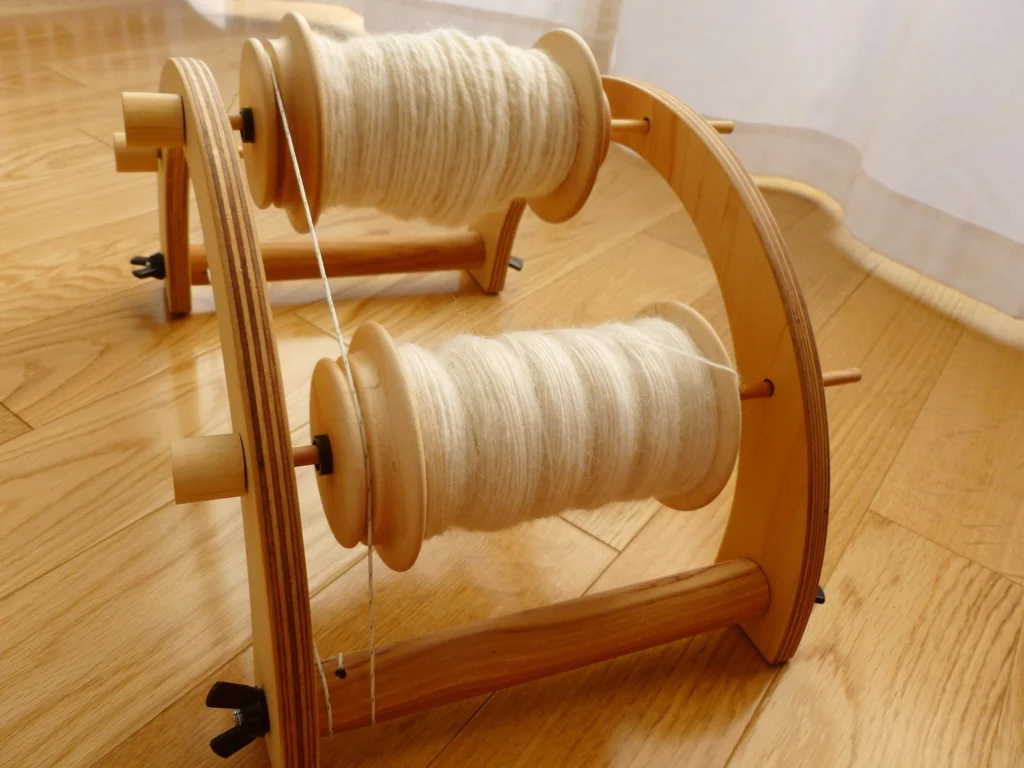
Oiling was a breeze since since only the footmen cranks and the bobbin ends on the flyer needed attention. 

Spinning-Wheel-Cleaning-Time.jpg

From start to finish the entire process only took about 50 minutes. The wheel looked beautiful and ready for a test spin. It spun effortlessly and quietly too. I’m looking forward to spinning a lot of yarn this year so I’m not going to wait months to clean it again. Gotta take care of my Sidekick after all. 

Wander the Web 22

Gwen-Erin-Fiber.jpg

Back home from the holidays and settling into the familiar routine along with a few changes for the better. One thing that hasn’t changed is my lovely fiber stash and I’m looking forward to spinning my first yarn of 2014. The Sidekick is clean, oiled, and ready to go. Let the weekend begin!

Sometimes you just need a cat gif. Then another one and another one…

Incidental Comics: Resolution

Kris Temmerman turned his front window into an arcade game.

365 Grateful

Tips for New and Experienced Knitters

Miniature Edible Scenes by Pierre Javelle and Akiko Ida. So fun and cute, the photos make me hungry. 

Breaking the Rules: A Guide to Successful Yarn Substitution 

Spinning Wheel Maintenance

Dirty-Spinning-Wheel.jpg

Okay, I admit it. I’ve been a bad spinner by not properly babying my wheel. The first step is admitting you have a problem, right? When I first got my wheel, I knew it had to be maintained on a regular basis. The manual talked about oiling and protecting the wood and dusting of all things. Totally doable. But I haven’t done any of those things. Before you drag out the pitch forks and the torches to take my wheel away, know I’m mending my ways. I have oil, wood wax, and dusting cloths. I’m going to spend the afternoon giving my Sidekick a proper cleaning before I spin the first yarn of 2014. After all the work this wheel has done over the past few months, it definitely deserves a little love.

Dirty-Treadles.jpg

Since this is my first time ever deep cleaning a wheel, a little research was in order. I found some helpful articles and have a better idea of what to do. Maybe they’ll help you and your wheel out too. 

The Spinner’s Glossary by Lee Juvan  - Handy overall article with lots of photos, tips, and instructions for cleaning and protecting your wheel. 

How to Care for Your Spinning Wheel - Basic video tutorial for how to clean and protect a spinning wheel; goes through the process for 4 different wheels.

How to Size and Replace Drive Bands

Schacht’s Spinning Wheel Care Tips

The Care & Feeding of Spinning Wheels by Karen Pauli popped up frequently in my research despite being published in 1981. Might get my hands on a copy. 

Design Goals

After reading numerous “Best Of” and 2013 showcase posts, I was inspired to make up a little gallery of my 2013 patterns. Here’s what I have to show off: The Cornered Slouch Hat.

Cornered-Slouch-Hat-Profile.jpg

And that’s it. Just one measly pattern. I had all these ideas in my head; some of which I sketched and swatched and started knitting. Out of all of these, the only pattern that saw the light of day was this hat. Disappointing? Yes. A kick in the pants? Definitely.

So, this year I’m setting a goal. My realistic side wants to design and release 6 patterns. That’s 1 pattern every 2 months. The crazy, overachiever part of me wants to push 1 pattern a month. I’m going to aim for something in the middle and see what happens. Some of the patterns will be ones that have been lingering on my needles and some will be the ones that I just have to cast on for right that second. 

YarnTrio.jpg

The pattern currently dancing around on my needles is definitely one that I wanted to cast on for as soon as the idea popped into my head. Unfortunately, I wasn’t even in the same state as the yarn at the time and had to wait a few days. Turned out to be a good thing since I was able to mull the project over and work out a few details. Well, as well as details can be worked before the yarn hits the needles. Now I’m one swatch in and the whole thing is still a good idea. 2014 is off to a great start. 

2014: Reboot

I’m usually not one to look back and remise at the dawn of a new year but 2013 was amazing. I got married, moved to the other side of the United States, went exploring, bought a spinning wheel, spun lots of yarn, and generally had a lot of fun. 

There were also things about 2013 that were difficult. Things that didn’t happen and other things that were outright disappointing. Also, I completely forgot about last year’s resolution/theme until it was time to make one for 2014. I had to look it up but, in 2013, I wanted to approach my life and projects with bold enthusiasm. Managed to pull it off about 50% of the time despite forgetting it. As for that other 50%? There was fear and guilt and procrastination because of the fear and guilt. Procrastinating doesn’t lead to enthusiasm of any sort unless your enthusiastic about procrastinating. Can’t say that I was but it was a tough cycle to break.   This is were 2014 comes in.

RippedYarn.jpg

REBOOT.

I’m aiming to leave the troublesome trifecta behind and that start fresh. The projects and goals that I kept pushing to the bottom are going straight to the top. I’m not going to feel guilty those things are still undone. Well, I probably will feel guilty but I’m not going to let it stop me anymore. 

Bring it on, 2014. I’m ready for you. I’m going to write, design knitting patterns, edit, swing kettle bells, go exploring, ride my bike, take all of the photos, read books, sketch, spin yarn, and whatever else strikes my fancy. May it be an amazing, kick ass kind of year.  

Pattern: Cornered Slouch Hat

Cornered-Slouch-Hat-Profile.jpg

A quick, simple hat pattern is a great thing to have up your sleeve whether you have a great yarn or just 2 more knitting days until Christmas. Simple cast on. Simple ribbing. Simple stockinette. Simple crown decreases. Simple finishing. Let the yarn do all the hard work. 

I designed the hat to showcase a marled orange and blue beauty of a skein. The yarn was originally a pooling mess of fingering weight that I chain plied to create a lovely, marled aran weight. You can easily use any aran yarn that’ll give you 4 stitches to the inch or ply your stashed fingering weight yarn with the help of this tutorial

Cornered-Slouch-Hat.jpg

Cornered Slouch Hat

Sometimes, all you want is a simple, slouchy hat. Knit up a fun yarn or show off some handspun. This simple pattern with squared decreases is the perfect display for your favorite yarn. 

Thanks to the stretchiness of ribbing and stockinette, this hat will fit a wide variety of noggins. 

Sizes: 21” and 23”

Yarn: 110 - 130 yds of aran weight yarn

Needles: US 7 (4.5 mm) needles

Download Now

Cornered-Slouch-Hat-Decreases.jpg

Pom-Pom Gone Wrong

Pom-Pom-Gone-Wrong.jpg

This isn’t what it looks like. It’s a disheveled pom-pom that doesn’t quite look like a house. Okay, so it is what it looks like. Let me explain. I saw a tutorial for these adorable little house pom-poms over on the Mr Printables blog. Seemed like an awesome idea to make a few as Christmas ornaments. 

Before I committed myself to making 5+ of the things, I decided to whip one up as a test. The wrapping diagrams were pretty easy to follow and the step-by-step photos answered the rest of my questions. Once the pom-pom form was loaded with yarn, out came the scissors. The resulting pom-pom looked nothing like a house. Since I spent at least 10 minutes cutting the thing open, it was abundantly clear that my scissors just weren’t sharp enough to trim it to shape. So, I cut my loses and chucked it across the room. It doesn’t make much of a house but it does make a cushy projectile. 

With the right yarn, sharp scissors, and some practice, I think these pom-poms would actually look like a house. When I have all 3 of those things and a complete lack of mailing deadlines, I’ll try again. 

Balding-Cyclops-Pom-Pom.jpg

Occasionally, I can see the house that it was supposed to be but, most of the time, all I see is a balding cyclops.

Cardboard-Pom-Pom-Form.jpg

What did work surprisingly well was the DIY pom-pom maker also from Mr Printables. I cut it out from a cardboard box and held everything together with rubber bands instead of alligator clips. If you can’t get your hands on an actual pom-pom maker, this version will definitely work in a pinch.  

Counting Down

Just 15 days until Christmas, my dear knitting friends. I hope you're way ahead on all you're projects or at least close to being done. There's just one more thing on my very short knit list, a small ornament, and it should be finished by the weekend. I hope. 

If you're looking for a quick, last-minute gift, I recommend simple hats, mitts, washcloths, and sport weight socks.  They're great tv knitting and you can wrap them up in no time at all. 

Wander the Web 20

Low-Tide-Santa-Monica.jpg

Walking on the beach during low tide, especially in December, never gets old. 

Enjoy the cute that is Goats in Sweaters

Faces in Things finds faces in the strangest places.

Architecture in Ginger Bread

Astronaut extraordinaire Commander Chris Hatfield does an AMA (AKA: Ask Me Anything)

Dr Whoodles: You can’t wear this Dr Who scarf but you can eat it. 

Peppermint Marshmallows! 

Another Day, Another Skein of Handspun

Spunky-Eclectic-Diesel-Handspun.jpg

Another skein of handspun washed, dry, and ready for its close up. It was spun just to be spun. Well, kind of. When I first dug the fiber out of my stash, I wanted to see if I could spin a fingering weight yarn on my wheel using my current whorls. So far, everything I’ve spun has ranged from sport to heavy worsted. The skeins’ random thin bits don’t really count. The last intentional fingering yarn I spun was on a spindle during Tour de Fleece 2013. After playing around with the settings, I was sure I’d figured out how to spin a fingering yarn. I put on the smallest, fastest whorl I had, 11:1, and set a high take-up. The only thing left to do was start spinning.

Spunky-Eclectic-Diesel-Spun.jpg

What I ended up with is definitely not a fingering weight yarn. What it definitely is, is a sport weight with sections of fingering and worsted mixed in. The yarn is beautiful and soft, but not really what I was going for. Oh well. Might teach me to start spinning small sample skeins before starting a project. Who am I kidding? That’s never going to happen when I’m spinning a single 4 oz bump of fiber.

Diesel-Handspun.jpg

Those precious little bumps of fiber are one-off pleasures. Usually, I’m not spinning with a specific project in mind. I spin them to enjoy the process and do something with wool. I want to enjoy the color and the feel of fiber moving through my hands. Of course, I want the yarn too but said yarn is a finished object of its own. It isn’t just a step in the larger process of a shawl of a sweater. It needs to be appreciated as yarn first before it morphs into something else. Plus, I feel like I’m wasting that tiny little bit I’d be tearing off for a sample.

I’m sure I’ll be more scientific and detail-orientated when I start spinning for large projects that  require more than 1 skein. I’ll take notes and spin sample skeins. I promise. Until that happens, I’ll enjoy the process and the inevitable stash enhancement.

The Specs

Fiber: Spunky Eclectic Handpainted Falkland

Color: Diesel

490 Yards

Sport Weight; 12-13 WPI

Diesel-Handspun-Skein.jpg

Black Friday and Beyond Sale

Sapling-Black-Friday-Sale.jpg

Thanksgiving was wonderful this year and filled with lots of great food. The Bearded One and I made Thanksgiving Tacos and were quite satisfied. Now that it’s Black Friday and time for the biggest country wide sale of the year, I might as well join in too. From now, Friday 12 AM PST to 12 PM Friday, December 6, my downloadable patterns are on sale for 3.50. No coupons necessary. 

Just head to my Ravelry shop or this site’s “Pattern” page, pick out your favorite patterns, and add them to your cart. The adjusted price will show up automatically. 

Black-Friday-Sale-Diagonal.jpg

Hello, Angora

Spun by Yarn Marm

Spun by Yarn Marm

This month’s fiber guild meeting was a crash course in spinning angora. The Yarn Marm came by to demo and spread the love of Angora Rabbits. She also brought along a giant, fluffy ambassador named Albert. FYI, angora rabbits are larger than you think. 

Spun by Yarn Marm

Spun by Yarn Marm

During the demo, several skeins of Yarn Marm’s handspun angora made the rounds around the meeting. Every single one of them was soft, fluffy, and absolutely luxurious. Most of the skeins were a simple 2-ply but a few were plied with thread. Of all the skeins I handled, the thread plied skeins were the most exciting and inspiring.

Spun by Yarn Marm

Spun by Yarn Marm

In the mid-levels of my fiber stash, there are several ounces of angora from two lovely rabbits named Harvey and Roger. It’s straight off the bunny with no further processing. Besides from lovingly petting it, I’ve had no idea what to do with it until last Saturday. Can I spin it as is without turning into roving? Yes. Is there a way to wash/full the yarn to prevent shedding? Yes. Now that I’m armed with a little bit of knowledge, I’m ready to dig the angora out and start spinning. So what that it’s probably harder to spin than superwash merino? I’ll cross that bridge when I come to it. 

Wander the Web 19

Marled-Chain-Ply-Yarn.jpg

Thanksgiving is sneaking up next week and I’m just sitting here with my Christmas knitting. 

The wooden Tryllemromler Installation looks like a giant strip of lace. 

Deconstructed Video Game Controllers by Ballen Photography - Part 1 & Part 2

A different take on the old fashioned Hot Chocolate Recipe

Why swatches (sometimes) lie.

How to Spin Variegated Top in Progression

Cauliflower with Brown Butter Crumbs

Partly Cloudy by Grant Snider 

Create Marled Yarn with Chain Plying

How To Chain Ply Variegated Yarn To Create Marled Yarn | withwool.com

Ever fallen hard for a skein of variegated yarn? Yarn that’s beautiful in the skein, but, when knit, turns into a pooling and flashing mess. There are several ways to combat pooling yarn. You can stripe with another yarn or knit from alternate ends every 2 rows. You can change the gauge or slip stitches or do all manner of finicky things. What happens when none of that works and you’re ready to stuff into the very back of the closet?

How To Chain Ply Variegated Yarn To Create Marled Yarn | withwool.com

I had about reached that point with a beautiful skein of orange and blue fingering weight yarn. The reason it didn’t end up forgotten in a closet was because my closet isn’t that big. Besides, my yarn stash is a bit too small to intentionally lose yarn. I tried tons of different tricks to get the colors not to pool but nothing really worked. I was about to move along to another project and a solid yarn when I came across Amy Christoffer’s Moxie Pullover. The sweater is knit with two different colors of yarn held together to create a lovely marled fabric. Why not ply that stubborn skein to create a marl? 

How To Chain Ply Variegated Yarn To Create Marled Yarn | withwool.com

After starting a movie, I sat at my wheel and decided to chain-ply the yarn instead making a 2-ply. Didn’t want to risk the color repeats matching up in a 2-ply and creating a thicker yarn with the exact same pooling problems. Less than an hour later, I had a wonderful marled yarn that I wanted to knit with instead of intentionally misplacing. 

Short and Sweet Directions for Chain-Plying Marled Yarn

How To Chain Ply Variegated Yarn To Create Marled Yarn | withwool.com

1. Figure out which way the yarn is plied. Commercial yarn is usually plied to the left, S twist, so you’ll need to chain ply to the right, Z twist. If you’re plying a single, spin to the left.

2. Wind the yarn into a center-pull ball.

3. Chain-ply. Use a wheel or a spindle, both work just fine. 

4. Once your finished plying, let the yarn rest for a day so the twist can settle into the yarn.

How To Chain Ply Variegated Yarn To Create Marled Yarn | withwool.com

5. Wind the yarn into a skein.  Never mind the crazy tendrils.

6. Soak the skein in a cool water bath with wool wash or gentle soap. Rinse carefully if the yarn isn’t superwash.

7. Hang to dry.

How To Chain Ply Variegated Yarn To Create Marled Yarn | withwool.com

Now the yarn is ready to be wound and knit up into marled goodness. FYI, chain plying will reduce the yardage by a third. This fingering yarn’s original 400 yards turned into about 133 yards of aran weight. So, instead of socks or a shawl, there’s enough yardage to knit a slouchy hat or a small cowl or fingerless mitts. Could even squeak out a small pair of slippers.  Bring on the marl!

How To Chain Ply Variegated Yarn To Create Marled Yarn | withwool.com

Lustrous Orange

Dawning-Dreams-Superwash-Merino.jpg

Can I say I have deep stash of fiber if I’ve been spinning for just under 2 years? Because, if anything qualifies, it’s this bump of fiber I’ve had sitting in my stash for over a year. The fact that I checked the Dawning Dreams shop for few weeks to make sure it was still available makes it seem like I’ve had it even longer. I was drawn to the color, a gradient that started with pale peach and ended with fire orange, and wasn’t concerned about the fiber, so long as it was wool. I finally succumbed to the pretty and ended up with my first 4 ounces of superwash merino. When I opened up the box, I was not disappointed. The fiber was soft and lustrous. The colors were everything I expected. Properly documented and swooned over, the bump went into the stash to wait for me to spin it up. 

Plied-Superwash-Merino-Skein.jpg

I was finally ready to spin it last month. So, I split the fiber lengthwise down the middle to preserve the gradient and got to spinning. Thanks to reading multiple blogs, I expected superwash merino to be slippery and, having spun slippery things before, thought I was prepared. Not so much. My experience spinning slippery fiber on spindle didn’t transfer well to spinning slippery fiber on a wheel. The learning curve was rather steep. 

Spinning the first few yards went well enough, so I kept going. Every thing was going smoothly until the single was just sucked up into the orifice, leaving my confused hands and the rest of the fiber behind. What just happened? I finally did find the end and started pulling it back through the orifice only for the single pull apart. Repeatedly. At the time, it seemed like I was destroying yard after yard of precious handspun. In reality, I probably only lost a few feet of singles not worth plying. I finally did get back to a strong section, joined, and started adding a lot more twist. 

Orange-Superwash-Yarn-Explosion.jpg

Frustrating as it was at the time, spinning superwash merino has made me a better spinner. It got me out of my comfort zone and away from my default yarn. It made me experiment and troubleshoot. I learned that making small adjustments to a wheel’s tension and take-up can drastically affect twist and the final yarn. It’s one thing to read about it and another thing to witness it first hand. 

The finished yarn is every bit as lovely as that bump of fiber I just had to have. It’s lustrous and soft with wonderful drape. It would be the perfect yarn for a shawl. If only I could pick a pattern.

The Specs

Fiber: Superwash Merino dyed by Dawning Dreams

440 yards

DK to sport weight, 11-13 WPI

Orderly-Orange-Superwash-Yarn.jpg

Wander the Web 18

Santa-Monica-Sunset.jpg

I’d forgotten how wonderful it is stand on the beach and watch the sun set over the Pacific Ocean. 

DyeYourYarn.com

DIY Button and Crochet Necklace - I really want to blow up the scale and make an extra long garland. 

Take-Out Fake-Out: Chicken Lo Mein

Cranberry Orange Breakfast Buns - Can never have too many recipes for early morning sweets. 

Five Ways to Find Inspiration Offline - I’m really fond of getting out of my own four walls and going for a long walk. 

Kelpies, Giant Horse Head Sculptures in Scotland

The Knitting Collection of Loes Veenstraand 

Hypnotic Kinetic Sculptures by Anthony Howe - "What matters is putting human feeling into your design."

How to Un-Ply Yarn

Plying can be magical, but it doesn’t always turn out the way you expect. Here’s how you can your un-ply your handspun to get the results you want. How To Un-Ply Yarn | withwool.com

Plying is magic. You can combine 2 or more strands or even just one and turn them into something beautiful and balanced. So, why would you ever want to un-ply yarn? Well, plying doesn’t always turn out the way you think it will. Maybe after plying 2 singles together, you realize that they would look much better chain-plied. Or, the colors barber pole instead of matching up. If you’re working with a commercial yarn, you could split the plies to use for sewing seams, attaching buttons, or embroidery.  I un-plied a skein of handspun because I’m stubborn and and wanted to the colors to match up. 

In order to make un-plying a less tedious process, you’ll need:

  • the yarn to un-ply - a few yards or a few hundred
  •     a spinning wheel or spindle
  •     a lazy kate or a small cardboard box and knitting needle combo to act as a lazy kate
  •     something to wrap freed singles around - small balls or origami stars or a ball winder
Plying can be magical, but it doesn’t always turn out the way you expect. Here’s how you can your un-ply your handspun to get the results you want. How To Un-Ply Yarn | withwool.com

1. With the spinning wheel or a spindle, remove twist by spinning the yarn in the opposite direction of the plying. For commercial yarn which is generally plied to the left, spin to the right. Remove as much of the ply twist as possible without adding any extra twist to the singles.

Plying can be magical, but it doesn’t always turn out the way you expect. Here’s how you can your un-ply your handspun to get the results you want. How To Un-Ply Yarn | withwool.com

2. Set up the bobbin or cop on the kate. If you’re using a lazy kate, separate the plies and pull them to opposite sides of a bobbin rod. If you’re using a box, cut slits in the cardboard for each single and pull them all through. In this tutorial, I’m splitting 2 plies but you can also take apart 3 or more plies with the same method.

Plying can be magical, but it doesn’t always turn out the way you expect. Here’s how you can your un-ply your handspun to get the results you want. How To Un-Ply Yarn | withwool.com

3. Evenly pull on the singles to prevent tangles and start wrapping. One single went to the ball winder the other was wrapped around a turkish single. 

When you’re finished, you’ll have at least 2 tangle free singles to work with. Sew on some buttons, embroider, or ply them together all over again. These singles went under the scissors to match up the colors before a second attempt at plying. Definitely worth the effort and the time. 

Plying can be magical, but it doesn’t always turn out the way you expect. Here’s how you can your un-ply your handspun to get the results you want. How To Un-Ply Yarn | withwool.com

Review: Schacht’s Industrious Collapsable Lazy Kate

Schacht-Lazy-Kate-and-Bobbins.jpg

Once I started filling up the bobbins from my new spinning wheel, it became abundantly clear that I needed a lazy kate. Or at least something to act as a lazy kate. A chopstick stabbed into a piece of styrofoam was the first thing shoved into service. It mostly worked. My second homemade lazy kate was a slightly too big box with holes poked in the side and, you guessed it, chopsticks holding the bobbins. It worked pretty well except for when the chopsticks fell out of the holes, which was often. Many an innocent single was broken in that foul contraption. I was all too happy to replace it with an actual lazy kate, Schacht’s Industrious Collapsible Lazy Kate.  

Before I clicked the “Buy” button, I thought about what I’d need from a lazy kate to benefit my spinning and fit into my available space. The kate would need to hold at least 3 bobbins, have adjustable tension, and pack small for travel. It also needed to sturdy and reasonably priced. After combing through Etsy and various spinning shops, Schacht’s lazy kate met all of my requirements for $60. Done.

Disassembled-Schacht-Lazy-Kate.jpg

The kate arrived at my door in lightning speed in a very flat envelope. Things were looking good already. After a few glamour shots, I put the kate together without tools and quickly put it to use. Schacht’s lazy kate is a vast improvement over my box and chopstick combo. Bobbins no longer went flying and they spun easily. Tensioning is easy too thanks to a spring and the two center dowels. Just loosen the wing nuts, twist a dowel, and tighten up the nuts. I’ve even managed to adjust the tension while my hands were full with chain-plying singles. 

Assembled-Schacht-Lazy-Kate.jpg

The Industrious Collapsable Lazy Kate is well built and of great quality. I’m not worried about breaking any of the pieces or repeatedly assembling and disassembling it. Assembled, the kate feels very durable in my hands. The size is nice too since it can easily fit 3 standard Schacht bobbins or 3 bulky bobbins. Even with as much as the kate can hold, it still packs flat and would be very easy to travel with. Just be careful not to lose any of the small pieces like the wing nuts or the rubber rings that secure the bobbin rods. Honestly, the small removable pieces are the only downside to this design. You could get away without the rubber rings but it’d be harder to compensate for missing wing nuts.

Schacht-Lazy-Kate-with-Bobbin.jpg

As far as looks go, the wood and finishing match Schacht’s Sidekick and Ladybug spinning wheels. Same minimalist style too. It feels like I have a matching set when I use the my Sidekick and kate together.

At just $60, I’m glad I picked Schacht’s Kate over both more expensive kates and those at the same price point. I’m sure I’ll be using it for years to come.